
Transforming plain porch posts into exterior stacked stone columns can rapidly elevate curb appeal—provided preparation and installation are executed with precision. This guide details framing, securing cement board, applying a moisture barrier, and setting stone with exact alignment. You’ll also cover proper caps, safety protocols, and proven pro methods such as string line positioning to ensure each column is structurally sound, visually consistent, and built to withstand decades of outdoor wear.
Before You Start: The Tools, Materials, and Why You CAN’T Just Stick Stone to Wood
Installing stacked stone columns demands more than veneer and enthusiasm—start with thorough prep using proven tools and durable materials to protect your schedule and margins. Avoid failures caused by skipping substrate work or using inadequate bases like bare wood; mistakes at this stage put every downstream dollar at risk.
Essential Tools for Exterior Stacked Stone Columns
Begin with personal protection: gloves, safety glasses, and dust masks are non-negotiable for safe cutting and handling. Equip the team with a notched trowel for even mortar coverage, level and tape measure for alignment, and a chalk line for reliable course marking. Cutting requires a masonry saw or angle grinder with diamond blade, plus a utility knife for trimming underlayment, a rubber mallet for seating stones, mixing buckets for mortar prep, and a caulk gun for sealing joints. Have all tools on-site before starting to maintain workflow and prevent delays.
Key Materials Required for Durable Installation
Use exterior-rated mortar or thinset compatible with your substrate, and grout if the design requires gap filling. Substrates should be concrete backer board or exterior-grade plywood—both resist moisture and provide rigid support. Secure them with corrosion-resistant screws and structural construction adhesive. Choose stone veneer that suits both the design and the support capacity; natural stone needs heavier-duty backing, while lighter options reduce tool wear but still demand proper base quality. Investing here prevents callbacks and premature failures.
Why You Should Not Stick Stone Veneer Directly to Wood
Wood expands, contracts, and absorbs moisture, which undermines adhesive bonds, leading to warping, loose panels, and hazards. A rigid, moisture-resistant substrate like concrete backer board ensures stability, protects adhesion, and safeguards your investment. Skipping this step may save hours now but guarantees costly repairs later—treat substrate prep as structural, not optional.
Safety Precautions During Installation
Wear eye protection when cutting stone, and ensure ventilation when mixing adhesives or mortar to avoid inhaling dust or fumes. Use stable scaffolding when working at height, never improvised setups. Dust masks and gloves protect against particles and chemicals; strong safety protocols keep your team healthy, productive, and able to deliver on time.

Step 1: Framing the Column Box (Your Blueprint for a Plumb, Square Structure)
Get the framing right from the outset—this single step dictates the stability and lifespan of the entire build. Minor base misalignments compound quickly as height increases, forcing expensive fixes later. Approach layout, excavation, and alignment with surgical precision, prioritizing stability, symmetry, and proper material staging to eliminate rework.
Planning and Site Layout
Mark each column footprint with stakes, string, or marking paint, ensuring clean, accurate lines. For multiple columns, run a continuous string line through their centers to guarantee project-wide symmetry. Identify underground utilities before digging, and confirm code and permit requirements; these factors directly impact method and dimension decisions and prevent compliance risks or service outages.
Foundation Excavation and Base Preparation
Excavate at least 4–6 inches wider than the finished column and 8–10 inches deep, adjusting for soil stability and height. Install a minimum 6-inch layer of compacted gravel or crushed stone for drainage and settlement resistance, compacting in 3-inch lifts with a hand tamper. Layered compaction delivers a consistent load-bearing surface that locks the column structure against lean or uneven settling.
Laying and Leveling the Base Course
Set the first course of stone or masonry blocks in the desired footprint—typically square or rectangular for porch builds. Level each piece, then confirm overall height with a long level. Verify corner angles with a carpenter’s square, adjusting with a rubber mallet. Apply mortar or construction adhesive sparingly, keeping material clear of visible edges to ensure clean finishes for veneer or wraps.
Ensuring Vertical Alignment and Structural Integrity
For wood-framed cores, confirm framing is solid and perfectly plumb before veneer application. After every few courses, check vertical alignment using both a level and plumb line. Stagger joints to strengthen bonding and deliver a natural interlocked appearance. Frequent alignment checks control tilt progression and reinforce the column’s resistance to lateral loads.
Common Challenges and Best Practices
Precise measurement at the start prevents cumulative errors as you build upward. Maintain level surfaces and plumb corners, as post-build corrections are rarely feasible. Prioritize foundation quality—the base is the primary defense against stone weight and shifting weather. A disciplined framing process locks in both performance and visual impact for years to come.

Step 2: Attaching Cement Board (Why This is the Only Substrate You Should Use)
When wrapping exterior stacked stone columns, start with a substrate that can handle structural demand and environmental stress. Cement board is the industry’s go-to because it performs under heavy loads, frequent wetting, and seasonal temperature swings. Choosing anything else risks premature failure, rework, and a damaged reputation. The right substrate at this stage safeguards installation quality and long-term client satisfaction.
Why Cement Board is the Preferred Substrate for Exterior Stone Columns
Cement board has the rigidity and load-bearing capacity to support stone veneer without deflecting. Engineered for outdoor use, it withstands moisture, freeze-thaw cycles, and daily exposure without breaking down. Inorganic composition prevents mold and mildew, so stone-clad porch posts retain a clean look and structural reliability for years.
How Cement Board Supports Secure Mortar Adhesion for Stone Veneer
A level, stable surface is essential for long-term mortar bond strength, and cement board delivers exactly that. Veneer pieces lock in firmly during installation and remain secure despite weather exposure, reducing the risk of mortar breakdown that loosens stones. By avoiding failures that lead to warranty claims and call-backs, seasoned installers and manufacturers protect margins and maintain client trust.
Why Alternative Substrates Are Unsuitable for Exterior Stone Columns
Wood, OSB, and plywood may seem budget-friendly but require heavy waterproofing to survive outdoors. Even with protection, moisture penetration can cause swelling, warping, or fungal growth—distorting the substrate and cracking mortar lines. Once this happens, veneer pulls away and repairs become costly. Professionals avoid these risks by specifying cement board for dependable results.
Industry Best Practices and Benefits of Using Cement Board
Choosing cement board from the start prevents the cascade of issues tied to substrate failure. Contractors deliver projects that meet durability standards, suppliers avoid post-sale headaches, and homeowners enjoy installations that protect curb appeal and property value for decades. For B2B installers, using the right substrate consistently builds a track record that wins repeat business.
Enhance Your Projects with Authentic Ledger Stone
Bring natural beauty, easy installation, and lasting durability to every design with our premium ledger stone collections. Ideal for contractors, designers, and distributors seeking real stone that adapts to diverse architectural styles while saving time and costs.

Step 3: Applying the Scratch Coat and Moisture Barrier (Don’t Skip This!)
Getting the moisture barrier and scratch coat right is critical to keeping stacked stone columns structurally sound and visually pristine for decades. Skipping or rushing these layers invites water damage and weakens adhesion. Handle this stage with precision to safeguard both the core structure and the stone veneer investment.
Installing the Moisture Barrier
Place a moisture barrier over the substrate, whether exterior-grade plywood or cement backer board. Most professionals use house wrap or heavy plastic sheeting, secured with corrosion-resistant staples or mechanical fasteners to withstand wind and handling. Overlap sheets by at least 6 inches to prevent water ingress, and verify compliance with local building codes—ignoring this can lead to inspection failures and expensive rework.
Applying the Scratch Coat
Once the barrier is in place, attach galvanized metal lath tightly to form a secure base for mortar. Mix Type-S or Type-N mortar with the correct bonding agent until spreadable and creamy, then apply a consistent 3/8″–1/2″ layer, pressing it firmly into the lath. Allow curing until thumbprint dry, typically 24 hours in moderate weather. Before installing stone, rake horizontal grooves with a scarifier or notched trowel to maximize grip and prevent veneer slippage under thermal cycling.
Key Considerations to Ensure Long-Lasting Results
Use mortars and bonding agents rated for exterior exposure and temperature extremes to avoid premature breakdown. Match lath gauge and fasteners to structural and environmental demands, especially in areas with strong winds or freeze-thaw cycles. Never shortcut curing times, as premature installation can cause adhesion failure that’s costly to fix. Ensure the moisture barrier is completely sealed against water intrusion—this singular step protects the substrate, maintains structural integrity, and upholds the finish quality clients expect for decades.
Step 4: Setting the Stone (Start From the Bottom and Check Level Every Time)
Precise stone setting is the point where exterior stacked stone columns move from framework to a high-end architectural finish. Any misalignment here can compromise durability, so treat each placement as final. Tight control over layout, leveling, and adhesive application minimizes rework and delivers a clean, professional result.
Prepare the Support Structure and Plan the Layout
Confirm the substrate is solid, plumb, and free of debris. Secure plywood or concrete backer board so it’s flat, preventing future shifts. Dry-lay stone pieces on the ground to adjust the mix of sizes and colors before adhesive application. This step avoids unwanted patterns, awkward joints, and waste while ensuring a balanced visual finish.
Apply Adhesive and Begin Setting Stones from the Bottom
For the strongest bond, coat both the substrate and backs of stones with adhesive or mortar to eliminate hollow spots that could fail in harsh weather. Press stones firmly in place, starting from the base and working upward in sequence. This maintains weight distribution and prevents slippage during curing.
Maintain Consistent Leveling and Use of Spacers
Spacers keep gaps uniform—critical for future grouting or clean shadow lines. Check plumb and level after placing each stone or panel. Work in small sections to correct alignment immediately, preventing lean and uneven courses while protecting appearance and structural integrity.
Handling Corners and Uneven Surfaces
Use factory-made L-shaped corner pieces to achieve seamless transitions without complex cuts. If mitering is necessary, measure twice and cut cleanly. On poor adhesion surfaces, remove dust and ensure adhesive is fresh. For dips or bumps, adjust with extra adhesive or temporary shims to align with adjacent stone faces.
Final Steps: Bracing and Cleaning
Install temporary bracing to prevent movement before adhesive sets, protecting the column’s vertical line. Remove excess adhesive immediately to avoid stains or hardened smears. Complete a detailed visual inspection of all joints and surfaces—the difference between standard and standout workmanship is in these final checks.
Pro Tip: Use a String Line to Keep Your Courses Perfectly Horizontal
On exterior stacked stone columns, maintaining perfectly level courses is essential for long-term stability and precise alignment across multiple posts. A tightly pulled string line provides a consistent visual guide, preventing drift as the structure rises and minimizing rework. This method saves time on site and ensures that every column aligns cleanly with others, producing the seamless, professional finish clients expect.
Why Using a String Line Matters
Without a reference line, small leveling errors accumulate, producing visible misalignment and breaking the visual flow across porch posts. Using a string line at each course secures uniform alignment and reinforces structural integrity—critical for delivering a polished, high-value result.
Step-by-Step: Setting Up and Using a String Line
Anchor the string line at the target height on both ends of the column using nails or screws, then pull it taut for an accurate visual guide. Check its position with a level before each new course. Move it upward as you progress, adapting for substrate irregularities while avoiding constant individual measurements. This keeps installation pace steady and results consistent.
Benefits for Contractors and Advanced DIYers
For professionals, the string line method eliminates repetitive measuring, freeing labor for other tasks while ensuring clean sight lines that instantly boost project value. Whether working with natural stone or premium faux products, it scales from a single decorative column to an entire porch series, delivering precise, dependable quality every time.
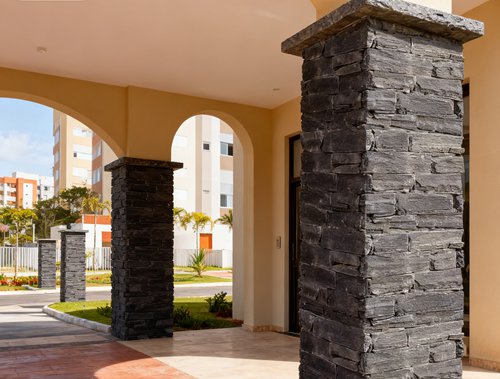
Step 5: Choosing and Installing a Cap to Finish the Job
In the final phase of exterior stacked stone column construction, the cap is both a design accent and a safeguard for long-term performance. A well-selected, correctly installed cap blocks moisture, withstands weathering, and signals the same quality as the build beneath. As the detail most visible to clients and visitors, it warrants careful planning.
Preparing the Column Top
Inspect the top of each column with a spirit level to confirm a flat, even surface. Remove dust, grit, and any residual mortar—small particles weaken adhesion. A clean, stable substrate anchors adhesive directly to the stone, ensuring the cap remains secure and aligned, eliminating the need for future corrective work.
Selecting the Right Cap
Measure the exact width and depth of the column with a steel tape. Choose a cap that overhangs 1–2 inches on all sides for effective water runoff and balanced proportions. Align the material choice with the project’s durability requirements and design intent: concrete for shapeable strength, faux stone for reduced weight, or composites for weather resistance and flexibility. Ensure aesthetic consistency with the column wrap and verify load capacity if adding decorative or functional fixtures.
Installation Steps and Finishing Touches
Dry-fit the cap to confirm precise alignment. Apply a continuous bead of construction adhesive or an even bed of mortar across the top, then lower the cap from the center to avoid skewing. For multi-piece or split caps, cut for a tight fit and seal seams with color-matched caulk or adhesive. Where mechanical fastening is needed, discreetly add screws. Finish by sealing joints with exterior-grade caulk to block moisture, especially in freeze-thaw climates, and remove any excess immediately to prevent staining. Press gently across the surface to verify full contact and a uniform finish.
Benefits of Proper Cap Installation
A well-installed cap delivers a polished, intentional finish that elevates curb appeal and reflects high craftsmanship. It also shields the column from weather damage, protecting stone panels and the structural core. Strategic execution at this stage reduces maintenance needs and safeguards the investment for decades.
A High-Impact Curb Appeal Project (But Is It a Beginner DIY?)
Exterior stacked stone columns can dramatically upgrade a home’s entrance, but installation demands vary with product type. For B2B suppliers, mapping product complexity to customer capability reduces dissatisfaction and boosts repeat business.
Faux Stacked Stone Column Wraps: A Beginner-Friendly Upgrade
Faux stacked stone wraps give homeowners a quick visual upgrade without advanced construction skills, slipping over existing porch posts to create textured, high-end finishes. Core steps include building a light sub-frame, adding plywood for stability, then securing lightweight panels with screws and adhesive — all achievable with basic tools. Completion in a single weekend creates a repeatable SKU for entry-level DIY markets, supported by concise guides and minimal tool lists for retail curb appeal kits.
Traditional Masonry Columns: Challenging for Beginners
Traditional masonry columns require expertise in site preparation, foundation setting, mortar work, stone shaping, and precise leveling. Errors at any stage can compromise safety and durability, while labor hours quickly exceed DIY expectations. Building code compliance adds complexity, making these products suitable for professional installation or structured training programs, not casual weekend projects.
Implications for B2B Suppliers and Brand Positioning
Suppliers should clearly separate faux wraps and masonry columns in catalogs, training, and POS content. Market faux wraps to novice users with how-to videos and simplified manuals, while providing masonry products with technical specifications, reinforcement data, and warranty details for professionals. Defining skill requirements upfront cuts return rates, safeguards credibility, and ensures sales go to customers equipped to deliver successful installations.
Your Top FAQs: Foundations, Framing Around Posts, and Finishing the Top
These are common questions we receive from homeowners and DIY installers tackling exterior stacked stone columns. Addressing them upfront helps avoid material waste, prevent structural issues, and achieve a clean, lasting finish.
Can I Apply Stone Directly to a Wood Post?
Placing stone directly onto a wood post leaves you exposed to moisture damage and poor adhesion over time. Frame the post first with cement board or exterior-grade plywood to create a reliable substrate. This extra step secures the veneer’s bond and minimizes future repairs, especially in climates with freeze-thaw cycles.
What Is the Best Way to Frame the Column?
Build out around your post using pressure-treated lumber or steel framing for longevity. Attach cement board or another stone-ready substrate to create a flat surface. Take time to ensure the framing is square and plumb; accurate alignment prevents uneven joints, keeps the panels interlocked, and avoids cracking from structural shifts.
Do I Need a Foundation for a Porch Column?
A solid footing is essential to carry the weight and prevent settling. Lightweight stacked stone panels generally don’t need a deep masonry base, unlike full-thickness stone. Still, inspect your existing porch foundation or post footings before installation; reinforcing weak points now avoids structural failures later.
How Do I Finish the Top of the Column?
Stone or precast concrete caps shield the top from water penetration while providing a clean, professional look. Seal around cap edges to block moisture ingress. If you opt for wood or metal trim, choose materials that withstand outdoor exposure and harmonize with the stone’s texture.
Is This a Good Project for a Beginner?
With careful planning and adherence to manufacturer guidelines, beginners can achieve a professional result. You’ll need basic carpentry skills for framing. Work slowly, double-check alignment as you place each panel, and consider practicing on a small section first. This approach builds confidence and reduces costly mistakes.
Building Columns That Last and Impress
Exterior stacked stone columns deliver a bold upgrade to any entrance, but longevity depends on disciplined preparation and precise execution. Use a rigid, moisture‑resistant substrate such as cement board, integrate a proper moisture barrier, and maintain accurate leveling at every stage to ensure structural integrity against time and weather. Start with dependable tools and materials, respect curing times, and keep alignment exact to avoid rework. Whether opting for lightweight faux wraps or full masonry, align the method with your skill level and project scope, and treat substrate and alignment as non‑negotiables to safeguard performance and curb appeal. Done right, your stone columns will elevate the entrance while keeping maintenance low for decades.
