Installation errors in natural stone systems often stem from a lack of technical oversight, turning high-end facades into structural liabilities. When weight loads exceed the standard 8-13 lbs/sqft threshold, panels can slump or detach entirely, compromising both the safety and aesthetic of a commercial project. Addressing these issues early prevents the need for full system replacements and protects the project’s bottom line.
This checklist identifies the root causes of panel slippage, joint cracking, and efflorescence. It details specific repair protocols, such as why switching from cyanoacrylate adhesives—which carry a 55% failure rate—to primer-based systems reduces bond failure to just 2.3%. The following sections also cover the dry-laying techniques and safety standards required to maintain a seamless, high-performance finish.
Panel Slippage (Slump): Causes and Emergency Reinforcement
Vertical panel slippage results from weight loads exceeding 8-13 lbs/sqft, substrate incompatibility, or contaminated surfaces that inhibit adhesive bonding. Emergency stabilization requires immediate mechanical bracing or ledger boards to halt movement, followed by substrate cleaning and the application of stone-rated epoxy adhesives to restore structural integrity.
Primary Triggers for Vertical Slumping and Movement
Natural stone systems often fail when weight loads exceed the standard threshold of 8-13 lbs/sqft. Installers who omit bottom-up support or ledger strips rely solely on the adhesive’s initial tack, which frequently proves insufficient for heavy interlocking Z-shape systems. Without mechanical ledgers to distribute the load, gravity pulls the panels downward before the bonding agent can reach full shear strength.
Substrate selection directly impacts bond permanence. Applying heavy panels to interior drywall instead of cement board or masonry substrates leads to adhesive failure. Drywall lacks the tensile strength to hold the weight of stone, causing the paper layer to delaminate or the adhesive to pull away entirely. Furthermore, dusty or contaminated surfaces prevent the high-strength epoxy resin from penetrating the substrate, resulting in a weak interface that eventually gives way under stress.
Improper curing environments also jeopardize the installation. High-strength epoxy resins require specific temperature and humidity ranges to form a permanent bond between the natural stone and the panel backing. Deviations from these requirements interfere with the chemical curing process, leaving the adhesive brittle or tacky. This failure often manifests as gradual slumping during the early stages of a project’s lifecycle.
Emergency Stabilization and Re-Bonding Procedures
Crews must install temporary mechanical bracing or ledger boards immediately upon detecting downward movement. This step halts the slump and protects the 2026 construction cycle from extensive structural damage. These temporary supports remain in place while technicians evaluate the failure site and prepare for systematic re-bonding. Quick stabilization prevents the interlocking teeth of the stone panels from shearing, which would otherwise necessitate a full system replacement.
Successful repair requires the total removal of affected panels to access the substrate. Workers must clean the wall surface and panel backing thoroughly, removing all old mortar or resin residue. Applying specialized stone-rated thin-set or high-performance epoxy adhesives ensures a superior bond compared to standard materials. During the re-installation, technicians verify the interlocking alignment to ensure weight distributes evenly across the entire panel system rather than concentrating stress on individual units.
The final stage involves using pH-neutral cleaners to remove any remaining contaminants before re-patching the joints. This cleaning process guarantees long-term adhesion and enhances weather resistance for exterior facades. By addressing the root cause—whether it was surface dust or improper weight support—and following these reinforcement steps, the stone system achieves the durability required for long-term performance.
Joint Cracking: Handling Thermal Expansion and Substrate Movement
Joint cracking results from thermal expansion, moisture warping, and substrate settlement. Effective management involves calculating maximum joint openings using specific elongation equations, selecting sealants with high elasticity, and utilizing precision repair methods like hydrodemolition to restore structural integrity.
Diagnosis of Joint Stress and Movement Triggers
Technicians identify critical repair candidates by measuring gaps wider than 3 mm (1/8 inch) caused by thermal expansion or contraction. These openings often signal that the joint has reached its design limit or that the underlying material has failed to accommodate shifting loads. Substrate movement frequently stems from moisture warping, slab settlement, or the infiltration of incompressible materials that prevent the joint from closing properly during heat cycles.
Concrete pavements expand and contract based on slab length and specific temperature ranges. Engineers use the calculation of the maximum joint opening (ΔL) to dictate the type of sealant and backer material required for a durable fix. Transverse joints typically handle larger movements exceeding 13 mm (1/2-inch) compared to longitudinal joints, making them more susceptible to deep cracking if the internal stress exceeds the material’s tensile strength.
Material Selection for Effective Expansion Control
Calculating the required sealant elasticity involves the maximum elongation equation (%E_max) to prevent bonding failure during future climate cycles. This data-driven approach ensures the selected material can stretch and compress without delaminating from the concrete interface. Preformed expansion joint fillers provide a compressible base for sealants in transverse joints, accommodating large-scale movements that standard pourable sealants cannot manage alone.
Applying bond-breaking tape at widths slightly narrower than the joint ensures the sealant functions as a flexible bridge rather than sticking to the bottom of the reservoir. This technique prevents three-sided adhesion, which is a primary cause of premature sealant tearing. For the best results, teams schedule installation during moderate spring or fall temperatures to ensure the sealant operates within its ideal movement range during extreme summer and winter peaks.
Repair Protocols for Sustained Joint Integrity
Hydrodemolition provides a clean, vibration-free method for accelerated replacement of damaged joint edges. This process allows for the integration of high-performance materials like Ultra-High Performance Concrete (UHPC) and stainless steel reinforcements to bolster bond strength. Technicians remove old sealant and fillers completely, cleaning the surfaces to a high standard before aligning new materials with precision shims.
Maintenance schedules prioritize regular inspections to detect restricted movement, material degradation, or visual signs of corrosion and spalling. Specific attention is given to contraction joints located within 30.5 meters (100 feet) of an expansion joint, as these areas experience higher stress. These specific locations require wider backer rods and highly extensible sealants to maintain a water-tight seal against increased substrate movement.
Color Inconsistency: Repairing by Blending Stones from Different Boxes
Installers manage color inconsistency by mixing stone panels from multiple crates and performing a dry lay before adhesion. This systematic blending ensures natural mineral variations are distributed evenly, preventing a disjointed patchwork appearance on the final surface.
Natural Variation and the Dry Laying Technique
Natural stone panels feature unique textures and tones that shift based on the specific quarry location and mineral composition. Dry laying requires the installation team to arrange these panels on a flat floor surface before applying any adhesive. This process allows workers to visualize the color distribution across the entire 2026 project site. By seeing the layout beforehand, installers can identify high-contrast pieces and place them strategically to create a balanced aesthetic.
Systematic Blending Procedures for Large Installations
Large-scale installations require teams to pull panels from three or more different boxes simultaneously. This technique prevents the formation of distinct color blocks or unnatural patterns on the wall. During the unboxing process, crews grade stones by shade to feather lighter and darker sections together seamlessly. Maintaining a consistent mix from multiple crates protects the project against the subtle batch shifts that frequently occur in large natural stone shipments.
Batch Verification and Batch Control Standards
Verification of packaging labels ensures all stones originate from the same production run, which helps minimize discrepancies in the base tone. Modern manufacturing in 2026 utilizes infrared cutting and three-stage inspections, yet slight color shifts remain a characteristic of authentic quarried materials. Project leads should communicate these natural variation expectations to clients during the design phase. Aligning project outcomes with the authentic character of the stone prevents disputes over inevitable mineral differences.
Elevate Your Projects with Authentic Natural Stone Ledger Panels

Efflorescence and White Haze: The Mistake of Poor Water Management
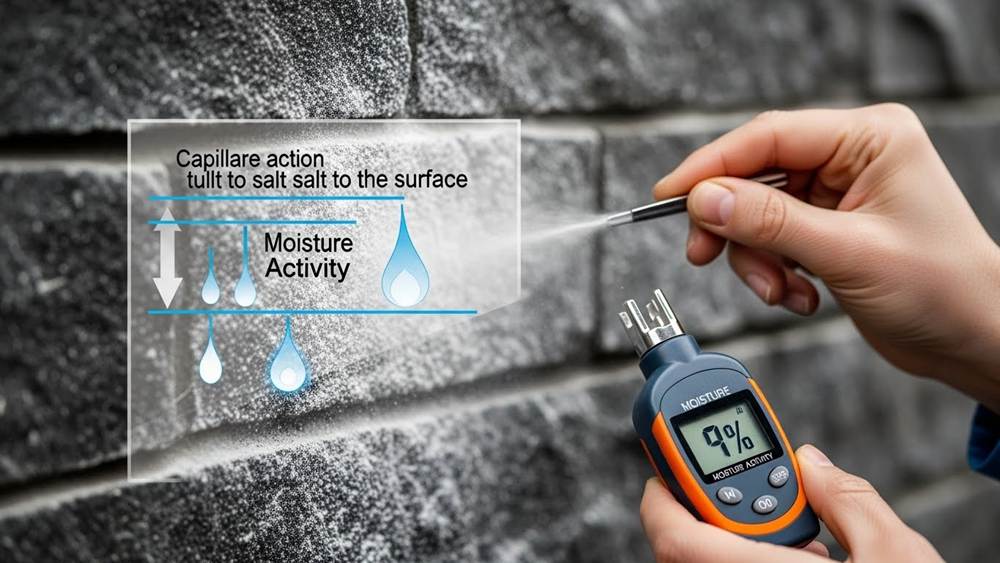
Efflorescence and white haze develop when water infiltrates porous stone or masonry, dissolves internal soluble salts, and deposits them on the surface during evaporation. This phenomenon serves as a primary indicator of failures in waterproofing, drainage systems, or material curing protocols.
Mechanisms of Salt Migration and Surface Haze
Soluble salts, including calcium carbonate and various sulfates, dissolve instantly when moisture penetrates the internal matrix of stone or concrete. As the material breathes, capillary action pulls this salt-laden moisture toward the exterior face of the panel. Once the water reaches the surface and evaporates, it leaves behind a white, powdery residue known as efflorescence.
If moisture cycles remain uncontrolled, these deposits undergo carbonation. This chemical reaction transforms the soft powder into a dense, crystalline haze that bonds tightly to the stone surface. At this stage, simple cleaning becomes ineffective, and the haze requires specialized mechanical removal to restore the original appearance of the installation.
Root Causes Linked to Installation Errors
High water-cement ratios in mortar represent a frequent installation error that facilitates salt leaching. Excessive water creates a highly porous internal structure, making it easy for moisture to transport minerals through the assembly. Maintaining a water-to-cement ratio below 0.45 significantly reduces the permeability of the bedding layer and limits potential migration paths.
The absence of secondary containment or effective vapor barriers often allows moisture to move unchecked from the substrate into the stone panels. Without a definitive break in the capillary path, groundwater or moisture from the backing wall travels through the stone. Additionally, inadequate drainage and blocked weep holes trap liquid water behind the panels. This trapped moisture amplifies the migration effect, particularly during freeze-thaw cycles where expanding ice forces salt-rich water into the stone pores.
Field Diagnosis and Restoration Protocols
Technicians identify active ingress points using moisture meters. Readings above 4% signal active water movement behind the stone, indicating that the source of the leak requires remediation before surface cleaning begins. A visual scratch test helps differentiate between simple efflorescence, which wipes away easily, and hardened carbonation, which resists light pressure.
Mechanical cleaning involves low-pressure washes kept strictly below 100 psi to prevent surface erosion. For stubborn deposits, technicians apply dry cement powder poultices to draw out embedded salts without damaging the natural texture of the stone. Professionals avoid acidic cleaners on limestone and other acid-sensitive materials to prevent permanent etching.
Long-term prevention depends on applying penetrating sealers once the surface dries to below 12% moisture content. Silane or siloxane-based sealers provide the best protection at coverage rates of 400-600 sq ft/gal. These breathable treatments allow water vapor to escape while preventing liquid water from re-entering the stone matrix, effectively stopping the cycle of salt migration.
Bonding Failure: Procedures for Repatching and Material Replacement
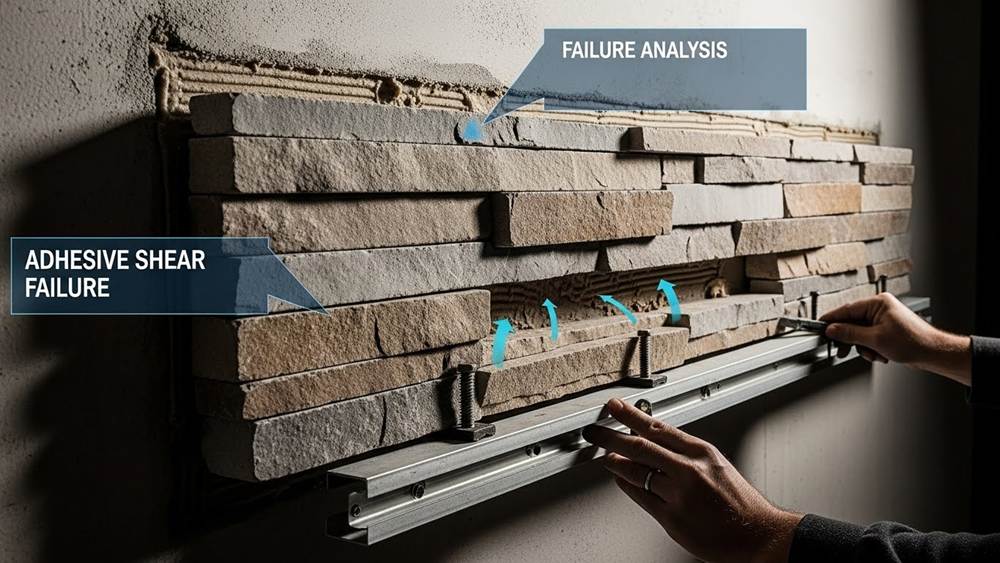
Repairing a failed bond requires a systematic approach involving failure analysis, mechanical surface cleaning, and the application of high-strength primer-based resins. Technicians must remove all residual adhesive and re-etch the substrate to ensure a clean zone for mechanical interlocking and long-term durability.
| Adhesive System | Failure Rate | Long-Term Performance |
|---|---|---|
| Cyanoacrylate | 54.0% – 55.6% | Significant failure risk over 12–14 months. |
| Primerless Adhesive | 6.3% | Moderate risk compared to primer-based options. |
| Primer-based Composite | 2.3% | Superior stability and mechanical interlocking. |
Failure Analysis and Surface Preparation
Technicians begin by assessing the failure site to identify the cause of the break. Cohesive failure indicates the adhesive itself split, while adhesive failure shows the material detached cleanly from the substrate. This distinction determines if the surface preparation needs more aggressive mechanical roughening. Remove all old debris and residual adhesive from the panels and the wall surface. Mechanical tools provide the best results for stripping away cured resins without damaging the underlying substrate.
Clean the area thoroughly using pumice or a specialized stone cleaner to remove oils, dust, and other contaminants. Once cleaned, prepare the surface using industry-standard etching techniques. Applying 37% phosphoric acid for 15 to 20 seconds creates microscopic pores on suitable substrates. This step is essential because it maximizes the surface area for mechanical interlocking, which prevents the new bond from failing prematurely.
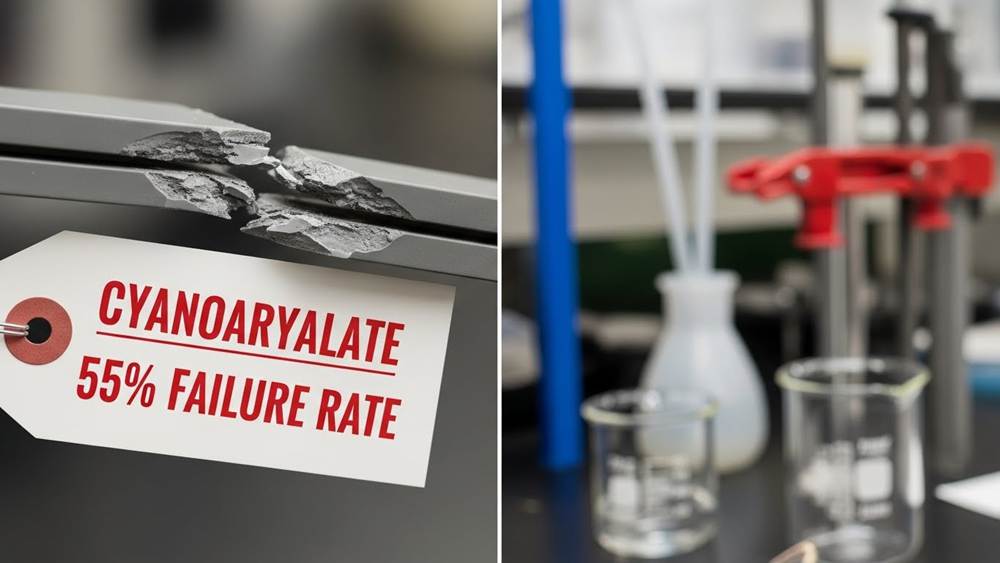
Adhesive Selection and Structural Re-Bonding
Selecting the right material is a critical step in the repatching process. High-strength epoxy resins formulated specifically for natural stone or composites provide the necessary structural integrity for repairs. Research suggests avoiding cyanoacrylate options, as they show failure rates as high as 55% in long-term durability tests. Primer-based adhesive systems offer a much lower failure rate, often around 2.3%, making them the preferred choice for permanent structural re-bonding.
Apply the fresh composite or epoxy resin to the prepared surfaces and secure the materials in place. Use light-curing methods for 20 to 40 seconds to achieve a fast and reliable set. After the bond is established, check for proper alignment and remove any excess resin before it fully hardens. Implementation of a 4-week re-evaluation schedule allows teams to monitor the patch for early signs of debonding, stress fractures, or environmental degradation.
On-Site Safety: Working at Heights and Heavy Material Handling
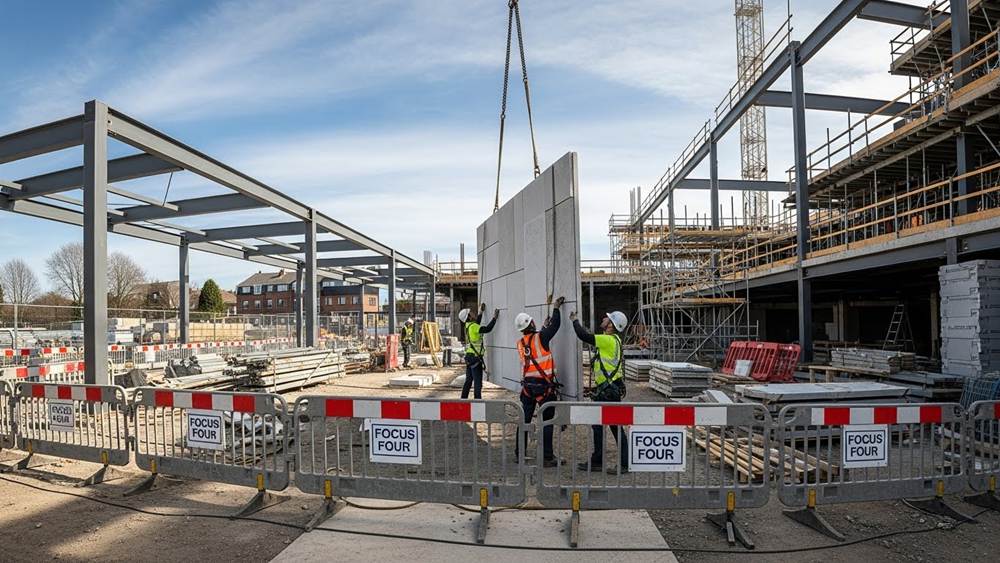
Safety during stone panel installation relies on active fall protection for work above six feet, controlled material hoisting using tag lines, and the execution of daily job hazard analyses. These protocols specifically mitigate the “Focus Four” risks, which represent the majority of construction fatalities, by combining physical barriers with systematic pre-task planning.
Fall Protection Protocols for Elevated Installations
Falls represent nearly 40% of all construction-related fatalities, with a significant portion of these incidents occurring at heights between 6 and 30 feet. To prevent these accidents, installation crews employ active fall protection systems, including safety harnesses and guardrails, for any task performed more than 6 feet above the ground. Daily scaffold inspections and the establishment of rigid site boundaries further protect workers from slippery or uneven surfaces often encountered during repair and installation cycles.
Struck-By Prevention During Heavy Material Handling
Struck-by incidents involving falling or flying objects cause 17% of construction deaths and lead to thousands of nonfatal injuries annually. Rigging teams use tag lines to maintain precise control over stone panels during hoisting, ensuring materials do not shift unexpectedly. Site supervisors maintain strict exclusion zones around heavy equipment and cranes to protect ground-level staff, while toeboards and secured tool tethering prevent equipment from falling onto lower work zones where other trades operate.
Risk Assessment and Job Safety Analysis
Firms that conduct formal job hazard analysis (JHA) reduce recordable injuries by 73% compared to companies that bypass pre-task planning. Safety programs focus on the “Focus Four” risks to eliminate high-consequence incidents during complex stone panel installations. Project managers designate safety personnel to oversee hazard identification in real-time, ensuring that all installation activities strictly follow site-specific protection plans and regulatory safety standards.
أسئلة مكررة
How should emergency support be provided if stone panels begin to slip?
Immediately secure the area and evacuate personnel to prevent accidents. Use temporary mechanical restraints such as compatible clips or bolted fixings to stop movement. For walkable surfaces, apply adhesive-backed anti-slip tapes or rubber matting as a quick fix while preparing for permanent structural repairs.
Is it better to use mortar or elastic caulk for repairing cracked stone joints?
Professionals recommend mortar for most masonry repairs because it maintains structural integrity and allows the wall to breathe. Elastic caulk often traps moisture behind the seal, which leads to freeze-thaw damage and accelerated stone delamination. Use caulk only for specific expansion joints where stone meets different materials like wood or metal.
Who is liable for color inconsistency: the manufacturer or the installer?
Liability depends on the source of the issue. Manufacturers bear responsibility for design defects or significant batch variations. Installers are often held liable if they fail to blend stones from multiple boxes during installation, use uncertified third-party components, or store materials in conditions that cause staining.
How can installers avoid scratching or damaging the stone surface during a project?
Use vacuum cups and slab dollies to lift and position panels instead of dragging them. Apply self-adhesive protective films or impact-resistant mats before construction begins to shield the surface from tools and heavy foot traffic. These barriers stay in place until the project is complete to prevent post-installation blemishes.
Is complete removal of old adhesive necessary when repairing a failed bond?
Complete residue removal is critical for the success of a new bond. While some professionals use heat to soften and pry off the main bulk of the material, the final substrate must be cleaned with specialized adhesive cleaners and scuffed to create a fresh, contaminant-free surface for the replacement adhesive.
Final Thoughts
Fixing installation errors requires a shift from reactive patching to proactive technical standards. Using mechanical ledgers to support vertical loads and selecting primer-based adhesives over cheaper alternatives eliminates the most common causes of failure. These steps ensure that panels stay secure and joints remain flexible under thermal stress.
جودة control during the blending and waterproofing stages protects the visual appeal and longevity of the stone. Crews who manage moisture levels and follow strict safety protocols reduce the risk of efflorescence and on-site accidents. Reliable results come from a commitment to these precise handling and application methods throughout the construction process.
