Ledger stone panels are manufactured pieces of natural stone, designed for seamless installation on walls and facades. Accurately cutting these panels preserves their aesthetic value, reduces installation waste, and ensures a professional finish. For designers and contractors, efficient, precise cuts mean fewer material losses, less job site rework, and safer project execution. This article details the essential tools, step-by-step techniques, and expert strategies to cut ledger stone panels cleanly and efficiently.
Required Tools, Setup, and Safety Equipment
Assemble the appropriate tools and safety gear before cutting Hauptbuchstein. Select your equipment based on your workspace—wet saws are better in controlled environments, while angle grinders are suited for on-site detailing. Include the following items:
- Wet tile saw with a diamond blade for straight, dust-controlled cuts in a garage or workshop
- Angle grinder with a diamond blade for curves, outlet notching, and trim work at elevation
- Miter saw with a masonry blade for efficiently cutting multiple thin panels
- Safety glasses, heavy-duty gloves, and a dust mask or respirator to prevent exposure to silica dust
- Pencil and straightedge for marking precise cut lines
- Measuring tape for confirming panel dimensions before and after modification
- Chisel and hammer for refining corners or cleanly breaking scored lines
- Sandpaper or diamond hand pad for smoothing cut edges
- Water source and outdoor-rated extension cords if operating a wet saw outdoors
Optimize your workspace, maintaining clear separation between electrical cords and any water sources. Confirm the diamond blade matches the thickness of your ledger stone to prevent motor overload and blade kickback. With a complete, organized setup, you can cut efficiently and reduce interruptions.

Process Guide: Achieving Clean Cuts on Ledger Stone Panels
Accuracy is essential when cutting ledger stone. Careful preparation and correct tool selection limit waste and minimize material damage. The following steps help ensure precision, regardless of the cutting environment.
Step 1: Mark and Secure the Panel
Measure the installation area and precisely mark cut lines on the stone using a pencil and straightedge. Double-check measurements around outlets, window frames, or corners, as small discrepancies can affect multiple panels.
Secure the panel firmly to your work surface, either by clamping or with stable supports. Prevent movement during cutting to achieve even edges and minimize workpiece shifting. For thin veneer sheets, placing scrap plywood beneath cushions the panel and prevents back-side breakage.
Step 2: Choose and Operate the Suitable Cutting Tool
Select a wet tile saw for straight, clean cuts in a workshop. Water cooling keeps blade temperatures low and ensures smooth edges—apply consistent, gentle feed pressure and avoid forcing panels through the blade.
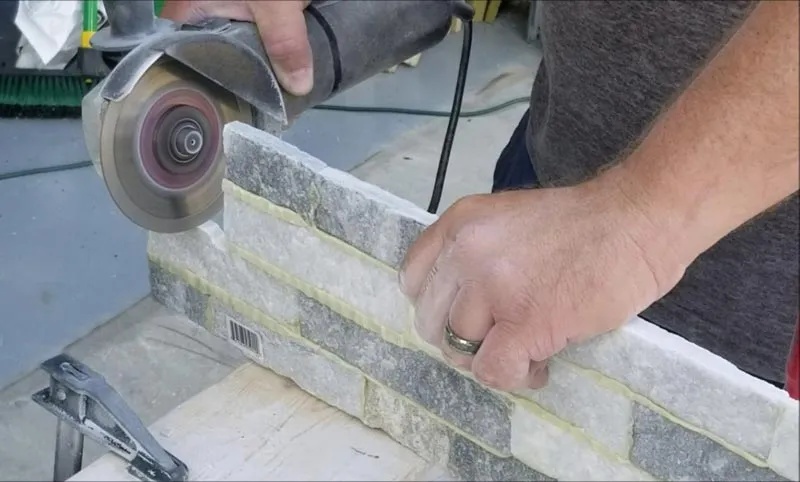
Use an angle grinder for on-site adjustments, outlet notching, or detailed edge shaping. Start the grinder fully before contacting the panel, and make slow passes to reduce edge chipping. For fast, consistent bevel cuts on thin panels, a miter saw with a masonry blade provides efficiency; however, technique is critical to avoid fractured edges.
Personal protective equipment is mandatory. Use goggles, gloves, and a respirator. Angle grinders produce significant dust—work outdoors or with ample ventilation. After cutting, smooth all raw edges with sandpaper or a diamond hand pad. For complex corners or small adjustments, score the back with a grinder and break the line using a chisel and hammer to protect the panel face from damage.
Tool Comparison: Wet Tile Saw, Angle Grinder, and Miter Saw
Selecting the optimal cutting tool depends on project scale, workspace constraints, and required finish quality. The comparison below summarizes each tool’s application and trade-offs.
| Feature | Wet Tile Saw | Angle Grinder | Miter Saw |
|---|---|---|---|
| Best Use | Clean, straight cuts on large panels with precise alignment | Detailing, outlet notching, and on-site custom adjustments | Rapid, repeated cuts on thin panels when speed is prioritized |
| Cut Quality | Smooth finishes with minimal chipping for visible edges | Capable of curves and notches; edges may require sanding | Fast but may chip panels if blade speed or feed rate is not managed |
| Dust Control | Low, due to continuous water cooling | High; requires outdoor use or significant ventilation and protection | Moderate; connect vacuum where possible to reduce dust |
| Portability | Stationary; needs dedicated workspace and water supply | Highly portable, with battery-powered models for tight spaces | Portable for light panels; less maneuverable than handheld tools |
| Skill Required | Intermediate—steady feed and alignment necessary | Intermediate to advanced—requires precise control | Beginner to intermediate—easier for users familiar with saws |
Choose a wet saw for bulk straight cuts in a workshop. Use an angle grinder for on-site custom trimming and notching, particularly on scaffolding or in confined areas. For rapid processing of multiple thin veneer panels, a miter saw provides speed, but edges may need additional finishing.
Elevate Every Project with Genuine Ledger Stone
Bring the timeless beauty and integrity of natural stone to your designs with our authentic ledger stone panels. Crafted for efficient installation with unmatched durability, our panels offer design flexibility—whether your style is sleek and modern, rustic, or luxurious. Benefit from factory-direct pricing, full customization options, and dedicated support. See why distributors and contractors rely on our expertly manufactured stone for lasting results and standout spaces.

Expert Recommendations and Common Mistakes in Ledger Stone Cutting
Even skilled installers may encounter preventable errors affecting either quality or safety. The chart below identifies frequent mistakes and corrective measures:
| Common Mistake | How to Avoid |
|---|---|
| Rushing through cuts causing chips | Feed panels slowly using steady pressure. Allow the blade to cut without forcing material through. |
| Not using safety gear | Always wear eye protection, gloves, and a dust mask. Stone dust poses respiratory and abrasion hazards. |
| Ignoring power cords or obstacles near the work area | Audit the workspace before cutting. Secure cords and clear debris to minimize tripping or accidental blade contact. |
| Making final cuts on site without dust control | Complete most cuts outdoors or in a controlled area using a wet saw. Use angle grinders onsite only for small, final adjustments. |
| Failing to finish cut edges | Smooth all cut edges with sandpaper or a diamond pad for safer handling and cleaner installation joints. |
Correcting these habits significantly reduces rework and improves overall project results. Prioritize precise measurements, use proper blades, and always finish edges for a professional outcome.
Techniques for Corners, Outlets, and Irregular Shapes
Projects often involve fitting panels around electrical outlets, inner corners, or creating L-shaped pieces. For these tasks, use an angle grinder to gradually remove material, starting with carefully marked cutouts and shallow passes. Incremental cutting limits face chipping and allows in-process adjustments.
To create a controlled break for corners, score the panel’s back with the grinder along your mark, then flip the panel and complete the break on the front with a chisel. This process preserves the finished face and achieves crisp, precise edges for tight installations. The scoring technique ensures predictable, professional results when handling complex shapes.
Always perform a dry fit for custom pieces before setting them with adhesive. Verify alignment, clearance, and fit to avoid time-consuming corrections after installation begins. This step is especially valuable for backsplashes and wrap-around corners with intricate patterns.
Post-Cutting Maintenance and Safety
After all cuts are complete, clean diamond blades and tool surfaces to prevent dust accumulation and corrosion. Wiping tools with a damp cloth followed by drying extends blade life and keeps electrical components in good condition.
Check all power cords, guards, and moving parts on saws and grinders for signs of wear. Identifying frayed wires, loose guards, or worn bearings early prevents on-site failures and safety incidents.
Store all tools dry and away from dust-prone environments. Proper storage in a sealed cabinet or bin prevents rust and ensures readiness for future projects.
Häufig gestellte Fragen
What type of blade works best for cutting stone panels?
A continuous rim diamond blade is preferred for natural ledger stone. It minimizes chipping and cuts through hard material efficiently, producing cleaner edges that require less finishing.
Can I cut ledger stone without a wet saw?
Yes. An angle grinder with a diamond blade is effective, but produces much more dust; always work outdoors or ensure proper ventilation, and use protective gear including a respirator and goggles.
How do I cut L-shaped corner pieces for wall returns?
Score the back of the panel with an angle grinder along your cut line, then snap the piece cleanly using a chisel. This approach protects the visible surface and delivers a sharp, uniform corner.
Is cutting stone veneer dangerous?
There are risks if appropriate safety precautions are neglected. Always use goggles, a dust mask, and cut-resistant gloves, and keep hands away from moving blades.
How do I avoid chipping the stone during cuts?
Operate the saw or grinder with a steady, slow feed and confirm the panel is fully supported to limit vibration. Use sharp blades, and finish with a diamond pad to smooth edges as needed.
Abschluss
Schneiden Hauptsteinplatten requires matching your tools and process to the job’s requirements. Wet saws produce reliable, dust-free straight cuts, while angle grinders offer the flexibility needed for detail work. Effective safety practices, careful measurement, and attention to finishing details ensure clean results and professional installations.
Thorough preparation and deliberate technique lead to consistently high-quality outcomes. By maintaining sharp blades, inspecting equipment regularly, and optimizing your workflow, you can deliver durable, visually striking projects—on time and with minimal material loss.
