Stone Shelf & Mantel failures drive rework, structural damage, and OSHA fines that cut into project margins and stretch schedules. On job sites, installers repeatedly trip over three pain points: anchors that only engage the veneer, missed studs behind a 1-inch stacked-stone layer, and uneven stone faces that force shim-heavy fixes. Those failures create callbacks, slow down handover, and expose contractors and specifiers to liability and remediation costs.
This guide functions as a hands-on technical SOP: it compares floating shelves versus traditional mantels on stone walls, lays out the core mounting secrets for tying through 1-inch stone into studs, explains whether to install the mantel before or after the stone, shows how to fill and shim uneven gaps, and defines weight limits and heat-clearance practices. Follow these steps to plan anchor paths, pick through-bolts or backing plates, size shims and caulk, and verify load ratings so installations pass inspection and remain safe long term.
Floating Shelves vs. Traditional Mantels on Stone Walls
Match bracket, anchor and material choices to stone load capacity and heat clearances to ensure safe, code-compliant mantel installations.
Load, anchoring and substrate requirements for shelves and mantels on stacked stone
Calculate total wall load by including the panel mass: standard flat stacked-stone panels weigh roughly 30–40 kg/m² (8–12 lbs/ft²) and rough panels sit near 55 kg/m². Confirm whether the stone sits over a full-thickness substrate; if not, install a continuous plywood nailer or full backing behind the veneer to distribute loads and enable through-bolting or ledger mounting.
Select anchors to match calculated loads and the substrate type. Use diamond-tipped masonry bits sized to the anchor manufacturer’s recommendation and avoid drilling through Z- or S-shaped vertical interlock seams to preserve panel fit. Verify combustible-clearance requirements with the local authority and, for combustible mantels near active fireplaces, plan a thermal barrier or switch to non-combustible materials such as concrete or metal.
- Anchor sizing guidance: M6 (1/4″) expansion anchors ~45 kg per anchor; M8 (5/16″) ~90 kg; M10 (3/8″) or chemical anchors for heavy loads—specify embed 50–80 mm (2–3″) into solid backing or substrate.
- Floating-mantel bracket spec: choose welded steel L-brackets or concealed box brackets with 120–160 mm (4.7–6.3″) embed length into substrate; set bracket depth to match mantel projection to prevent cantilever deflection.
- Drilling and sealing: drill full-depth holes with diamond bits, clean holes, and use stainless-steel anchors or specify chemical resin for maximum pull-out strength.
Material and dimensional choices: matching mantel style to stacked stone characteristics
Use panel size and course height to set mantel scale: Top-Quellstein panels come in 150 × 600 mm or 150 × 550 mm with thickness from 10–25 mm (1–2.5 cm) for standard runs and up to ~35 mm for rough premium panels. Design floating shelves in the 200–300 mm (8–12″) depth range for typical displays; size traditional mantels to 300–400 mm (12–16″) when you need extra surface area, and account for heavier anchors and deeper brackets as depth increases.
Balance materials against heat and weight constraints: wood gives warmth and lower weight but reduces heat tolerance; concrete or engineered stone raises heat resistance and stiffness but raises anchor counts and bracket depth. Plan seams and corners around interlocking Z/S panels and matching L-corners to hide joints, and order a 5–10% material overage for cuts and returns. Specify same-batch quarry sourcing to limit visible hue shifts—Top Source Stone reports 95% hue uniformity within a single batch for stacked stone.
- Panel dimensions: 150×600 mm or 150×550 mm; standard thickness 10–25 mm, rough panels ~35 mm.
- Depth selection: floating shelves 200–300 mm; traditional mantels 300–400 mm—increase anchor size and embed depth for deeper projections.
- Finish control: require same-batch quarry consistency and order spares to match long runs or future repairs.
Installation workflow and on-site best practices for stone-wall mantels
Start with a site inspection: identify stone type (slate, quartzite, sandstone), measure combined mantel plus expected contents weight, and locate solid backing or plan a continuous nailer behind the veneer. Dry-fit interlocking panels and L-corners, mark bracket locations on substrate while avoiding vertical interlock lines, and confirm level and sightlines before cutting or drilling.
Follow controlled drilling, anchoring and finishing steps: drill full-depth masonry holes with diamond bits, blow or vacuum-clean each hole, set anchors or inject chemical resin, and torque fasteners to manufacturer specs. Attach brackets to the substrate, slide the mantel on, check for deflection and level, then conceal fasteners with matching stone or grout and leave calculated movement gaps for thermal expansion. Perform incremental load testing and document final heat clearances relative to the fireplace or insert.
- Pre-install checklist: confirm panel counts and carton specs (standard boxes: 7 pcs ≈ 0.63 m² or 8 pcs ≈ 0.72 m²), inspect crate integrity, verify hue uniformity and matching L-corners, reserve spare panels for repairs.
- Dry-fit and mark: assemble panels, mark bracket locations avoiding Z/S interlocks, confirm level and sightlines before drilling.
- Anchor sequence: drill, clean, install anchors or chemical resin, set and torque per spec; for maximum strength use stainless-steel hardware or epoxy-set steel rods where required.
- Mount and finish: secure bracket, install mantel, check level and deflection, hide fasteners, and leave small movement joints for thermal cycling.
- Testing and verification: load-test incrementally, inspect anchor pull and bracket deflection, and record final clearances versus fireplace manufacturer and local code requirements.

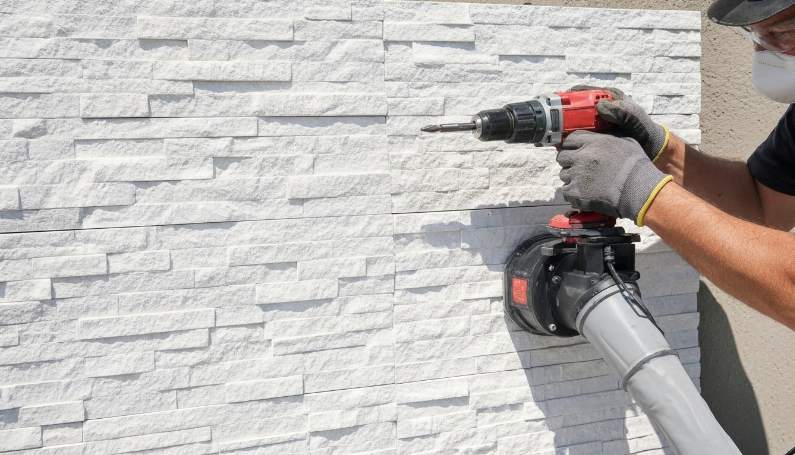
Mounting Secrets: Anchoring into Studs Through 1-Inch Stone
Correct anchor selection and verified stud engagement prevent failures and save rework and liability on commercial stone installations.
Pre-install assessment and load calculations
Start by quantifying every weight that the assembly will carry: Top Source Stone panels at 1″ thickness weigh about 30–40 kg/m² (8–12 lb/ft²) and must join the live load you expect from shelves, brackets, or mantels. For design live loads use realistic line loads — books commonly produce 30–50 lb/ft linear — and apply a safety factor of 2.0 for public or commercial applications to set required anchor capacity.
Size anchors so the per-anchor working load stays below the anchor’s allowable capacity; distribute anchors along stud lines to avoid concentrated loads. Confirm substrate type before finalizing anchor count: solid wood studs or blocking accept direct embedment, but metal studs require blocking or a toggle/two-point solution to reach target capacity.
- Record panel mass (30–40 kg/m²) and add it to live loads plus safety factor 2.0.
- Calculate anchors so working load per anchor < allowable; increase anchor count for long spans.
- Verify studs are solid wood/blocking; plan blocking or toggle anchors for metal studs.
Accurate stud locating through 1″ stone and veneer
Use a combination of tools: a strong rare-earth magnet, an electronic stud sensor rated for masonry, and a 1/16″ (1.5 mm) diamond masonry probe bit. Sweep a wide area to mark probable stud centerlines, then confirm each mark by drilling a small-diameter masonry probe hole to detect wood fiber or backing behind the veneer.
Expect the stud face to sit 10–30 mm behind the stone surface because of adhesive or furring. Measure probe depth carefully and verify stud spacing by locating two adjacent studs; standard spacing of 16″ or 24″ o.c. will validate your findings before you commit to full-size holes.
- Tools: rare-earth magnet, masonry-rated electronic stud sensor, 1/16″ diamond probe, marker.
- Procedure: scan, mark, probe small hole, confirm wood fiber or backing, measure depth.
- Confirm by finding two adjacent studs and checking for 16″ or 24″ o.c. spacing.
Fastener selection: diameter, length and embedment requirements
Choose structural hardware: hex-head lag screws or threaded rod with washers and backing plates; use plated steel or stainless in corrosive environments. For light shelves use 1/4″ (6 mm) fasteners; step up to 5/16″ (8 mm) or 3/8″ (10 mm) for medium and heavy loads, and increase diameter for concentrated point loads.
Specify embedment into solid wood studs at a minimum of 1.5″ (38 mm) and prefer 2″ (50 mm) for heavy-duty fittings. Calculate fastener length as: stone thickness (25.4 mm for 1″) + adhesive/furring + drywall/blocking + stud embedment. For 1″ stone over drywall typical fastener lengths fall in the 90–100 mm (3.5″–4″) range.
- Recommended hardware: hex-head lag screws or structural threaded rod with washers/backing plates.
- Diameter guide: 1/4″ light, 5/16″–3/8″ medium/heavy; increase for concentrated loads.
- Embedment: min 1.5″ (38 mm); prefer 2″ (50 mm) for heavy duty.
- Length calc example: 25.4 mm stone + adhesive/furring + drywall + 50 mm embedment → ~90–100 mm total.
Drilling and installation sequence with dust control
Use a hammer drill or rotary with a diamond-tipped masonry bit for the stone layer, then switch to a wood bit for the stud pilot. Fit a drill stop and use a torque wrench for final tightening to avoid over-stressing the stone or stripping the stud embedment. Control dust with water suppression or a vacuum dust-capture system when drilling natural stone to limit respirable silica.
Follow a repeatable sequence: drill the masonry pilot at low speed, clean the hole, drill the wood pilot to final diameter, place washer/plate and install the fastener. For heavy loads combine mechanical anchorage with a structural epoxy rated for masonry: clean and inject epoxy, insert threaded rod or dowel, then allow full cure before loading. Protect the stone face with a sacrificial backing plate or large-diameter washer to spread clamping forces and reduce chipping when you torque.
- Tools: hammer drill/rotary, diamond masonry bit, wood bit, drill stop, torque wrench.
- Sequence: (1) drill masonry pilot low speed with water/vacuum; (2) clean hole; (3) drill wood pilot; (4) install washer/plate and fastener.
- Heavy-duty option: inject structural epoxy, set threaded rod, let fully cure then torque.
- Protect the face with large-diameter washers or a backing plate to prevent point loading and chipping.
Verification, troubleshooting and final sealing
Verify every anchor with a field pull or hand-load test: light fixtures should tolerate 50–100 lb (22–45 kg) without movement; test heavier fittings to design load or use a calibrated pull tester. If an anchor shows movement or drift, stop and reassess rather than tightening more; slipping usually signals insufficient embedment or an incorrect anchor type.
Resolve failures by enlarging the hole and installing a bonded threaded rod with epoxy, or convert to a through-bolt with a backing plate to spread loads. Seal exposed holes with non-staining silicone or color-matched masonry grout and preserve appearance with matching L-corners or interlocking panels. Protect crews: require respirators rated for silica dust, eye and hearing protection, and insist on wet cutting or dust extraction whenever you drill or cut natural stone.
- Pull-test targets: 50–100 lb for light fixtures; for heavy loads test to design value or use a calibrated tester.
- If cracking occurs, enlarge hole and install epoxy-bonded threaded rod or use through-bolt with backing plate.
- If fastener slips, increase embedment depth or add blocking behind the stud line.
- Finish: seal with non-staining silicone or color-matched grout; use matching L-corners to retain a seamless Top-Quellstein look.
- PPE: respirator for silica, eye and hearing protection; use wet cutting or dust extraction to control silica dust.
Premium Stacked Stone for Faster Installs

When to Install the Mantel: Before or After the Stone?
Sequence dictates anchor choice, load distribution and finish tolerance—pick the right order to avoid drilling stone, reduce rework and meet safety clearances.
Assess wall substrate, stone load and mantel requirements
Start by identifying the substrate and the stone panel type: full-thickness natural stone behaves very differently from interlocking stacked stone veneer panels (standard sizes 150×600mm or 150×550mm). Use the veneer weight numbers when you model loads—flat panels run roughly 30–40 kg/m² and rough panels about 55 kg/m²—then add the mantel weight and any hanging loads to get the total design load per linear metre. Confirm whether the wall behind the veneer contains continuous blocking or studs at the mantel elevation; typical blocking spacing sits at 16″ o.c. or you can specify a continuous plywood or steel plate behind the veneer for heavy loads.
- Measure veneer thickness: standard 1–2.5 cm; premium pieces up to 3.5 cm. Plan bracket length to clear stone thickness plus required embed depth.
- Confirm thermal and clearance constraints with the fireplace manufacturer before final placement; natural stone shelves typically require ≥12″ above the firebox for standard depths, while non-combustible cast stone may allow smaller clearances depending on depth.
- Specify fasteners by substrate: use stainless-steel lag bolts into wood blocking and stainless sleeve or chemical (epoxy) anchors into structural masonry/CMU.
Install mantel before stone — recommended sequence and anchor specs
When you install the mantel before applying veneer, mount the structural support first and set the final datum for the stone to follow. Attach a continuous ledger or heavy-duty hidden brackets to studs or to a steel plate secured to the structure; for wood blocking use stainless steel lag screws sized M8–M10 (5/16″–3/8″) with full thread engagement into the blocking and add washers or through-bolts for heavy timber mantels. For heavy combined mantel + veneer loads, specify brackets rated for the combined weight and design each bracket with a safety factor of at least 3 relative to the expected static load.
- Secure ledger/brackets to studs or continuous blocking; use through-bolts where possible for maximum clamp load.
- After support is locked in, apply stacked stone panels over the substrate and use interlocking Z/S-shape panels or matching L-corners to hide bracket heads and seams.
- Adhere veneer with polymer-modified cementitious mortar or stone-grade adhesive; add masonry anchors into blocking at critical mechanical points when you can access the backing.
- Seal the mantel-to-stone junction using a flexible, paintable joint sealant sized to accommodate small movements and thermal expansion.
Install mantel after stone — masonry anchoring method and drilling precautions
When you must fit the mantel after the veneer, plan recessed pockets or removable panels in the veneer to accept brackets before the mortar cures; this avoids cutting finished stone later. If you must drill through installed panels, use diamond-core or wet drilling methods with steady clamping and dust/water control to avoid hairline fractures. Select anchors for masonry carefully: stainless-steel sleeve anchors work well for solid masonry, and chemical epoxy anchors provide higher capacity where the substrate or panel is thin—add 10–25 mm to anchor length to account for panel thickness and embedment depth.
- Provide a hidden steel backing plate behind the veneer where anchors will terminate; distribute load across multiple panels to prevent local stress on the stone.
- After installing brackets through stone, verify bracket deflection under the expected load and keep deflection within typical limits (L/180 to L/240) for shelving-like elements.
- Conceal fastener heads with matching L-corners or Z-shape interlocks and perform a final visual check for same-batch color consistency before closing joints.

Dealing with Uneven Surfaces: Filling the Gap Between Wood and Stone
Accurate gap assessment and the right backing/filler preserve adhesion, reduce callbacks, and ensure stacked stone panels perform under load and movement.
Survey and measure uneven joints: tolerances, load risk, and layout
Measure every joint with a straightedge and feeler gauges and log the maximum deviation across 2 m spans; target substrate flatness of ≤4 mm per 2 m wherever possible to limit dead load and prevent panel rocking. Record panel geometry and expected loads: Top Source Stone panels ship as 150 × 600 mm (or 150 × 550 mm) rectangles, 10–25 mm typical thickness (up to 35 mm premium), and weigh roughly 30–40 kg/m² for flat finishes or ~55 kg/m² for rough panels—use those figures to size backup systems and anchors.
Survey the wood substrate capacity and mark your panel layout so Z‑ or S‑shape interlocks and matching L‑corners land on solid backing. Flag deep voids (>15 mm) and vertical joints that don’t coincide with studs or blocking; these locations require backer rod, filler, or dedicated mechanical support to avoid stress concentrations and long-term failure.
- Tolerance check: ≤4 mm deviation per 2 m span.
- Panel sizes: 150 × 600 mm or 150 × 550 mm; thickness 10–25 mm (up to 35 mm premium).
- Weight to plan for: 30–40 kg/m² (flat), ~55 kg/m² (rough).
- Mark gaps >15 mm for backer rod or structural backing.
Choose compatible backing and filler systems for wood–stone interfaces
Select materials that handle differential movement: for gaps larger than 10–12 mm install closed‑cell polyethylene backer rod to control fill depth and prevent three‑sided adhesion, then seal with a movement‑rated MS polymer or polyurethane sealant. For shallow gaps under 10 mm use a low‑slump polymer‑modified cementitious mortar that bonds to both wood backing and stone without sagging.
Convert a wood substrate into stone‑ready backing by installing 12.5 mm cement board or exterior‑grade plywood fastened with corrosion‑resistant screws and, where required, stainless steel or galvanized metal mesh to support loads in the 30–55 kg/m² range. When bedding full panels, use a polymer‑modified thinset or cementitious adhesive rated for natural stone and verify compatibility with quartzite and slate; follow manufacturer open time and cure parameters to ensure full bond strength.
- Gaps >10–12 mm: closed‑cell polyethylene backer rod + flexible sealant.
- Gaps <10 mm: low‑slump polymer‑modified cementitious mortar.
- Substrate upgrade: 12.5 mm cement board or exterior plywood + corrosion‑resistant screws and metal mesh.
- Sealant: high‑performance MS polymer or polyurethane rated for freeze‑thaw and Gulf humidity.
- Adhesive: polymer‑modified thinset rated for natural stone (verify for quartzite/slate).
Install fillers and panels: step sequence, anchoring, and joint detailing
Prepare surfaces: clean dust, oils, and loose material; prime wood with the manufacturer‑recommended moisture barrier on exterior work and ensure backer board joints are taped and flush. Fill deep voids with backer rod first, then tool in the flexible sealant for movement joints and wait the product’s tack time before applying adjacent mortar or setting panels.
Bedding and anchoring require firm, repeatable details: apply a notched bed of polymer‑modified mortar sized to panel thickness, press 150 × 600 mm panels into place using the CNC‑precision Z/S interlocks to minimize visible gaps, and use stainless steel mechanical anchors or masonry screws where panels exceed 30 kg/m² or for rough textures. Place anchors at panel corners and midpoints as required, leave expansion joints of 6–12 mm where wood meets stone, tool sealant flush and sloped for drainage, and allow adhesives to cure 24–48 hours with sealant curing per manufacturer before exposing to load or weather. Verify flatness and joint tightness after cure and use matching L‑corners for wrapped transitions to maintain color and texture continuity while reducing on‑site cutting.
- Surface prep: clean and prime; tape and flush backer board joints.
- Fill order: backer rod → sealant for movement joints → mortar/panel bedding.
- Anchors: stainless steel mechanical anchors or masonry screws at corners and midpoints for panels >30 kg/m².
- Expansion joints: 6–12 mm, tool sealant flush and slope for drainage.
- Cure windows: adhesive 24–48 hours; sealant per manufacturer before exposure.
- Quality check: verify flatness, adhesion, and joint continuity after cure; prefer matching L‑corners for wrapped edges.

Safety First: Weight Limits and Heat Clearances for Mantels
Calculate loads and clearances up front to avoid failed anchors, code stops, and costly rework on stone-fireplace projects.
Calculate dead load and required support capacity
Start by sizing the mantel surface and selecting the panel weight class: flat gestapelter Stein averages 30–40 kg/m² (8–12 lb/ft²) while rough panels approach 55 kg/m². Multiply the mantel surface area (m²) by the chosen kg/m² to get the dead load, then add a conservative live load allowance for décor and incidental use. Factor panel thickness—standard panels run 10–25 mm and premium rough pieces can reach 35 mm—because thickness raises weight per square metre and changes bracket demand.
- Measure shelf area. Example: 1.5 m × 0.25 m = 0.375 m²; at 40 kg/m² → dead load = 15 kg.
- Add live load for décor (estimate 5–15 kg depending on use). For the example, assume +5 kg → total = 20 kg.
- Apply a safety factor of 2.5–3 when sizing brackets/anchors; design support for ≈45–60 kg in the example (20 kg × 3).
- Plan distributed supports: space brackets based on their rated capacity—typical spacing ranges 300–600 mm on center depending on load rating and bracket design.
Assess heat clearances and thermal protection for combustible mantels
Identify the appliance type (wood, gas, electric) and obtain the manufacturer’s clearance table before you specify mantel material or placement. Natural stacked stone is non‑combustible, but any wood or composite mantel facing still needs thermal isolation from the fire opening. Where combustible components exist, install a continuous non‑combustible substrate or a metal heat deflector behind the facing and validate the setup with an on‑site operating test using an IR thermometer during a representative burn to confirm surface temperatures remain within acceptable limits.
- Follow vertical clearance rules by shelf depth: shelf depth ≤ 2″ → 6″ clearance; standard natural stone shelves (≤4″) typically require ≥12″ above the firebox; a 6″ depth may require ~14.
- Maintain non‑combustible facing: 6–8″ each side of the firebox and 12″ above the opening as a baseline unless the appliance manual or AHJ specifies higher clearances.
- Prefer non‑combustible mantels (concrete, stone) where clearances approach limits; where not possible, add an air gap or certified heat shield.
- Do not treat interlocking Z/S‑shape geometry as thermal protection—use it for fit and appearance only.
Anchor selection and installation best practices for stone walls
Verify stone quality and drill with carbide or diamond masonry bits sized to your anchors. Choose corrosion‑resistant fasteners: stainless steel expansion anchors or epoxy‑set threaded rods perform well for heavy loads; common heavy‑load sizes range M8–M12. Wherever possible, embed anchors into sound substrate or a full mortar bed and avoid relying on thin veneer or friable stone as the primary load path.
- Prefer a continuous steel cleat or ledger plate to spread load across multiple anchors rather than concentrating forces at single points.
- Use interlocking Z/S panels and matching L‑corners to help distribute weight and conceal attachments, which reduces point stress on anchors.
- After installation, perform a proof‑load test at 1.5× the design load on installed anchors before finishing; verify no slippage and confirm torque/wedge anchor expansion per manufacturer specs.
- When drilling, pick anchor locations after dry‑fitting panels so you hit solid stone or mortar—not fragile face pieces; shim or backer as needed for uneven surfaces.
Abschluss
Proper installation—secure anchoring to studs through the stone, consistent gap filling, and observing weight and heat clearances—protects people, preserves the wall and mantel, and prevents structural or fire issues. Following these steps keeps projects aligned with safety standards like OSHA and helps extend the service life of both the mantel and the stone veneer.
Review your project plans and field conditions before ordering materials, noting stud locations, expected loads, and clearance needs. Contact Top Source Stone or your authorized dealer for certified samples, technical specs, and help selecting anchors and mounting methods for stacked stone installations.
Häufig gestellte Fragen
How do you install a floating shelf on a stacked stone wall?
Installing a floating shelf on stacked stone depends on the stone type and its load capacity. Drilling into stone is more difficult than into drywall, so choose a lighter floating shelf and assess the wall’s capacity; floating mantels are often simpler and safer to add without extensive construction. If weight or stone characteristics are uncertain, consult a pro.
Can you mount a heavy wood mantel on stone veneer safely?
Possibly—but it depends on the stone veneer and supporting structure. Stone veneer and natural stone have varying load capacities; a heavy wood mantel may require additional backing or a lighter option. Many people choose a lighter floating shelf on stone because it’s simpler and safer to install.
What are the best anchors for mounting shelves or mantels on stacked stone walls?
You don’t strictly need a mantel with a stone fireplace. A mantel is a design and functional choice: floating mantels enhance contrast and openness and add display space, while full surrounds offer more storage but cost more and require more complex installation. Choose based on your visual goals, space and weight requirements.
How do you hide gaps between a wood mantel and a stacked stone wall?
Hiding a gap depends on design and installation precision. Selecting a floating mantel style, proper fit, and material that complements the stone can minimize visible gaps; because drilling and fitting to stone is harder, careful measurement and installation help reduce gaps. If appearance is critical, choose a design (floating shelf vs surround) that minimizes visual bulk.
How much weight can a stacked stone wall support for shelves or mantels?
The best anchor depends on the stone type and the load you need to support—weight load capacity varies with stone. Because drilling into stone is harder than drywall, use anchors and mounting methods rated for masonry and for the specific weight; when in doubt, favor lighter shelves or consult a professional.
