
Launching a stone veneer project can be straightforward with the right approach. This guide outlines ledger stone panels, their materials, and how modular formats streamline installation. You’ll get targeted style ideas, see proven indoor and outdoor uses, and follow clear steps for preparation and maintenance—enabling you to deliver fireplace surrounds, accent walls, or exterior facades efficiently, without overruns in time or budget.
What Ledger Stone Panels Are
Ledger stone panels enable architects, contractors, and distributors to achieve the visual impact of gestapelter Stein without the extended timelines or structural requirements of full-thickness masonry. Knowing their material makeup, style range, and installation demands ensures you can specify products that fit budget, performance, and design requirements.
Definition and Composition
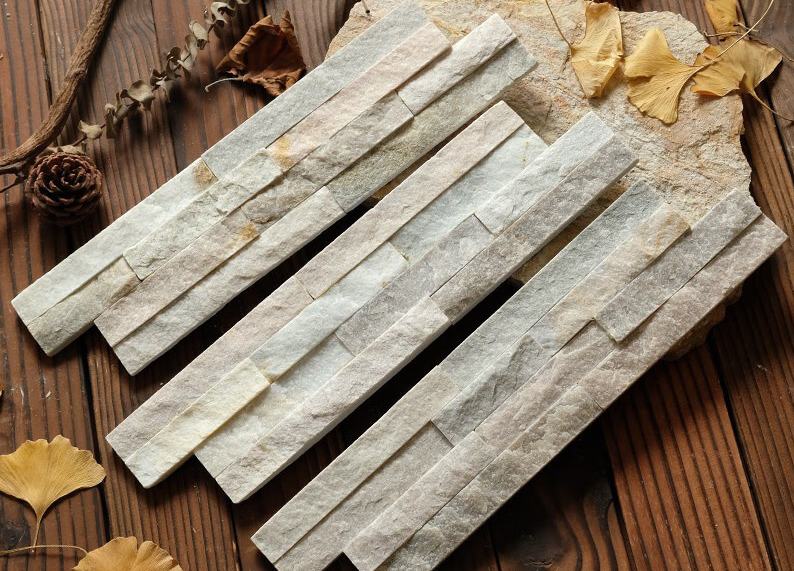
These are pre-assembled cladding units engineered to deliver the layered look of masonry in a format that accelerates installation. For premium builds or when maximum durability is essential, natural stone panels use strips of marble, travertine, quartzite, or similar materials bonded to a rigid backing, offering UV resistance and long service life. If cost or weight limits drive the choice, manufactured options made from concrete, stone aggregates, and pigments replicate natural textures at a lower price. Selection depends on the client’s maintenance tolerance, site conditions, and authenticity goals.
Visual Styles and Finishes
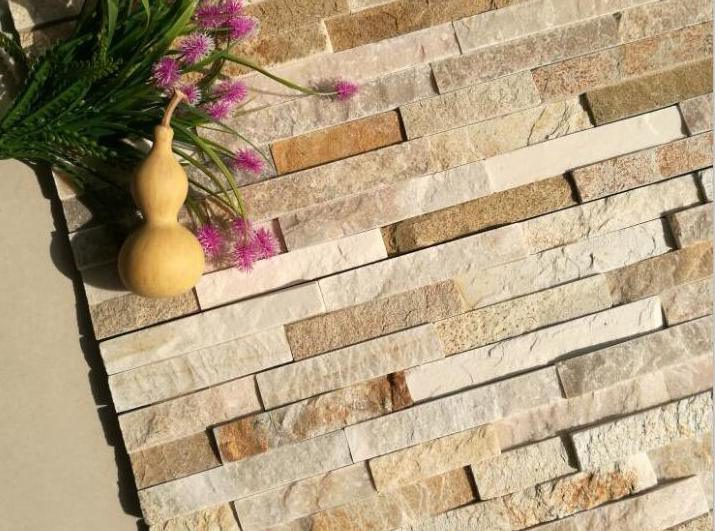
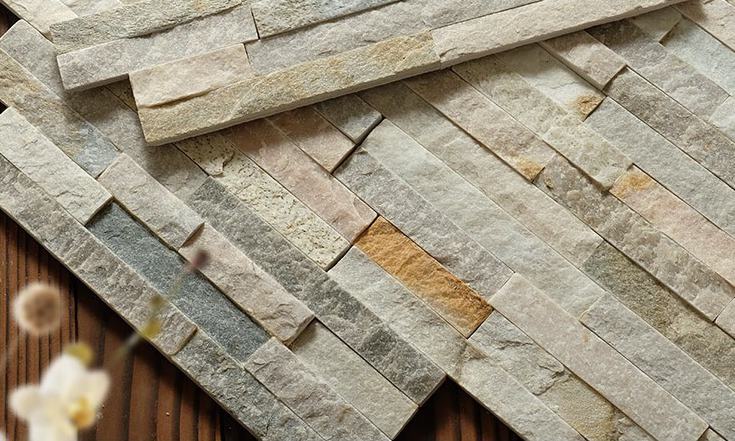
Natural stone panels offer the color variation, veining, and texture that convey authenticity. Formats range from mixed-shape rustic styles, split-face for uniform roughness, dimensional cuts for bold relief, to slim linear pencil profiles for refined detailing. Manufactured panels deliver consistent tone and texture—ideal for large commercial façades or modular projects—and palettes can be customized to match branding or site-specific schemes. Both types commonly come in 6″ x24″ interlocking modules, creating seamless horizontal lines without visible grout and reducing labor while maintaining a polished finish.
Installation and Structural Considerations
Panelized formats reduce installation time compared to hand-setting each piece, a clear benefit on tight schedules. Natural stone’s 8–13 pounds per square foot weight requires solid substrates and often skilled installers; using cement board over drywall or attaching directly to brick, block, or concrete provides a stable base. Interlocking edges keep joints tight, and matching L-shaped corner units eliminate miter cuts. Even with heavier materials, their slim profile means no structural footings are needed—ideal for retrofits or accent upgrades.
Applications and Use Cases
Ledger stone panels work across residential and commercial spaces—feature walls, fireplaces, kitchen backsplashes, and bathroom partitions indoors; façades, garden walls, and wainscoting outdoors. For exterior or wet areas, use moisture barriers and sealants to protect substrates and extend surface life. Natural stone withstands high-traffic and exposed environments thanks to its UV stability and weather resistance, while manufactured panels satisfy less demanding applications at lower installed cost. Their versatility supports styles from rustic to contemporary, giving specifiers the flexibility to meet diverse client goals without compromising efficiency.
What Ledger Stone Panels Are Made Of (typical materials and finish)
Selecting the right material and finish drives both the visual impact and operational success of a ledger stone installation. For B2B buyers, matching stone characteristics to environment, project brief, and budget is non‑negotiable. From raw stone choice to panel bonding and surface treatment, every stage influences performance, installation efficiency, and client satisfaction.
Common Natural Stone Materials
Ledger panels are typically produced from slate, quartzite, sandstone, marble, limestone, granite, travertine, and schist. Slate is in high demand for its rustic character and slip resistance, making it viable for vertical and horizontal use. Quartzite offers superior strength with understated sparkle, while sandstone’s warm tones suit hospitality and residential schemes. Marble and limestone deliver premium finishes for high‑impact interiors. For heavy‑traffic or load‑bearing sites, granite and travertine add durability and distinctive texture. Choosing by stone type ensures performance and design goals stay aligned.
Panel Construction and Bonding
Panels are assembled from individually cut stone pieces bonded with synthetic or cement‑based adhesives selected for structural compatibility. In quality manufacturing, hand bonding preserves tonal variation and achieves an artisanal finish absent in mass‑production. Interlocking profiles such as Z‑shapes minimize visible seams and accelerate installation. Most designs eliminate the need for post‑install grouting, saving crews time and reducing site disruption—benefits that directly improve delivery schedules.
Finishes Available for Ledger Stone Panels
Finish selection shapes texture and visual appeal. Natural cleft maintains a rugged split face for rustic concepts. Honed provides a smooth matte suited to contemporary interiors. Split face offers strong relief for statement walls. In exterior or wet‑area applications, specify sealing after install to guard against staining and weather damage—an inexpensive measure that preserves appearance and extends service life.
Typical Applications and Material Selection Considerations
Ledger panels suit interior and exterior use including fireplace surrounds, backsplashes, facades, retaining walls, and poolside features. Match stone and finish to site demands—use slip‑resistant stone for pool decks, honed marble for prestige lobbies. Assess durability, textural impact, and installation efficiency to deliver on client performance goals while controlling maintenance costs. Smart specification here safeguards margins and reduces project risk.
How Ledger Panels Are Installed (basics of mounting and common methods)
Installing Hauptsteinplatten requires precise planning and disciplined execution. A well-managed process safeguards both aesthetics and long-term performance. Contractors should control each stage—from substrate preparation to sealing—to prevent costly callbacks and strengthen client trust.
Preparing the Installation Surface
Verify the substrate is flat, clean, and dry—any dust, debris, or uneven areas will weaken adhesion and drive future repairs. Suitable substrates include drywall, concrete, and cement backer board; always follow the manufacturer’s specifications. For exterior or large-scale work, install a water-resistant barrier and confirm compliance with local codes before starting. Thorough preparation here dramatically cuts the risk of water intrusion and structural failure later.
Starting with Corner Installation
Install corners first when working across multiple walls to establish alignment and avoid disruptive seams. L-shaped corner panels reduce cutting complexity and maintain a continuous, professional finish. This sequence also prevents cumulative measurement errors that arise when corners are left until last.

Common Mounting Methods
Mortared installation involves applying mortar to both substrate and panel, setting panels from top down when visible joints fit the design. Dry-stacked installation builds bottom up with tight, jointless seams for a seamless appearance. Back-buttering each panel with a notched trowel enhances adhesion, especially on uneven surfaces. Use a chalk line or level to set the first course, adding shims if needed so the base row is perfectly level—any misalignment here will compound through the wall.
Cutting and Fitting Panels
Measure each gap or corner before cutting to reduce waste and prevent mismatched joints. Stagger seams and break up long runs for a natural stone pattern. Employ high-quality cutting tools to keep edges clean, ensuring panels fit snugly without cracking or chipping. Precision at this stage directly reflects on installation quality.
Exterior Installation Considerations
For outdoor work, install water-resistant barriers and flashing before panel placement to block wind-driven rain and condensation. After installation, seal joints and stone surfaces with a weather-rated sealer to protect integrity and finish. Ensure all methods meet local regulations—noncompliance risks warranty issues and delays in project approval.
Key B2B Considerations
Confirm substrate suitability against manufacturer guidance before mobilizing crews. Select installation techniques that scale efficiently from residential to commercial deployments. Adhering to best practices and codes minimizes rework, secures schedules, and reinforces your capacity to manage projects of similar or greater scope.
Enhance Your Projects with Authentic Ledger Stone
Explore our range of natural Hauptsteinplatten that blend genuine stone beauty with efficient installation. Perfect for contractors, distributors, and designers looking to add durable, versatile, and elegant stone accents to any space.

Where Ledger Stone Panels Excel in High-Impact Applications
Ledger stone panels combine design authority with long-term performance, making them a strategic specification for premium architectural elements. The table below details 4 primary application areas with their B2B advantages, helping you target solutions that meet project demands and exceed client expectations.
| Application | Key Considerations for B2B Projects |
|---|---|
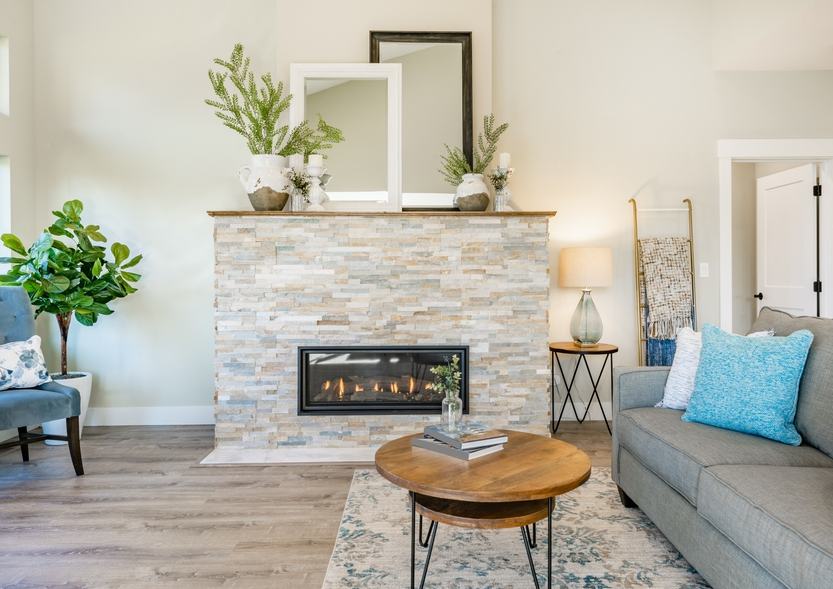
| Fireplaces | Delivers a dramatic, heat-resistant centerpiece adaptable to rustic or modern schemes. Install full wall coverage or focus on the mantel to broaden design variations in residential and hospitality projects. Natural stone elevates asset value and ensures lasting visual impact with minimal maintenance. |
| Accent Walls | Transforms lobbies, reception areas, or living rooms into signature spaces with added depth and character. Wide color, finish, and stone options support brand alignment or thematic consistency. Custom solutions enable market differentiation in competitive residential and commercial sectors. |
| Backsplashes | Offers a moisture- and stain-resistant surface that simplifies cleaning for kitchens, bars, and bathrooms. Pencil and split-face profiles integrate into modern or transitional interiors. Fast installation and low upkeep make them ideal for high-turnover commercial environments. |
| Exterior Facades | Boosts curb appeal and delivers weather resistance for exteriors, columns, and entryways. Performs reliably in retail, commercial, and residential developments under demanding climate conditions. Durable, sustainable stone options align with green building goals without sacrificing aesthetics. |
The DIY-Friendly Angle (why ledger panels are popular with homeowners)
Ledger stone panels have become a go-to solution for homeowners and DIY enthusiasts as they enable real stone veneer projects without the need for specialized trades. The combination of authentic stone aesthetics and an installation system designed for efficiency delivers faster upgrades, lower costs, and accessible execution for motivated buyers. This simplicity also streamlines resale or project handover, since end users can complete installations without incurring high labor expenses.
Simple, Modular Installation
The interlocking panel format cuts down on the number of adjustments and precision cuts versus traditional stone veneer, which often demands shaping each piece individually. Customers with basic tiling or masonry experience can follow layout plans to complete wall sections efficiently, reducing labor hours and error risk. For distributors, this modularity accelerates installs, drives higher user satisfaction, and fuels repeat orders by eliminating the frustrations tied to conventional stone fitting.
Lightweight and Versatile
At 8–13 pounds per square foot, panels can be moved and placed without heavy lifting gear, expanding applications to surfaces such as drywall (when properly backed), backer board, or concrete. The lower weight minimizes structural concerns—critical in remodels where walls aren’t built for full-thickness stone—and removes equipment rental needs, cutting costs and making smaller-volume projects financially feasible.
Authentic Stone Look Without the Fuss
These panels replicate natural textures and tones so accurately that they’re virtually indistinguishable from hand-laid stone, yet eliminate the need for placing and aligning each piece individually. Installers require only basic tools—a trowel, level, and wet saw—plus standard mortar or tile adhesive, keeping capital and tool investments minimal. This makes the product approachable for first-time DIY buyers and cost-sensitive projects while supporting rapid project turnover.
Cost-Effective Home Improvement
Streamlined installation directly reduces labor costs, the largest expense in stonework, allowing homeowners to transform spaces within tight budgets—even across multiple projects. Faster completion limits household disruption and ensures upgrades are ready to use sooner. Buyers maintain full control over schedules, avoiding contractor delays and markups—a core reason ledger panels continue to displace traditional methods in the residential market.
Important Preparation Steps (surface readiness, tools, and safety)
Thorough preparation determines installation quality and durability. Inspect and prepare the substrate, stage your tools, and finalize your layout before mixing mortar—these steps prevent mid-project delays and costly corrections.
Surface Readiness
Confirm the wall is flat, clean, smooth, and fully dry. On drywall, install cement backer board over studs, fill joints with mortar, and embed tape per manufacturer instructions to prevent panel shift and improve adhesion. On concrete or solid masonry, skip backing but clean thoroughly with a damp sponge to remove dust. Indoors, protect floors with drop cloths or heavy-duty construction paper to avoid chips from dropped stone or mortar splatter—safeguarding client property and avoiding repair costs.
Essential Tools and Materials
Keep a notched trowel, level, wet saw, chalk line, measuring tape, and mallet on hand for accurate cuts, straight courses, and tight fitting without damage. Stock Hauptsteinplatten, stone-rated thin-set mortar, leveling shims, and sealer for final protection. For exteriors or fireplaces, specify high-performance mortar to withstand heat and moisture. Mix mortar in small batches to peanut butter-like consistency to avoid premature curing and waste—tool readiness directly supports efficiency and consistent results.
Safety and Layout Preparation
Snap a chalk line 6 inches above the floor to set the starter row and maintain alignment. Dry-lay panels in order to preview the finish and catch alignment issues early. For exposed corners, start at the lower corner for clean transitions; on flat walls, work from bottom left to right. Use shims to level the first course—an uneven base compounds errors. Install fixtures, mantels, or trim before panels to ensure seamless integration and avoid rework.
Maintenance and Care (sealing, cleaning, and long-term care)
Ledger stone panels deliver lasting value, but without disciplined upkeep, even premium installations deteriorate quickly. For procurement managers handling large inventories or flagship builds, a structured plan sustains both aesthetics and warranty protection. Seal immediately after installation, tailor cleaning protocols to natural stone, and time seasonal inspections to catch issues early—avoiding avoidable repairs and replacements.
Sealing: Key Practices and Recommendations
Apply a penetrating sealer or enhancer right after installation to guard against water ingress, stains, and fading. In commercial or exterior projects with heavy traffic or exposure, this step is mandatory. Match the sealer to the exact stone type—incorrect products fail fast. Before each application, inspect and clear surfaces so the sealer bonds fully. Reapply annually or per manufacturer guidance to stay within warranty terms and prevent costly callbacks.
Cleaning Methods Best Suited for Ledger Stone Panels
Use soft-bristled brushes or a vacuum with a brush attachment for daily dust removal, keeping joints clear and surfaces scratch-free. For deeper cleaning, dilute a pH-neutral stone cleaner and work in sections, avoiding acidic or alkaline agents that can damage the finish. Address stains with targeted solutions: baking soda paste for organic marks, mild degreasers for oil, and stone-safe removers for mold, algae, or efflorescence. Never use abrasive pads—these ruin the texture clients expect. Consistent application of these methods maintains showroom readiness and minimizes replacement cycles.
Long-term Care: Inspections and Seasonal Maintenance
Schedule visual checks for cracks, chips, or fading after storms or freezes to intercept problems before they spread. In spring and fall, remove leaves and grit; in winter, clear snow or ice to avoid freeze-thaw damage and biological growth. For interiors, regular dusting and prompt spill response reduce preventive costs and maintain compliance with manufacturer guidelines. Align all actions with the stone’s geological profile and official care instructions to protect warranties and ensure the panels deliver full design and performance value for clients.
Common Pitfalls and How to Avoid Them (alignment, cuts, and moisture considerations)
Ledger stone panels deliver impressive visual impact, but installation missteps can quickly erode quality and drive up corrective costs. Alignment errors, poorly executed corners, and inadequate moisture protection often surface within months if not addressed from the outset. Prioritizing these factors safeguards aesthetics and durability, particularly when working with premium materials and intricate layouts.
Alignment Mistakes: Causes and Prevention
Misaligned seams create visible gaps or uneven surfaces, often appearing within the first year. Many installers start from an inaccurate reference point, triggering a chain of errors across the wall. Establish a perfectly level ledger board for the first row, then use additional reference ledgers across larger spans to control vertical alignment. Confirm walls are plumb and level before adhering panels—uneven substrates can force edges apart and disrupt visual flow. Avoid repetitive “zipper” lines by varying panel placement to achieve a natural, random finish rather than a mechanical pattern.
Cutting Challenges: Corner Fitment and Material Handling
Unclean corner joints occur when panels are not miter-cut precisely at 45 degrees—a cut requiring both skill and specialized tools. Skipping proper mitering leaves exposed edges that detract from the build’s professionalism. Installers without advanced saws often settle for irregular fits, undermining uniformity. For projects with heavy corner work, source pre-cut L-shape panels from reputable manufacturers to reduce fitment challenges and maintain a consistent finish, even for less experienced crews.
Moisture Considerations: Risks and Mitigation
Moisture failures in ledger stone systems are rarely detailed in standard guides, yet they can damage substrates and interiors. While stone resists water, panel assemblies are not watertight. On exterior facades or damp zones, install moisture membranes and flashing before stone placement. Once fitted, treat surfaces with high-grade natural stone sealers to prevent staining and slow water penetration at joints.
General Best Practices and When to Consult Professionals
High-bond mortars secure panels and prevent shifting during cure, which is critical for clean lines. After removing temporary ledger boards, close gaps with tailored cuts so the pattern flows seamlessly. While DIY installation can be rewarding, stone’s precision tolerances make large or intricate projects unforgiving. Assess your capability against project demands—complex angles, wide spans, or mixed textures often warrant professional crews that deliver accuracy and spare you hidden rework costs.
Quick Start Plan (shopping list, steps for a weekend project)
Planning to install ledger stone panels over a single weekend? Organize materials in advance, prepare the substrate properly, and follow a disciplined installation sequence to avoid costly errors. This streamlined plan reduces downtime on site and improves outcomes, particularly for first-time installers in residential projects.
Essential Shopping List and Tools
Sourcing ledger stone panels that meet your design requirements and application type—whether interior feature walls or exterior facades—is the first step. Use polymer‑modified mortar formulated for gestapelter Stein and apply it with a notched trowel for consistent coverage. Equip yourself with a level to maintain proper alignment, a wet saw or angle grinder for precision cuts, and a chalk line for clear reference marks. Keep shims or spacers for uniform joints, install cement backer board over drywall for support, use a rubber mallet for safe adjustments, clean excess mortar with a damp sponge, and finish with a compatible stone sealer as needed.
Substrate and Surface Preparation
Verify the substrate is structurally sound, clean, dry, and flat, correcting uneven spots before work begins. On interior drywall, secure cement backer board; for exterior or masonry, retain concrete, masonry, or cement board as the base layer. Remove dust, paint, or debris that could impair adhesion—the integrity of the installation depends on this step.
Step-by-Step Installation Guide
Measure the surface accurately, then dry‑lay panels to confirm the layout and plan all necessary cuts before mixing mortar. Snap a chalk line to guide the bottom row. Mix mortar per the manufacturer’s instructions. Start from the bottom up, back‑buttering each panel for better grip, and seat them with a mallet. Maintain alignment and joint spacing with shims or spacers, and cut panels for edges and corners using a wet saw or angle grinder for clean transitions.
Finishing Touches and Sealing Tips
Allow panels to set for at least 24 hours. Before the mortar hardens, remove residue with a damp sponge. Apply a compatible natural stone sealer if desired to protect against stains and simplify cleaning. For ongoing care, clean with a soft brush and pH‑neutral solution to preserve finish and extend service life.

FAQs About Ledger Stone Panels (5 concise questions and answers)
Below are targeted answers to frequent questions raised by project managers, contractors, and commercial designers when specifying ledger stone panels. Each response delivers practical, installation-ready insight to help you mitigate risk, control budgets, and meet client expectations.
Is ledger stone real stone?
Ledger stone panels are cut from quarried stone, ensuring each piece retains authentic grain, veining, and surface texture formed naturally over decades. This delivers a premium finish and the structural integrity required for both residential and commercial applications, supporting long-term performance and value.
Are they hard to install?
The interlocking Z-profile ensures rapid, accurate alignment, significantly reducing crew hours versus traditional stonework. At 8–13 lbs per sq ft, most projects avoid extra structural reinforcement, which speeds preparation and keeps labor costs in check while maintaining build quality.
Where can I use them?
Panels install effectively on cement board, brick, or concrete in both interior and exterior settings. They are specified for fireplaces, feature walls, facades, kitchen islands, and hospitality interiors, adapting to rustic, modern, or mixed-style designs without compromising substrate integrity.
How do you cut them?
Use a wet saw with a diamond blade to achieve clean, accurate cuts that protect edge integrity. This precision is critical for corners, outlet openings, and custom shapes, ensuring panels interlock seamlessly and maintain a consistent visual line across the installation.
Are they expensive?
Upfront material costs can exceed manufactured veneers, but savings from reduced labor and minimal structural upgrades balance budgets. Real stone’s durability lowers replacement frequency and sustains long-term curb appeal, making it a strategic investment where impact and longevity are priorities.
Practical Takeaways for Your Ledger Stone Project
Ledger stone panels deliver the layered impact of traditional masonry with faster, cleaner installation, making them a strategic choice for high-visibility spaces. Select natural or manufactured materials based on authenticity goals, budget, and site demands, and align style and finish with environmental factors to secure both aesthetics and durability. Prioritize thorough surface preparation, precise alignment, and use of corner panels, quality mortar, and compatible sealers. Control moisture ingress and manage load-bearing limits to protect structure and finish, and engage specialists for complex layouts or exposed exteriors. Strategic planning now creates installations that perform reliably and present exceptionally for years.
