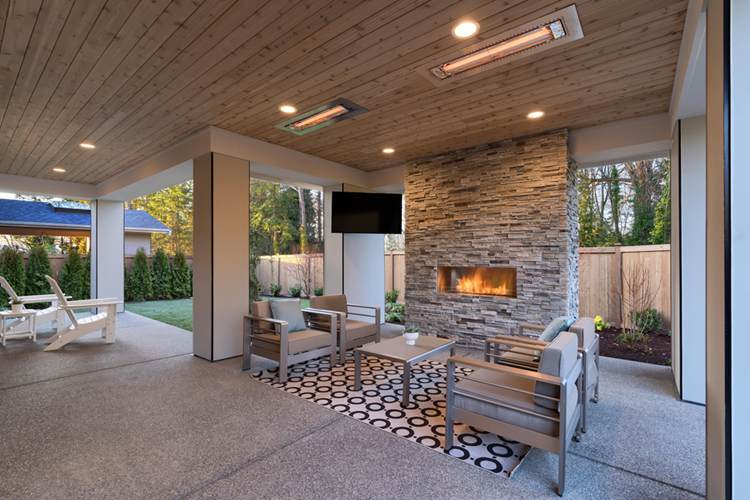
Installing stacked stone transforms your fireplace with natural texture and elegance. You’re not just adding a decorative element—you’re creating a focal point that brings warmth and character to your entire living space. The key to a lasting, beautiful result lies in proper surface prep and following a clear, methodical approach.
Proper surface prep and stepwise execution ensure a durable, professional finish. When you take the time to prepare your substrate correctly and apply each stone with care, you’re building something that will look stunning for years to come. This isn’t about rushing through the project—it’s about doing it right the first time.
This guide breaks down tools, materials, and installation steps for seamless results. You’ll learn exactly what you need, how to prepare your fireplace surface, and the proven techniques that professionals use to create that polished, high-end look. Whether you’re working with natural stone or manufactured panels, you’ll have the confidence to tackle this project and achieve results you’ll be proud to show off.
Prerequisites: Tools & Materials Needed
Before you dive into your fireplace transformation, let’s make sure you’ve got everything lined up. You don’t want to be halfway through and realize you’re missing a crucial tool—that’s a recipe for frustration. Think of this as your prep checklist, the foundation that’ll make your installation smooth and stress-free.
| Item | Specification/Notes |
|---|---|
| Type S Mortar | Essential for bonding stone to metal lath; mix according to manufacturer instructions for optimal adhesion |
| Metal Wire Lath | Provides critical bonding surface on painted or smooth fireplace surfaces; measure to fit surround before installation |
| Trowel and Notched Trowel | Standard trowel applies mortar; notched trowel creates grooves for enhanced stone adhesion |
| Level and Measuring Tape | Non-negotiable for maintaining straight rows and finding the high point on your floor; accuracy here saves headaches later |
| stone veneer Panels or Natural Stacked Stone | Choose based on your aesthetic preference and budget; natural stone offers authenticity, panels provide easier installation |
| Masonry Anchors and Screws | Secures wire lath to fireplace surface; proper anchoring prevents future issues with stone stability |
| Grout and Grout Bag | Stone veneer joint grout in your desired color fills gaps between stones; grout bag allows precise application |
| Stone Veneer Sealant | Protects your finished stone work and makes future cleaning easier; apply around electrical boxes for professional finish |
| Soft-bristle Brush and Paddle Mixer | Brush cleans surface debris; paddle mixer ensures mortar reaches proper consistency without lumps |
With these tools and materials gathered, you’re setting yourself up for success. Each item plays a specific role in creating a durable, professional-looking installation that’ll last for years.
Surface Preparation and Layout Planning
Getting your fireplace ready for stone veneer isn’t just a quick wipe-down—it’s the foundation of everything that comes next. Think of this phase as setting up the scaffolding before building a house. Without it, even the best stones won’t stick around for long.
Start by cleaning the fireplace surface thoroughly with a soft-bristle brush. You’re removing all the dirt, dust, and debris that could prevent mortar from bonding properly. If your fireplace has existing paint or a very smooth surface, you’ll need to install metal wire lath using masonry anchors. This creates the grip that mortar needs to hold the stones securely in place.
Next, determine your panel orientation and establish a level reference line across the base of your fireplace. This line becomes your guide for keeping everything straight as you work your way up. Before you place a single stone, confirm that your substrate can handle the weight—lightweight stone veneer typically runs between 8 and 13 pounds per square foot, so most fireplaces handle this without issues.

Mixing and Applying Mortar Base Coat
Getting your mortar right isn’t just about following a recipe—it’s about creating the foundation that’ll hold your beautiful stone in place for decades. Start by mixing Type S Mortar according to the manufacturer’s instructions, adding water gradually until you achieve a smooth, workable consistency that’s neither too runny nor too thick.
Now comes the critical part: troweling that base coat onto your wire lath. You’re aiming for an even 1/2-inch thickness across the entire surface. Think of it as spreading frosting on a cake—you want consistent coverage that gives your stones something substantial to grip onto.
Here’s where patience pays off: wait about 20 minutes while the mortar remains pliable, then grab your notched trowel and rake horizontal grooves through that base coat. These grooves aren’t just for show—they create the texture that dramatically enhances stone adhesion, giving each piece a mechanical bond that’s far stronger than a smooth surface ever could.
The hardest part? Walking away. Your base coat needs at least 24 hours to cure before you can start placing stones. Rushing this step undermines everything that follows, so give that mortar the time it needs to develop its full strength.
Step 1: Attach Stone Veneer Panels Securely
Apply Mortar to Stone Back
Start by mixing your heavy-duty stone veneer mortar with a paddle mixer until you’ve got a thick, spreadable consistency—not too soupy, not too stiff. You want it to hold its shape when you scoop it up. Now, grab your trowel and apply at least a half-inch layer of mortar to the back of each stone panel. Don’t skimp here. Coverage matters more than you might think because any gaps will compromise your bond and could lead to stones loosening down the road.
Spread that mortar evenly across the entire back surface. You’re creating the foundation for a permanent installation, so every square inch needs attention. Think of it like buttering toast—you wouldn’t leave dry spots, right? The same principle applies here. Full coverage ensures your stones stay put for years to come.
Press Stones with Twist Motion
Always begin at the bottom corner of your fireplace and work your way up. This keeps things stable and prevents mortar from dripping onto stones you’ve already set. Take your first stone panel and press it firmly onto that prepared base coat. Here’s the key technique: use a slight twisting motion as you push. This forces the mortar to squeeze out from the edges and creates that tight lock you’re after.
Don’t move on too quickly. Grab your level and check that the stone sits perfectly straight. If it’s off even slightly, adjust it right away while the mortar’s still workable. Waiting means you’ll have to chip it off and start over, and nobody wants that headache. Keep checking alignment as you move across each row to maintain clean, straight lines throughout your installation.
Step 2: Install Corner Stones and Maintain Consistency
Use Matching Corner Pieces
Corners can make or break your fireplace’s final look, so let’s get them right from the start. Pre-cut L-shaped corner stones are your best friend here—they’re designed to wrap around edges seamlessly, giving you that professional finish without the headache of cutting stones yourself onsite.
Here’s a pro tip that’ll elevate your work: alternate how your corners overhang. On one corner, let the stone extend off your main wall. On the next corner, flip it—let it overhang off the short wall instead. This creates an interlocking pattern that looks natural and intentional, just like a mason with years of experience built it.
Factory-matched corner panels save you time and frustration. They’re precisely cut to fit together, so you can skip the complex cutting process and focus on getting your stones placed correctly. Trust me, your project will move faster and look better when you use these pre-made pieces.
Maintain Consistent Joint Gaps
Tight joints aren’t just about aesthetics—they’re about safety and durability. Pay special attention near the firebox hearth, where embers could potentially escape through gaps. Keep those spaces minimal and uniform across your entire installation.
As you work, fill gaps consistently to prevent any ember hazards and maintain that clean, intentional appearance. A uniform joint pattern shows craftsmanship and attention to detail. Don’t rush this part—take your time to get it right.
Pull out your level frequently, checking every few rows to guarantee alignment stays true. Even small deviations compound quickly, so catch them early. Consistent checking means straight rows and professional results that you’ll be proud to show off.
Step 3: Grouting and Finishing Touches
Once your mortar has cured for at least 12 hours, it’s time to bring everything together with grout. This step isn’t just about filling gaps—it’s about creating a cohesive, polished look that ties all your hard work into one stunning focal point. Mix your grout to the color you’ve chosen, and get ready to add the final layer of character to your fireplace.
Here’s where patience pays off: load your grout bag about halfway, cut a small opening at the tip, and carefully fill each joint between the stones. Work in manageable sections so the grout doesn’t harden before you can finish it. You want to keep things moving, but not rushed—this is where your attention to detail really shines through.
After filling the joints, grab a rake or brush and smooth everything out for that seamless finish. Use a soft-bristle brush to gently remove any excess grout from the stone faces—you don’t want residue dulling the natural beauty of your veneer. Finally, seal around electrical outlets and any other penetrations to ensure a clean, professional appearance that’s ready to impress.
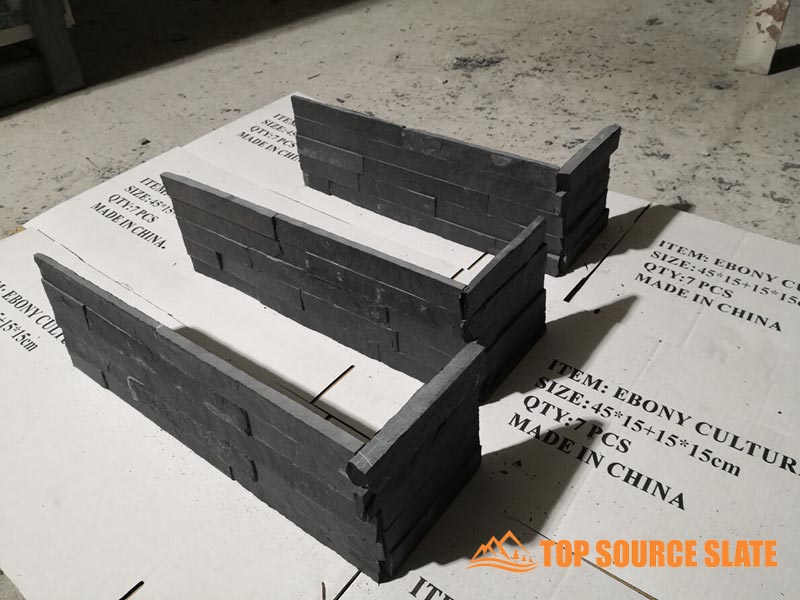
Enhance Your Projects with Authentic Ledger Stone
Provide your clients with natural stone panels known for genuine texture, versatile design, and easy installation. Partner with us to access high-quality ledger stone that adds lasting value and beauty to residential and commercial spaces.

Expert Tips & Common Mistakes to Avoid
Getting stone installation right comes down to respecting the fundamentals. These aren’t just rules—they’re the difference between a fireplace that lasts for decades and one that needs repair. Let me walk you through the most common pitfalls and how to sidestep them.
| Common Mistake | How to Avoid/Solution |
|---|---|
| Skipping wire lath on painted surfaces | Wire lath is your insurance policy. Paint creates a slick surface that mortar can’t grip. Install it before you mix a single batch of mortar, and your stones will stay put for the long haul. |
| Ignoring level line reference | Find the high point on your floor using a level, then mark a level line across the entire fireplace width. This single reference line keeps your rows straight and your installation looking intentional instead of accidental. |
| Not curing base coat fully before stone setting | Give that base coat the full 24 hours. Rushing this step is tempting, but it’s where most problems start. Wait it out, and your stones will bond properly and stay secure. |
| Using excessive mortar causing stone slippage | Apply mortar evenly at roughly 1/2-inch thick on the back of each stone. Press with a twisting motion and hold until you see mortar squeeze out around the edges. That squeeze means you’ve got a solid bond. |
| Neglecting joint finishing and sealing | Joints aren’t just about looks—they protect your stone. Fill them carefully with a grout bag, smooth them out with a rake or brush, and seal with stone veneer sealant. This final step is what separates rushed jobs from pro installations. |
Maintenance and Long-Term Care
You’ve put in the work to install your gestapelter Stein fireplace—now let’s make sure it stays beautiful for years to come. Regular maintenance doesn’t have to be complicated, but it’s essential for preserving both the appearance and structural integrity of your installation.
Start with routine cleaning using a soft-bristled brush and plain water to remove dust and soot buildup. Avoid acidic cleaners or harsh chemicals that can damage the stone’s surface or strip away protective sealers. For tougher stains, reach for a pH-neutral stone cleaner specifically designed for natural or manufactured stone—and skip the high-pressure washer, which can erode mortar joints and damage the stone itself.
Plan to reseal your stone veneer every 2-3 years to lock in color vibrancy and create a protective barrier against stains and moisture penetration. This simple step makes a huge difference in how your fireplace weathers everyday use. While you’re at it, inspect the mortar joints for any hairline cracks or gaps that could compromise structural stability. Catching and repairing these early prevents bigger problems down the road and keeps your installation looking as solid as the day you finished it.

Frequently Asked Questions About Fireplace Installation
What is the average installed cost per square foot for stacked stone fireplaces?
You’re looking at $15 to $30 per square foot for materials and labor combined. Natural stone runs higher than manufactured veneer, and the final price depends on your prep work—existing brick needs less prep than drywall with wire lath installation.
Is stacked stone rated for exterior and freeze/thaw conditions?
Most quality stone veneers handle freeze/thaw cycles well, but you need to check the manufacturer’s rating. Look for products specifically labeled for exterior use—they’re engineered with better moisture resistance and won’t crack when temperatures drop.
How steep is the learning curve for first-time professional installers?
If you’ve got basic masonry skills, you’ll pick it up in a weekend project. The trickiest parts are corner alternation and keeping your base coat cured properly—once you nail those techniques, the rest flows naturally.
What long-term cleaning protocols keep stone veneer in top condition?
Wipe down with a soft brush and mild soap every few months. Avoid harsh chemicals that strip sealant, and reapply stone veneer sealant every 2-3 years to maintain that protective barrier against soot and moisture.
Does this upgrade add measurable value to the property?
Yes—real estate agents consistently report that stone fireplaces boost perceived value and help homes sell faster. You’ll typically recoup 75-100% of installation costs, especially in markets where buyers prioritize character and craftsmanship.
Your Fireplace Transformation Awaits
You’ve walked through every critical step—from substrate prep to that final protective seal. When you follow these techniques, you’re not just stacking stones. You’re building a fireplace that’ll stand the test of time and turn heads every single day.
The real game-changer? It’s always been the prep work. A clean, well-prepped surface and consistent mortar application separate weekend warriors from true craftspeople. Stick to these fundamentals, and you’ll see a professional finish that makes visitors ask, “Who did your fireplace?”
Ready to push your skills even further? Consider branching into advanced veneer patterns or tackling an outdoor hearth project. Each new challenge sharpens your technique and expands what you can create with stone.
