
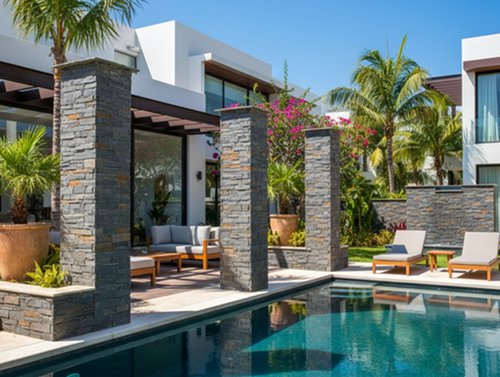
Stacked stone columns bring natural beauty and lasting strength to your home’s exterior. They’re not just decorative—they transform ordinary entryways, porches, and driveways into architectural statements that catch every eye. You’re looking at a project that directly boosts your property’s value while giving you the satisfaction of creating something permanent and impressive.
This guide breaks down the entire process into manageable steps. You’ll learn how to frame properly, install with confidence, and finish like a pro. Whether you’re wrapping an existing post or building from scratch, following these clear instructions ensures your columns will stand strong and look polished for years to come.
You don’t need to be a master mason to pull this off. With the right approach and attention to detail, you’ll create columns that look like they’ve always belonged there. Let’s get started on building something that makes your home stand out.
Prerequisites: Tools & Materials Needed
Before you start building, let’s get everything lined up. You don’t want to be halfway through and realize you’re missing a critical piece—trust me, it breaks your momentum and can compromise the quality of your work.
Here’s what you need to have ready:
| Articolo | Description | Note |
|---|---|---|
| Framing Lumber or CMU Blocks | Wood or concrete masonry units for base and structure | Ensure treated or rated for outdoor use |
| Cement Backer Board | Substrate for stone panels | Must be securely fastened to framing |
| Mortar Mix | Type S or polymer-modified mortar | For bonding stone panels |
| Stacked Stone Panels or Veneer | Natural or manufactured stone | Choose style matching design |
| Column Caps | Stone or precast caps | Finish and protect top of column |
| Corner Pieces | Purpose-built for seamless edges | Enhance professional look—this is where amateur work shows |
| Trowels and Mixing Tools | Mortar application tools | Appropriate sizes for stone panels |
| Level and Plumb Bob | For precise alignment | Critical for vertical accuracy—no shortcuts here |
| Rebar and Concrete (Optional) | For structural reinforcement | Recommended for load-bearing columns |
Pay special attention to those corner pieces—they’re what separate a DIY look from a professional installation. When your corners wrap seamlessly without visible seams, people notice the quality, not the construction method.
Step 1: Build a Solid Framing Base
Before you can start stacking stone, you need a rock-solid foundation—literally. If your column will bear any weight, start by pouring a proper concrete footing. Let it cure fully and check that it’s perfectly level. This isn’t the place to cut corners.
Once your footing is ready, build your frame using pressure-treated lumber or CMU blocks. Measure twice, cut once—your dimensions need to be exact. The frame dictates the final size and shape of your column, so precision here saves you headaches later.
Here’s where many DIYers stumble: they skip the constant leveling. Grab a plumb bob and a quality level, and use them religiously as you build. Check vertical alignment at every stage. Even a slight lean early on will compound as you add height, leaving you with a crooked column and stone that won’t sit right. Stay diligent, and your frame will give you a flawless canvas for the stone work ahead.

Step 2: Attach Cement Backer Board for Substrate
Before you can apply stone, you need a solid, moisture-resistant base that’ll keep your column standing strong for decades. Cement backer board is your go-to substrate here—it’s designed to handle the weight of rivestimento in pietra and the weather extremes your column will face.
Start by fastening the backer board securely over your frame using corrosion-resistant screws. Space them every 6-8 inches along the studs, making sure each piece sits flush and tight. You’re building the foundation for your entire stone surface, so don’t rush this step.
Once the boards are up, seal every joint with alkali-resistant mesh tape and a thin layer of thin-set mortar. This prevents moisture from sneaking behind your stone and causing damage down the road. Let the mortar cure completely, then give the surface a final inspection—it should be clean, flat, and free of any dust or debris.
This prep work might feel tedious, but it’s what separates a professional-looking column from one that cracks or detaches within a few seasons. You’re setting yourself up for success.
Step 3: Install Stacked Stone Panels Accurately
Mixing your mortar to the right consistency is where precision meets artistry. You want a thick, creamy blend that holds its shape when you trowel it but spreads smoothly without clumping. Apply a solid, even coat on both the backer board and the back of each stone panel—this dual application creates the bond that’ll keep your column standing strong for years.
Start at the bottom corner and work your way up. Press each panel firmly into place, using a slight twisting motion to ensure full contact with the mortar. This is where those purpose-built corner pieces become your best friend—they wrap seamlessly around edges, giving you that Pietra naturale look without the telltale seam that screams “amateur hour.
Pay close attention to your joint pattern. Stagger each row so the seams never line up vertically—this creates structural stability and a more authentic, hand-laid appearance. As you work, step back periodically to check alignment. Small adjustments now save you from awkward gaps or misaligned edges that’ll haunt you every time you pull into the driveway.
Elevate Your Designs with Authentic Ledger Stone
Explore premium natural stone panels that combine timeless beauty, versatile styles, and efficient installation. Perfect for distributors, contractors, and designers seeking durable, low-maintenance solutions that enhance any space—from modern interiors to rustic exteriors.

Step 4: Install Column Caps and Finishing Touches
You’ve built a beautiful column—now it’s time to crown it. The cap isn’t just decoration; it’s your first line of defense against water damage. Choose a cap that matches your stone’s character and extends slightly beyond the column’s edges. This overhang directs rainwater away from the stonework, preventing moisture from seeping into joints and causing freeze-thaw damage over time.
Secure the cap using a high-quality exterior-grade adhesive or mortar designed for stone applications. Apply a generous bead along the top of your column, press the cap firmly into place, and check that it’s level in all directions. Let it cure according to the manufacturer’s instructions—rushing this step invites trouble down the road.
Walk around your finished column and inspect every joint with a critical eye. Look for:
- Gaps between stones where mortar may have settled
- Uneven edges that could trap water
- Areas where the wrap meets the post that need additional sealing
Apply a flexible exterior sealant to any vulnerable spots, especially where the cap meets the column body. This final attention to detail transforms a good installation into a lasting one that’ll weather seasons without complaint.
Materials for Stacked Stone Columns Compared
Choosing the right material for your stacked stone column isn’t just about looks—it’s about finding the sweet spot between your budget, your skill level, and how much structural support you actually need. Let’s break down your three main options so you can make a confident choice that works for your specific project.
| Property | Pietra naturale | Manufactured Veneer | Faux Stone Wraps |
|---|---|---|---|
| Durata | Very high, weather resistant across all climates. Real stone stands up to decades of harsh conditions without losing its integrity or appearance. | High durability with good climate adaptability. The concrete-based composition handles freeze-thaw cycles well and resists most weather patterns effectively. | Moderate durability, suitable for non-structural decorative use only. Won’t crack or rot, but shouldn’t carry any real load beyond its own weight. |
| Peso | Heavy and requires a strong, properly engineered foundation. You’ll need to pour a substantial concrete footing to support the considerable mass. | Moderate weight, lighter than Pietra naturale but still substantial. Most standard foundations can handle it without major reinforcement. | Very light with minimal structural impact. You can install these over existing posts without worrying about added load or foundation upgrades. |
| Installation Complexity | Skilled masonry required for proper construction. You’ll need experience with:
|
Moderate complexity, DIY possible with research and preparation. The modular panels and veneer pieces come with installation guides that ambitious homeowners can follow successfully. | Easy installation, suitable for DIY projects. These wraps snap or adhere directly to posts with basic tools and minimal construction knowledge required. |
| Cost | High material and labor costs. Between quarrying, transportation, and skilled mason rates, you’re looking at premium pricing that reflects the authentic craftsmanship. | Moderate cost that balances quality and affordability. The manufactured process keeps prices reasonable while still delivering a high-end stone appearance. | Low to moderate depending on brand and finish quality. These offer the most budget-friendly path to achieving a stone column look. |
| Maintenance | Basso maintenance with occasional cleaning. A simple pressure wash once or twice a year keeps natural stone looking fresh for generations. | Low maintenance, but monitor for cracks over time. Check mortar joints periodically and reseal if needed to prevent moisture infiltration. | Very low maintenance, washable and colorfast. These polyurethane wraps resist fading and clean up easily with just soap and water. |
Setting Foundations & Structural Support
A rock-solid foundation isn’t optional—it’s the backbone of any load-bearing column. Start by excavating deep enough to reach undisturbed soil, then pour concrete footings sized for your column’s weight and local frost line requirements. Your footing should extend below the freeze line to prevent heaving and cracking during seasonal shifts.
Reinforcement is where strength meets longevity. Thread vertical rebar through the center of CMU blocks or within your wood framing, then fill the core with concrete. This creates a unified, load-bearing structure that can support gates, roof overhangs, or heavy rivestimento in pietra without sagging or shifting over time.
Don’t overlook drainage and soil stability. Poor drainage leads to water pooling around the base, which softens the ground and invites settling. Install a gravel bed beneath your footing and ensure proper grading to channel water away. Compacted, stable soil paired with a well-drained base keeps your column standing straight for decades.

Waterproofing & Weatherproofing Techniques
Stone panels bring natural water resistance to your column, but you’ll need to protect what’s underneath. Think of it this way: the stone is the armor, but the real battle against moisture happens behind the scenes. If water seeps through joints and sits against your substrate, you’re looking at rot, mold, and structural headaches down the road.
Start by installing a quality vapor barrier behind your backer board, especially in outdoor installations or anywhere humidity runs high. This creates a critical shield that stops moisture from penetrating your framing. You’re not just building a pretty column—you’re building one that’ll stand strong through years of rain, snow, and temperature swings.
Once your stone is up, seal it properly. A high-quality natural stone sealer does two jobs:
- Prevents staining from dirt, water runoff, and organic matter
- Makes future cleaning effortless with just soap and water
- Extends the life and appearance of your investment
Don’t skip the drainage details either. Make sure water can escape from behind the stone through weep holes or proper flashing. Trapped moisture is your enemy, and good drainage keeps your column dry from the inside out.
Expert Tips & Common Mistakes to Avoid
Building a stacked stone column takes patience and attention to detail. Even experienced DIYers can run into problems if they skip key steps or rush the process. Here’s what to watch out for and how to get it right the first time.
| Common Mistake | How to Avoid / Solution |
|---|---|
| Uneven framing causing crooked stone | Check your frame with a level and plumb tool every few inches as you build. A crooked post will show through no matter how carefully you lay the stone. Take your time with the framing—it’s your foundation for everything that follows. |
| Visible seams at corners | Invest in purpose-built corner pieces designed to wrap seamlessly around edges. These pieces overlap naturally and eliminate that awkward, obvious joint where two flat panels meet. It’s the difference between a professional finish and a DIY giveaway. |
| Inadequate substrate fastening or sealing | Secure your cement board or backer board with corrosion-resistant screws every 8 inches. Tape and seal all joints with a waterproof membrane or mesh tape. If moisture gets behind the stone, you’ll face cracking, mold, and structural damage down the road. |
| Using incorrect mortar mix | Always use a polymer-modified mortar specifically rated for rivestimento in pietra applications. Standard mortar won’t bond as well and can crack under temperature changes or moisture exposure. Read the label and match the product to your stone type and climate. |
| Skipping waterproof barriers | Install a vapor barrier or weather-resistant wrap before you attach your substrate. Add sealant around the base and cap to prevent water from seeping into the column. Moisture is the silent killer of stone installations—don’t give it a way in. |
Domande frequenti
What is the ideal size for a stacked stone exterior column?
Most residential columns range from 16 to 24 inches square, with heights of 6 to 10 feet depending on your porch or entryway design. You’ll want to match the column size to your home’s scale—larger homes can handle bigger columns, while smaller cottages look best with more modest dimensions.
Is a concrete footing necessary for all columns?
Yes, if your column bears any structural load, you’ll need a concrete footing that extends below the frost line in your area. Even decorative columns benefit from a small footing to prevent settling and cracking over time.
How do I waterproof the column frame effectively?
Apply a quality waterproof membrane or house wrap to your wood or metal frame before installing the stone veneer. This creates a barrier that prevents moisture from reaching the structural frame and causing rot or rust.
Which stacked stone material is best for exterior durability?
Natural stone offers the longest lifespan, but manufactured stone veneer provides excellent weather resistance at a lower cost. Faux stone wraps work well for decorative applications but aren’t recommended for load-bearing structures or harsh climates.
What is the typical cost range for this project?
Expect to spend $500 to $1,500 per column for DIY projects using manufactured veneer or faux stone wraps. Professional installation with natural stone can run $2,000 to $5,000 per column depending on size, materials, and local labor rates.
Wrapping Up Your Stone Column Project
Building stacked stone columns transforms your home’s exterior with a durable, high-end look that lasts for years. You’ve learned the importance of starting with a perfectly plumb frame and choosing the right materials—whether you go with real stone, manufactured veneer, or lightweight wraps.
The secret to professional results lies in careful substrate preparation and precise Installazione in pietra. Take your time with each layer, use proper corner pieces to avoid visible seams, and don’t rush the bonding process. Your attention to these details separates a good project from a great one.
Once your columns are complete, keep them looking sharp with occasional cleaning and inspections. You might also want to explore adding decorative caps, lighting fixtures, or matching stone accents around your entryway. Each enhancement builds on the foundation you’ve created, giving your home that polished, cohesive look you’re after.
