Precision in stone corner details separates a professional masonry installation from a failed project that drains margins through rework and diminished property value. When corners look artificial or show website seams, they expose the entire facade as a veneer, undermining architectural integrity and the original design intent. Masons and project managers often face unexpected labor costs when installers spend excessive hours field-cutting edges to hide the structural flaws of low-quality materials.
This technical guide breaks down the mechanics of 90-degree stone masonry, focusing on the structural differences between natural interlocking corners and faux L-shaped caps. We examine how exposed edges impact the visual authenticity of manufactured products and provide specific protocols for wrapping pillars and window transitions. The following sections compare installation timelines for prefabricated natural pieces against manual mold cutting to provide a clear framework for estimating labor and ensuring long-term aesthetic durability.
The Challenge of 90-Degree Corners in Stone Masonry
Mastering corner transitions determines whether a stone facade looks like a solid architectural feature or a failing veneer that exposes the substrate behind it.
Standard 90-degree corners represent the most vulnerable point in any stone installation. Field-cut miter joints often fail because they lack the structural mass to withstand building settlement and thermal expansion. When these joints separate, they create unsightly gaps that compromise the weather-resistant barrier and ruin the visual continuity of the stone pattern.
Preventing Structural Gapping and Separation
Successful installations move away from traditional miter cuts toward dedicated corner units. Miter cuts performed on-site often result in “thin” edges that are fragile and prone to chipping. By using prefabricated L-shaped corners, we ensure the stone maintains its full thickness around the bend, creating a robust mechanical bond that resists separation as the building settles over time.
- Avoid traditional field miter cuts which lead to structural separation as the building settles.
- Use dedicated corner units to ensure a consistent stone thickness and structural bond at every 90-degree angle.
- Select high-strength epoxy adhesives designed for 2026 construction standards to secure edge pieces against heavy wind loads.
Substrate Preparation and Corner Flashing
Moisture management starts at the substrate. Corners are notorious for water infiltration if the flashing and lath are not wrapped correctly. We require installers to provide a continuous, stable surface by wrapping the reinforcement material around the corner rather than stopping it at the edge. This prevents moisture from finding a path into the wall assembly through the joint.
- Wrap metal lath or cement board around the corner to provide a continuous, stable surface for the stone bond.
- Install specific flashing systems to prevent water infiltration at the most vulnerable joint of the masonry wall.
- Verify that corners are perfectly plumb before installation to avoid compounding alignment errors across the wall face.
Managing Thermal Bridging and Movement Joints
Temperature fluctuations cause stone and substrates to expand at different rates, placing extreme stress on 90-degree intersections. Modern architectural designs often overlook thermal bridging at corners, which can lead to localized condensation and structural fatigue. Planning for movement joints near these transitions allows the wall to breathe and shift without cracking the stone panels or popping pieces off the facade.
- Design movement joints near 90-degree transitions to manage thermal expansion without cracking the stone panels.
- Address thermal bridging issues common in modern architectural designs to maintain energy efficiency at the building’s exterior corners.
- Utilize natural stone’s inherent weather resistance to protect corners from UV exposure and fading through 2026 and beyond.
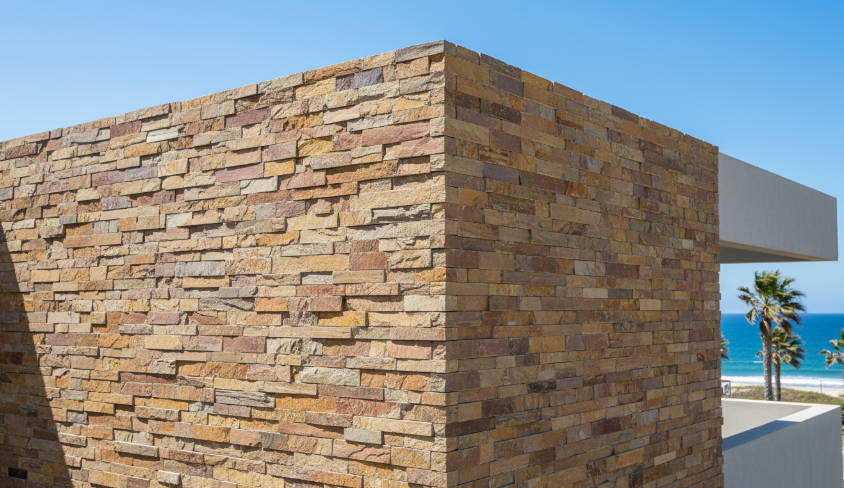
Natural Interlocking Corners vs. Faux “L-shaped” Caps
Natural stone corners eliminate the “dead giveaway” of manufactured veneers by providing through-body color and organic texture that resists UV degradation and mechanical chipping.
Standard manufactured stone often fails at the most critical visual point: the 90-degree transition. Because faux products rely on concrete molds and surface-level pigments, any chip or wear reveals the dull aggregate underneath. Natural stone interlocking pieces utilize genuine quarried material, ensuring that every angle displays organic variation and depth. This authenticity remains consistent throughout the life of the installation, as natural minerals do not suffer from the UV fading that typically plagues pigment-based artificial caps.
| Performance Metric | Pietra sorgente superiore (Natural) | Generic Faux Stone |
|---|---|---|
| Edge Realism | Split-face natural cleft; no mold lines | Uniform edges with visible molding artifacts |
| Color Composition | Through-body mineral color | Surface-applied pigments and dyes |
| UV Resistance | Inherent stability; zero fading | Prone to bleaching over 5-10 years |
| Durata | Freeze-thaw resistant quartzite/slate | Lightweight concrete; prone to spalling |
Structural Precision of Pre-fabricated Corner Units
Modern manufacturing standards have shifted away from manual miter cutting toward factory-engineered L-shaped units. We utilize infrared cutting technology to ensure every corner piece meets a precise 90-degree specification. This precision allows the units to wrap around pillars and window returns without the gapping or structural separation often seen with field-cut joints. High-strength epoxy resin bonds the individual stones to a reinforced panel substrate, which prevents stone fallout during the rigorous 2026 construction cycles.
Installation Efficiency and Labor Impact
The move toward interlocking corner systems directly addresses the rising cost of specialized masonry labor. By providing pre-matched corner pieces, we help contractors meet tight deadlines while eliminating the dust and waste generated by on-site miter cutting. These panels maintain a lightweight profile—typically between 8 and 13 lbs per square foot—which allows for rapid installation on standard wall substrates without the need for expensive structural footings.
- Interlocking “male-female” designs camouflage vertical joints and remove the need for grouting.
- Precision factory cuts ensure a professional finish on every pillar and column wrap.
- Streamlined logistics for 2026 projects prioritize “ready-to-ship” inventory for high-demand regions.
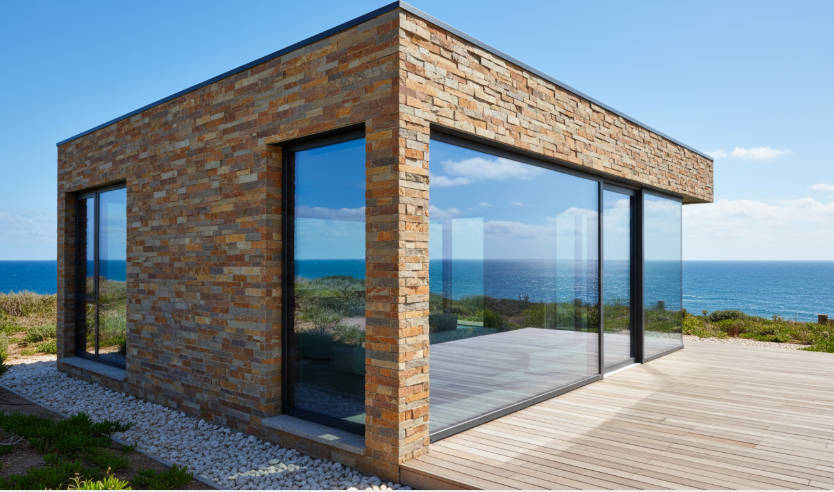
Long-term Durability and Maintenance Requirements
Natural stone corners provide a resilient solution for high-traffic commercial areas and exterior residential facades. Unlike faux caps that reveal a concrete core when struck, Pietra naturale maintains its integrity against physical impacts and weathering. Applying a high-quality breathable sealant protects the system from environmental staining while simplifying routine maintenance. The permanent bond of the natural stone panels ensures that corners withstand the thermal expansion and contraction common in diverse climates, from the freezing temperatures of Canada to the high humidity of the Gulf regions.
Premium Factory-Direct Stacked Stone Ledger Panels

Why Exposed Edges Reveal the “Fake” in Manufactured Stone
The visual integrity of a Installazione in pietra often fails at the margins, where the thin profile of manufactured veneers exposes the industrial reality behind the artificial facade.
The Uniformity Trap of Molded Concrete
Manufactured stone relies on repeatable molds that inevitably produce artifacts and unnatural regularity along the edges. Even in 2026, molding processes struggle to replicate the jagged, non-repeating profile of natural quarry stone. When installers place these units side-by-side, visible mold lines on the sides signal an industrial origin to any observant buyer or inspector. These straight lines and repeating patterns become glaringly obvious on large-scale walls where identical edge shapes appear with rhythmic frequency.
- Repetitive casting creates “twin” stones that break the organic chaos required for high-end masonry.
- Industrial mold seams often require manual grinding on-site, which further destroys the intended stone texture.
- Uniform edge thickness makes the material look like a tile application rather than a structural stone element.
Surface Pigmentation vs. Through-Body Color
Artificial veneers typically use concrete composites with color applied only to the surface, creating a jarring visual disconnect at the edges. Natural stone panels, such as those sourced from Top Source Stone’s direct quarry layers, maintain their authentic color through the entire depth of the material. If a natural stone panel chips or requires a custom cut, the newly exposed surface shows the same mineral richness and hue as the face. Conversely, exposed edges on manufactured stone often reveal a dull gray or tan concrete core that immediately ruins the architectural intent.
- Cutting manufactured stone in the field creates “dead” edges that require paint kits to hide the concrete interior.
- Natural minerals like slate and quartzite offer 100% through-body color consistency, eliminating the need for touch-ups.
- UV exposure often causes surface-dyed concrete to fade, while Pietra naturale remains color-stable over decades.
Texture Inconsistency and Material Porosity
The physical composition of cast stone fails to match the dense, varied texture found in natural slate, quartzite, or marble. Manufactured stone edges often appear unnaturally smooth or display tiny pinholes—bubbles trapped during the casting process—which serve as a fingerprint for artificial products. Authentic stone panels provide a rugged, split-face texture that holds up to close inspection from any angle. Natural stone exhibits unique mineral veins and crystalline structures that continue through every edge, providing a tactile authenticity that concrete mixes cannot simulate.
- High-resolution inspection reveals the porous, aerated nature of cement-based “stones.”
- Natural stone density provides superior freeze-thaw resistance compared to porous cast alternatives.
- CNC diamond-blade edges on natural stone ensure a tight fit without sacrificing the organic split-face texture.
The Visual Failure of Painted-On Veining
Mimicking the complexity of natural stone requires more than surface-level color application. Shadows on manufactured stone often highlight the lack of genuine depth at the edges of the panel, as the “veining” is frequently just a surface print. Natural stone interacts with light organically, showing authentic 3D depth rather than flat, painted-on effects. Real stone edges contribute to the overall massing of a project, whereas faux edges often flatten the visual impact, making the wall look like a thin skin rather than a solid structure.
- Light refracts off natural quartz crystals in ways that pigmented concrete cannot replicate.
- Artificial coloring lacks the subtle transitions and transitions found in same-batch quarry sourcing.
- The absence of authentic mineral depth makes faux stone appear “muddy” under direct sunlight.
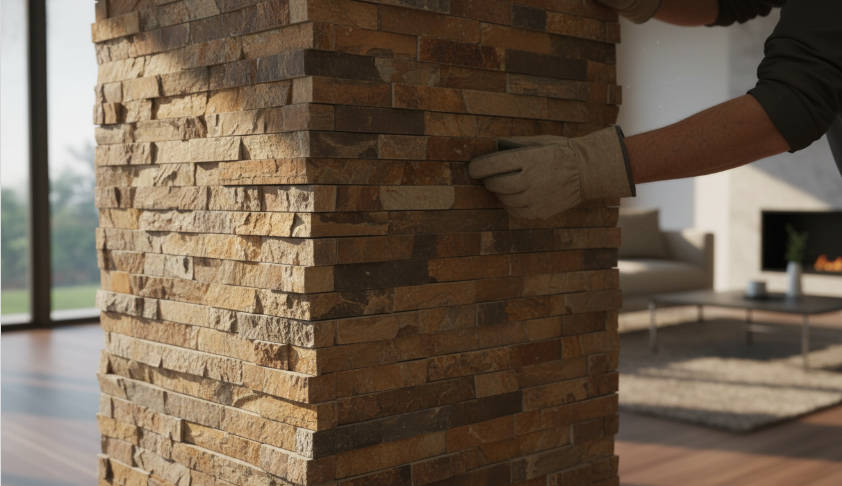
Achieving a Seamless Transition Around Pillars and Windows
Effective stone masonry around architectural apertures depends on the integration of mechanical corner solutions and strict moisture mitigation protocols to prevent structural gapping.
Utilizing L-Shaped Corner Pieces for Pillars
Standard stone panels often leave visible vertical seams when applied to 90-degree pillar edges, which undermines the authenticity of the installation. We solve this by providing pre-fabricated L-shaped corner pieces for every model in our “Big 10” inventory. These units wrap around external angles without the need for complex, time-consuming miter cuts on-site. By using matching stone corners, you maintain natural texture continuity and ensure the pillar looks like solid, structural masonry rather than a thin veneer.
| Caratteristica | Field-Mitered Cuts | TSS L-Shaped Corners |
|---|---|---|
| Installation Speed | Slow (Requires 45° diamond blade cutting) | Fast (Pre-assembled drop-in units) |
| Visual Continuity | Visible seams; difficult to match texture | Seamless wrap; 95% hue uniformity |
| Structural Bond | Vulnerable to adhesive failure at tips | High-strength epoxy resin reinforced |
Using these pre-fabricated units reduces on-site labor by eliminating the high-precision masonry cutting typically required for pillars. The internal Z-shape interlocking system remains consistent with our standard panels, allowing for a tight, male-female connection that camouflages the installation substrate.
- Eliminate visible seams by utilizing matching stone corners that maintain natural texture.
- Reduce labor costs by removing the requirement for precision diamond-blade cutting.
- Ensure structural integrity with high-strength epoxy resin pre-applied at the factory.
Moisture Management with Proper Flashing and Barriers
External installations around windows and pillars represent the highest risk for water infiltration. We require the installation of a robust water-resistant barrier (WRB) and kickout flashing to direct runoff away from the building envelope. Natural stone is inherently water-resistant, but the panel system must include a dedicated drainage plane to prevent moisture from becoming trapped behind the panels, which can lead to efflorescence or substrate rot in wet climates.
- Install kickout flashing to prevent water from entering behind the stone facade.
- Apply a high-quality natural stone sealer to facilitate cleaning and prevent staining.
- Incorporate a drainage plane to manage hydrostatic pressure in high-exposure environments.
Precision Gap Placement for Window Sills
Modern architectural designs in 2026 demand specific clearances to handle building settlement and thermal expansion. Maintaining a minimum 2-inch gap at window sills is critical for material movement and unimpeded drainage. When transitioning from interior drywall to window frames, always use cement board as the substrate. This ensures a stable bonding surface that will not degrade if moisture penetrates the stone grout lines over time.
- Maintain a 2-inch gap at window sills to accommodate material expansion and drainage.
- Use cement board as a stable substrate to ensure a permanent bond at window transitions.
- Align the Z-shape system carefully to hide grout lines around the frame for a professional finish.

Installation Time: Prefabricated Natural Corners vs. Cutting Molds
Switching from on-site miter cutting to prefabricated L-shaped corners reduces total installation labor by approximately 70%, allowing contractors to bypass complex angle calculations and specialized wet-saw requirements.
Eliminating Field Miter Cutting Requirements
Manual on-site cutting of 45-degree angles consumes excessive labor hours and increases the risk of material waste. In 2026, relying on masons to calculate and grind every corner piece leads to project bottlenecks and inconsistent results. Traditional cutting methods require skilled masonry work and specialized wet saws to create seamless 90-degree joins, which often fail if the substrate isn’t perfectly plumb.
Prefabricated L-shaped corners arrive ready for immediate placement. This removes the need for complex angle calculations on the job site. By using pre-assembled units, we reduce the time spent on corner fabrication significantly compared to manual molding. These units allow for a “plug-and-play” workflow where the installer simply alternates the long and short legs of the corner to maintain a natural staggered bond.
Labor Cost Reductions and Project Efficiency
Standardized corner systems allow contractors to optimize their workforce and meet aggressive construction schedules. Reduced installation hours translate directly into higher project profitability for developers. When crews use interlocking Z-shape designs, the corner units align with flat panels without visible grout lines, eliminating the need for tedious hand-filling or stone-by-stone adjustments.
| Efficiency Metric | Manual Field Mitering | TSS Prefabricated Corners |
|---|---|---|
| Fabrication Time | 15-20 Minutes per Piece | < 1 Minute (Instant) |
| Skill Requirement | Senior Mason / Specialty Tooling | Standard Cladding Installer |
| Material Waste Rate | 10% – 15% (Chipping/Errors) | 0% (Factory Quality-Controlled) |
| Joint Type | Field-Applied Thinset/Mortar | High-Strength Factory Epoxy Bond |
Faster installation cycles help teams manage multiple job sites simultaneously. By shortening the time required for exterior stone cladding, companies free up specialized labor for more complex architectural details. This shift from site-fabrication to assembly-style installation is the most effective way to protect project margins in a competitive B2B market.
Factory Precision versus Site Fabrication
Manufacturing controls ensure consistent quality that field cutting and molding simply cannot replicate. Advanced infrared cutting equipment produces precise dimensions, ensuring a flush fit that avoids the gaps found in hand-cut stones. We apply high-strength epoxy resin under controlled factory conditions to create a permanent bond between the stone components, offering far more durability than on-site mortar joins.
- CNC diamond-blade edges ensure every corner piece fits tightly against standard flat panels.
- Three-stage quality inspections eliminate defective pieces before they reach the crate, preventing delays caused by onsite rework.
- Same-batch quarry consistency guarantees that corner textures and hues match the main wall panels perfectly.
Choosing factory-built corners also improves safety on the job site. Reducing the need for continuous wet-saw operation minimizes dust inhalation risks and decreases the likelihood of tool-related injuries. This approach provides a professional finish that mimics traditional full-bed masonry while utilizing the speed of modern panelized systems.
Conclusione
Selecting natural interlocking corners ensures that transitions around pillars and windows maintain the structural integrity and aesthetic depth of real stone. Precision-cut L-shaped pieces eliminate the visible seams often found in faux alternatives while significantly reducing on-site installation labor. Using products sourced from a single quarry vein guarantees a uniform finish that lasts without the risk of UV fading or delamination.
Contatto Top Source Stone to request our latest stacked stone catalog or to receive a sample box for your next project. We help dealers and wholesalers secure consistent inventory with direct-from-quarry pricing and professional logistics support.
Domande frequenti
How to install stacked stone on outside corners?
To install stacked stone on outside corners, you should always start with the corner pieces before laying the flat wall stones. Ensure your metal lath wraps around the corner at least 12 inches to provide structural reinforcement. Apply a scratch coat and then use the “back-buttering” technique, applying mortar to both the wall and the back of the stone. Alternate the long and short returns of the L-shaped corner pieces as you move upward to create a staggered, natural-looking “woven” pattern that prevents long vertical seams.
Do you need special pieces for stone corners?
Yes, industry professionals highly recommend using dedicated L-shaped corner units. These pieces are specifically manufactured to wrap around the corner, hiding the thickness of the stone and the substrate behind it. Using special corner units eliminates the need for difficult miter cuts and prevents the structural separation and gapping that often occur when two flat pieces are simply joined at a 90-degree angle.
Why do faux stone corners look fake?
Faux stone corners often look fake when installers use “mitered” flat pieces instead of L-shaped corner units, which exposes the raw concrete or aggregate core of the stone. Additionally, a “stacked” look appears artificial if the vertical joints are not staggered properly or if the installer fails to alternate the direction of the corner returns. Professional installations avoid these “dead-end” seams by mimicking the random, interlocking pattern of traditional dry-stack masonry.
How to cut natural stone corners?
Natural stone corners should be cut using a wet saw equipped with a high-quality diamond blade for precision. For standard 90-degree angles, it is best to use pre-cut L-units; however, for custom angles, you should miter the edges at a 45-degree angle. To maintain a natural aesthetic, use a masonry chisel and hammer to “pitch” or hand-tool the cut edges, restoring the rugged, textured look of the stone face so the saw marks are hidden.
Best way to wrap a pillar in stacked stone?
The most effective method for wrapping a pillar is to work from the bottom up, installing corner units on all four corners of each course before filling in the flat sections. Ensure the pillar is prepared with a weather-resistant barrier and metal lath that is tightly secured. By alternating the orientation of the corner pieces on every layer, you create an interlocking structure that provides both thermal stability and a seamless, high-end appearance that mimics a solid stone column.
