Stacked stone veneer is a decorative wall treatment made from natural stone panels or manufactured alternatives. It enhances surfaces with a textured, layered look but can develop chips and cracks over time. Repairing damaged areas maintains both the appearance and the structural integrity of the installation. This article outlines professional repair techniques, recommended materials, and tips to ensure seamless, long-lasting results.
Tools and Materials Needed for Stone Repair
Before starting your repair, gather the right equipment to ensure a professional finish. Having everything on hand prevents interruptions and allows you to work efficiently while adhesives remain workable.
- Stiff-bristled brush – Essential for texturing fresh mortar to match the surrounding stone’s natural surface
- Putty knife or chisel – Removes old adhesive and loose debris from damaged areas
- Vacuum or broom – Clears dust and particles for proper adhesive bonding
- Color-matched repair mortar or stone epoxy – Primary adhesive for securing loose or replacement stones
- Small trowel or palette knife – Applies mortar with precision in tight spaces
- Color pigments (optional) – Fine-tunes mortar shade to blend with existing stone
- Painter’s tape or ratchet straps – Holds stones firmly in place during the curing period
- Clean cloths – Wipes away excess adhesive before it hardens
- Mineral-based stain (optional) – Adjusts color tone on repaired areas for seamless integration
- Protective gloves and eye protection – Shields hands and eyes from mortar dust and adhesive chemicals
Quality tools are critical for repairs that blend with the surrounding stonework. Invest in a dedicated stiff-bristled brush for texture work—precise texturing is key to professional results.
How to Repair Chipped or Cracked Stacked Stone Veneer
Repairing chipped or cracked stacked stone veneer requires thorough preparation, suitable materials, and careful attention to matching both color and texture. The following steps detail an effective process for restoring both appearance and integrity.
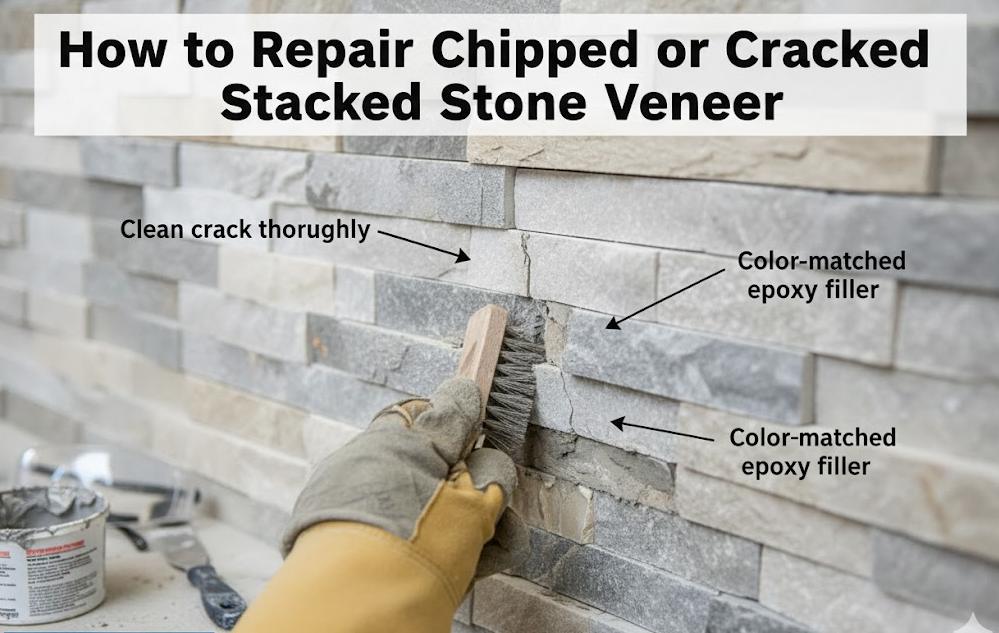
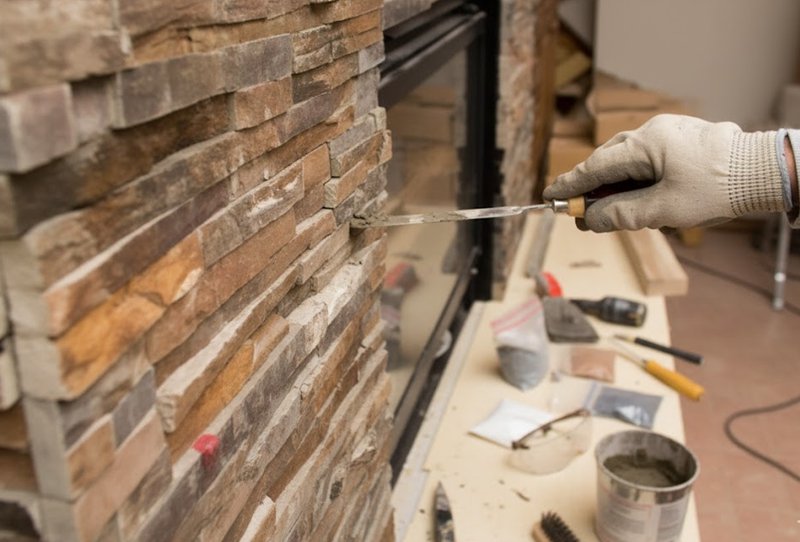
Step 1: Clean and Assess the Damaged Area
Use a stiff-bristled brush to remove dust, dirt, and loose stone fragments from the area. This reveals the full extent of the damage and prepares a suitable bonding surface. Determine whether the issue is a surface chip, a deeper crack, or partial detachment from the substrate.
Remove any residual adhesive or mortar with a putty knife, creating an even surface for repair. Addressing these remnants strengthens the new bond. During this inspection, check for moisture or signs of structural movement that could have caused the issue and correct them as needed.
Step 2: Mix and Apply the Repair Material
Choose a polymer-modified thinset mortar for structural repairs or stone-grade epoxy for smaller chips and cracks. Add pigments or mineral-based stains as needed for color matching, and test the shade on a sample or concealed location as color may shift during curing.
Apply the mortar or epoxy with a small trowel or palette knife, ensuring it fills the entire damaged area and eliminating air pockets. To match the surrounding texture, stipple the surface with a stiff-bristled brush or lightly drag a trowel across the repair. Complete this step before the material sets, as most mortars and epoxies harden quickly.
Step 3: Secure, Blend, and Finish the Repair
If an entire stone has been replaced, secure it with painter’s tape or ratchet straps until the adhesive cures. Most thinsets and adhesives require one to two days to achieve full strength; avoid disturbing the repair during this period and follow manufacturer recommendations.
Once cured enough for light handling, remove excess mortar with a damp sponge. To address minor color mismatches, use a diluted mineral stain applied with a small brush, feathering the edges for a natural transition. Periodically step back to evaluate the match from various angles and distances.
Bring Authentic Stone to Every Project
Enhance your portfolio with premium pannelli di pietra del libro mastro crafted for exceptional beauty, lasting durability, and seamless installation. Each panel features genuine natural stone—no two are alike—delivering timeless texture and outstanding versatility for interiors and exteriors. Enjoy efficient installs, consistent quality, and custom options designed for distributors, contractors, and designers. Add lasting value to your builds with factory-direct solutions and unmatched support.

Selecting the Right Repair Material for Stacked Stone
The appropriate repair material depends on the type of damage and the performance required. Each option provides specific benefits for restoring rivestimento in pietra visually and structurally.
| Material | Best Use | Strength | Application Tips | Maintenance |
|---|---|---|---|---|
| Stone epoxy | Small chips & cracks | Very strong | Color-match for seamless blend | Inspect for yellowing periodically |
| Repair mortar | Larger chips or edge rebuilds | High, durable | Recreate stone texture with brush | Routine cleaning |
| Polymer thinset | Replacing loose stones/panels | Strong, flexible | Use as adhesive behind entire stone | Check bond annually |
Stone epoxy is suitable for repairing hairline cracks and minor chips, as it cures quickly and can be tinted for a near-perfect match. For more extensive damage that requires rebuilding edges or corners, repair mortar allows enough working time for shaping and texturing. When reattaching loose stones or panels, polymer thinset offers a strong, flexible bond that tolerates slight movement.
Achieving an invisible repair relies on duplicating the original texture as well as color. Employ a stiff-bristled brush and a small trowel to closely replicate the adjacent stone’s finish before the mortar hardens.
Expert Tips and How to Avoid Common Mistakes
Even experienced installers can encounter challenges with stacked stone veneer repairs due to improper texture matching or impatience during curing. The tips below address frequent mistakes and provide guidance for achieving seamless repairs.
| Common Mistake | How to Avoid or Fix |
|---|---|
| Poor color match | Blend pigment into mortar or epoxy beforehand and test on scrap stone. Adjust while wet to avoid noticeable mismatches. |
| Over-smoothing the repair | Use a stiff-bristled brush to replicate the original texture before the mortar or epoxy sets. Smooth patches contrast with Pietra naturale surfaces. |
| Rushing the cure | Allow adhesives and epoxy the full specified curing period—typically one to two days. Handling repairs too soon can weaken bonds. |
| Leaving debris behind | Clean thoroughly with a wire brush or putty knife. Any dust or old adhesive can undermine the new bond and result in failure. |
Prioritizing texture replication with trowels and brushes ensures patches blend with the surrounding stonework. Carefully shaping and finishing the repair material when fresh leads to discreet, lasting repairs.
Maintaining and Protecting Stacked Stone After Repair
Establishing regular maintenance routines extends the durability of stacked stone installations. Inspect stonework regularly for cracks, loose components, or signs of water intrusion. Clean surfaces with a soft-bristled brush and light water to minimize buildup without causing damage.
Apply a breathable stone sealant after completing repairs. Reapply as recommended to provide moisture protection while allowing the stone to vent naturally. This is especially important for exterior projects subjected to the elements. Promptly address any new cracks or loose veneer to prevent water infiltration and escalation of damage.
Ensure that landscaping and drainage systems direct water away from stone walls. Limiting moisture exposure helps prevent adhesive failure and substrate issues, further safeguarding both new and existing repairs.
Domande frequenti
Can I buy a stone repair kit off the shelf?
Yes, composite repair kits containing epoxy and color-matching pigments are available at hardware stores. These are suitable for small chips and cracks, but for larger repairs or securing loose stones, use polymer-modified thinset mortar or professional-grade adhesives for optimal results.
How do I perfectly match the color of my stone veneer?
Test mineral-based stains or pigments on scrap or concealed stone first to ensure a close match. Focus on reproducing both texture and color. Texture replication using a brush or trowel is often as important as color blending for a seamless result.
What’s the best adhesive or compound for fixing chipped stacked stone?
Stone epoxy is ideal for small chips and cracks due to its strong, weather-resistant bond. For reattaching loose pieces, use polymer-modified thinset mortar for flexibility and secure adhesion. Construction adhesives may suffice for minor fixes but lack the durability required for demanding applications.
If a single stone in the panel is cracked, can I replace just that piece?
Yes. Remove the damaged stone with care, thoroughly clean the cavity, and cut a replacement to fit. Apply thinset mortar to both the back of the new stone and the wall, press it into place, and support it with painter’s tape while the adhesive cures.
My panel is loose—can I reset it or does it need replacing?
Loose stones can often be reset rather than fully replaced if they are undamaged. Remove all old adhesive, apply new thinset or a suitable adhesive, and secure with temporary supports until fully cured. Inspect the substrate for underlying issues before reinstalling.
Final Thoughts
Professionally repairing chipped or cracked stacked stone veneer involves thorough preparation, precise matching of texture and color, and allowing adhesives to cure fully. These steps help ensure repairs blend with the original installation and maintain durability over time.
Ongoing maintenance—such as sealing and prompt attention to small defects—prevents larger problems and extends the life of your stonework. Mastering these repair methods allows confident restoration of more prominent architectural features, safeguarding both appearance and value.
