Stacked stone veneer corners are where two wall faces meet at a right angle, using either premade corner pieces or precision-cut miters. Professionally executed corners provide a seamless, tightly-fitted look that enhances visual appeal and structural reliability for every project. This article details proven installation techniques and troubleshooting guidance for flawless stone veneer corners, from substrate preparation to advanced mitering and best-practice maintenance.
Tools and Materials for Stone Veneer Corners
Before starting, assemble all necessary materials and tools for a precise corner installation. Proper preparation prevents delays and ensures professional, consistent results—even on complex projects.
| Tool / Material | Purpose / Specfications |
|---|---|
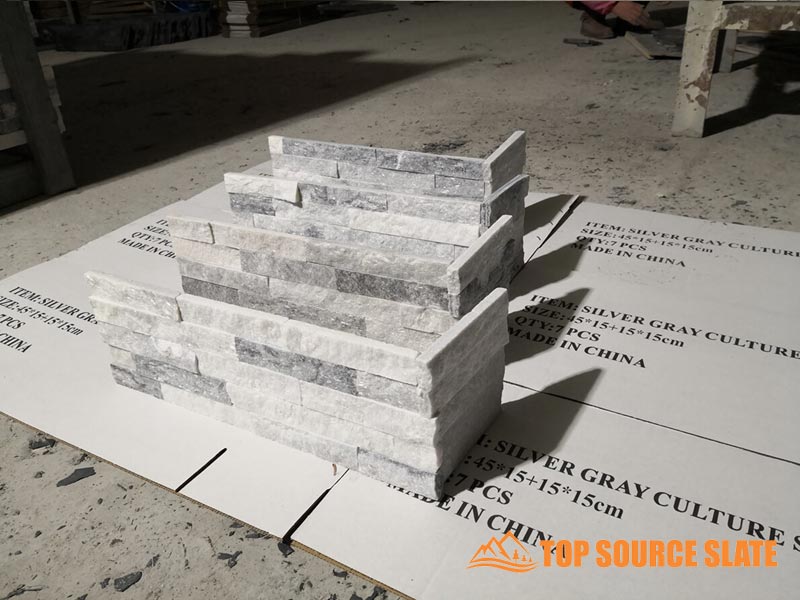
| Ledger stone panels | Flat panels and dedicated corner pieces for interlocking ends |
| Adhesive/thinset mortar | Polymer-modified formula for superior bonding on vertical surfaces |
| Notched trowel | Spreads adhesive evenly and prevents voids behind panels |
| Wet saw with diamond blade | Makes clean straight cuts and precise miter angles for tight corners |
| Chalk line & level | Keeps horizontal courses straight and prevents corner drift |
| Measuring tape | Ensures accurate panel lengths and corner overlap measurements |
| Rubber mallet | Taps panels into place without chipping edges or cracking stone |
| Safety goggles & gloves | Protects eyes from flying chips and hands during cutting and handling |
| Masonry brush/wire brush | Preps concrete or brick surfaces by creating texture for better adhesion |
| Grout spacers/shims | Maintains consistent joint spacing where corner panels meet |
Each tool has a defined function to secure accurate alignment and tight seams. Forgoing key items exposes installations to visible gaps and uneven lines—details that diminish overall quality.
How to Install Pre-Made Stone Corner Pieces
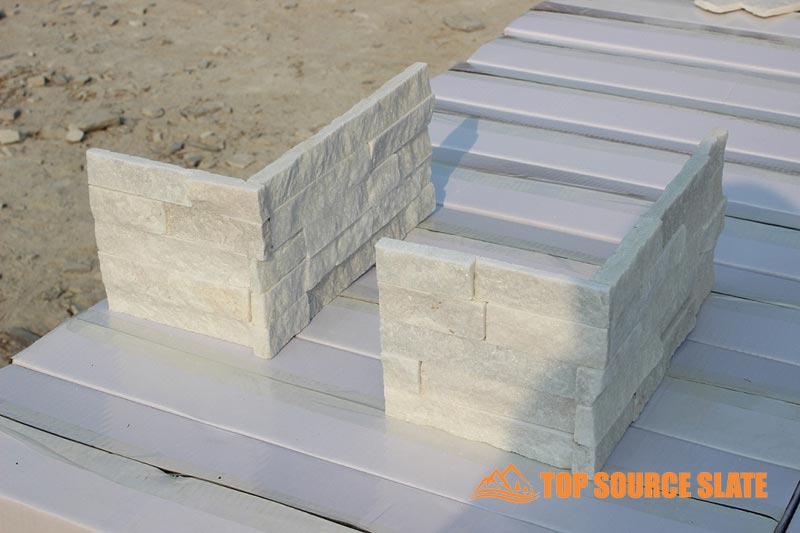
Pre-made corner panels are designed with alternating long and short returns to interlock at corners, replicating traditional stonework. Their molded form accelerates installation and creates consistent, seamless transitions when used with proper installation methods.
Step 1: Prepare Surfaces and Dry Layout
Clean the substrate thoroughly, removing dust, grease, and loose debris. When installing over drywall, reinforce the area with cement board, as drywall alone cannot bear the weight of stone veneer panels.
Lay out corner pieces on the floor before mixing mortar. Alternate long and short returns in each course to stagger joints and mimic traditional masonry’s balanced appearance. This step also exposes alignment issues before adhesive is applied.
Mark a plumb chalk line at the corner, extending floor to ceiling. Use a four-foot level to confirm vertical alignment at several points. This reference ensures stacked courses remain true, avoiding cumulative errors as you build upward.
Step 2: Set Corner Stones in Place
Apply polymer-modified thinset to both the wall substrate and the back of each corner panel. Spread a uniform layer with the trowel’s flat side, then comb with the notched edge to increase contact area. This back-buttering method prevents voids and maximizes bond strength.
Align each panel edge with the plumb line, using spacers to maintain a typical 3/8-inch joint. Tap panels gently with a rubber mallet to ensure full seating in the mortar before it sets. Confirm courses remain level and plumb at each step.
For alternating courses, rotate each corner unit 180 degrees. Staggering the long and short returns distributes seams and any minor color or texture changes, creating a cohesive look without repetitive vertical lines.

How to Miter Stacked Stone for Seamless Corners
Mitering involves cutting panels at precise angles so they meet flush, eliminating overlap and minimizing visible seams. This technique produces a continuous, high-end corner appearance—especially on stone profiles with straight edges and uniform thickness.
A wet saw with a diamond blade and a reliable angle finder are essential. When done correctly, mitered corners deliver durable, grout-free joints for lasting visual uniformity.
Step 3: Measure and Cut Precise Miters
Measure both wall faces at the intended corner. Many existing corners are not exactly 90°, so confirm the true angle with an angle finder. Mark cut lines on the back of panels to account for the full thickness.
Set the wet saw to the required angle. Guide each panel through the blade slowly to maintain the stone’s natural face and avoid chips. Test fit panels after each cut, refining contact surfaces with a sanding block or stone rub until the mitered edges fit tightly together.
Step 4: Install and Finish Mitered Edges
Apply adhesive evenly to both the back of mitered panels and the wall. Position the first panel, then join the second so beveled surfaces meet cleanly. Maintain steady pressure while the adhesive sets; if needed, use painter’s tape to hold the joint in place until cured. Fill any micro-gaps with color-matched stone dust and adhesive for a truly continuous look.
Ready to Elevate Your Stone Veneer Installations?
Stop settling for amateur-looking corners and visible seams. Our premium Ledgersteenpanelen are designed for installers who demand professional results. Each panel features interlocking edges that create seamless transitions around corners—no special trim pieces needed. Whether you’re tackling interior accent walls or exterior facades, you’ll appreciate the consistent thickness and natural color variations that make installations faster and cleaner. Get access to wholesale pricing and expert installation support that helps you bid jobs with confidence.

Surface Preparation for Reliable Bonding
Thorough surface preparation is essential to ensure long-term adhesion. Scrub masonry or block walls with a wire brush to remove debris and generate adequate texture for bonding. This roughens the surface, improving mortar grip.
On drywall substrates, install cement board as stone veneer is too heavy for drywall alone and increases risk of corner cracking. Cement board distributes the load evenly and provides moisture resistance.
For exterior or high-humidity projects, use a moisture barrier and apply a scratch coat to address minor irregularities and create even suction. Allow the scratch coat to cure fully—generally 24 hours—before installing stone. Cutting corners at this stage compromises adhesion at critical points, especially at exposed corners.
Installation Problems and Practical Solutions for Corners
Professional results depend on avoiding common corner mistakes. The following issues can undermine both appearance and function—each has a practical correction standard among experienced installers.
| Common Mistake | How to Avoid/Fix |
|---|---|
| Visible seams or joints at corners | Rotate corner pieces 180 degrees on alternating courses to interlock and stagger joints. Offset vertical seams by several inches for a cohesive, woven appearance without repetitive lines. |
| Incorrect adhesive type or poor coverage | Use only polymer-modified thinset, applied evenly to both wall and panel backs, filling all voids for strong, lasting adhesion. |
| Panels misaligned between wall faces | Snap chalk lines on both planes before beginning installation. Use spacers to keep elevations consistent across adjoining walls and achieve crisp, level corners. |
| Cracking from substrate movement | Install cement board on stud-framed walls and always use a scratch coat outdoors. Both improve stability, minimizing cracks due to movement or temperature changes. |
| Chipping stone face during cutting | Feed panels slowly through the wet saw with a sharp blade and steady support. Smooth rough edges with a stone rub for a flawless fit. |
Implementing these solutions requires minimal extra time but prevents costly rework. Corner quality directly impacts both the aesthetics and durability of the finished wall.
Corner Pieces vs. Miters: Selecting the Right Approach
Corner pieces simplify installation, providing consistent fit and minimal cutting—an efficient solution for large projects or irregular stone profiles. Their design blends well with heavily textured stone and reduces the need for specialized tools. In contrast, mitered joints deliver a seamless, modern aesthetic for straight-edged profiles but require greater precision, a quality wet saw, and advanced skill. The decision hinges on the stone’s shape, wall conditions, desired finish, and available tools.
For stacked ledgestone or rugged stones, corner pieces save hours while achieving a natural transition. Mitering thin-cut, smooth stone produces a continuous corner line suitable for contemporary designs. Accurate wall geometry is required for miters; deviations from square risk visible gaps. Choose an approach that matches your project’s requirements and your level of experience—misaligned miters waste material and time, while well-executed corner pieces ensure reliable, rapid completion.
Always evaluate both wall angles and available cutting equipment before selecting an installation method. This ensures consistent quality and reduces avoidable installation errors.
Veelgestelde vragen
Do I need special corner pieces, or can I use only flat panels?
Flat panels can be used if you are prepared to make precise miter cuts and ensure careful alignment at each corner. However, dedicated corner pieces simplify installation and provide a more professional finish. These pieces feature interlocking sides that wrap naturally around corners, concealing seams and speeding up workflow.
What’s the best way to cut an angled miter into stone veneer?
Use a wet saw with a diamond blade for precise, clean angled cuts. Mark each cut line clearly and guide the panel steadily through the blade to avoid chipping. Smooth the cut surface with a stone rub to achieve a tight, seamless junction at the corner.
How do I make sure there aren’t visible gaps at my corners?
Maintain consistent joint spacing with spacers or shims, and apply polymer-modified thinset to both substrates before pressing panels into place. Tap gently with a rubber mallet and check the work with a level after every few rows to correct alignment before errors become noticeable.
Should I use extra adhesive when working at corners?
Apply an even, thorough layer of thinset for maximum coverage but avoid excess. Overusing adhesive can misalign panels and cause uneven surfaces. Focus on full coverage to eliminate air pockets and strengthen the final bond.
What if my wall corner is not a perfect right angle—how should I adjust?
Measure the actual wall angle with an angle finder and adjust your miter cuts for a precise, gap-free joint. For corner pieces, custom-cut as needed to fit irregular angles and test fit before applying adhesive. This approach delivers a balanced, professional appearance on walls that are not perfectly square.
Maintenance and Longevity for Stone Veneer Corners
Long-term durability and clean appearance depend on proper maintenance. After installation, use a high-quality stone sealer on all joints and exposed surfaces. Select a breathable sealer formulated for natural or manufactured stone to protect against moisture infiltration.
For cleaning, use a soft-bristled brush and a pH-neutral stone cleaner. Avoid harsh chemicals or acidic solutions, which can damage both stone and joints. Refrain from power washing—high-pressure water risks dislodging grout and weakening adhesion. For persistent stains, gentle scrubbing and a thorough rinse with a garden hose are usually sufficient.
Conduct annual inspections, particularly after extreme weather. Examine corners for loose panels, cracked mortar, or water penetration—signs that indicate the need for resealing or immediate repair. Timely intervention ensures integrity and extends service life, reducing the likelihood of expensive repairs later.
Final Thoughts
Achieving flawless stacked stone corners requires careful planning, precise tools, and attention to detail in every step—from initial layout to final maintenance. Whether using pre-formed corner pieces for efficiency or hand-mitering for a tailored finish, implementing these best practices ensures seamless transitions and reliable performance on every project.
With these techniques, installation challenges become manageable, and your workmanship stands out. The expertise gained here applies well to advanced features, including arches, accent walls, and exterior façades, enabling you to deliver superior results with confidence in future stonework projects.
