Mastering how to cut stacked stone is the primary defense against shattering expensive quartzite panels and eroding project margins. Using incorrect blade speeds or dry-cutting methods leads to delamination and jagged edges, which forces costly material replacements and delays installation timelines.
Our manufacturing protocols utilize CNC diamond-blade precision to ensure Z-shape panels maintain a tight male-female interlock. This analysis benchmarks techniques for handling stone thicknesses up to 3.5cm and provides data on maintaining same-batch quarry consistency during high-volume resizing.
Wet Saw vs. Angle Grinder: Which Is the Best Tool to Cut Stacked Stone?
The wet saw handles 95% of straight panel cuts and dust control. Use the angle grinder for the final 5%—specifically electrical outlets, plumbing notches, and interlocking adjustments.
| Feature | Wet Saw | Angle Grinder |
|---|---|---|
| Best For | Straight lines & high-volume cutting | Outlets, curves & detail trimming |
| Dust Control | High (Water-suppressed) | Low (Heavy silica dust) |
| Edge Finish | Clean, factory-grade precision | Rougher; may need manual finishing |
| Setup | Stationary workshop/cutting station | Portable, handheld maneuverability |
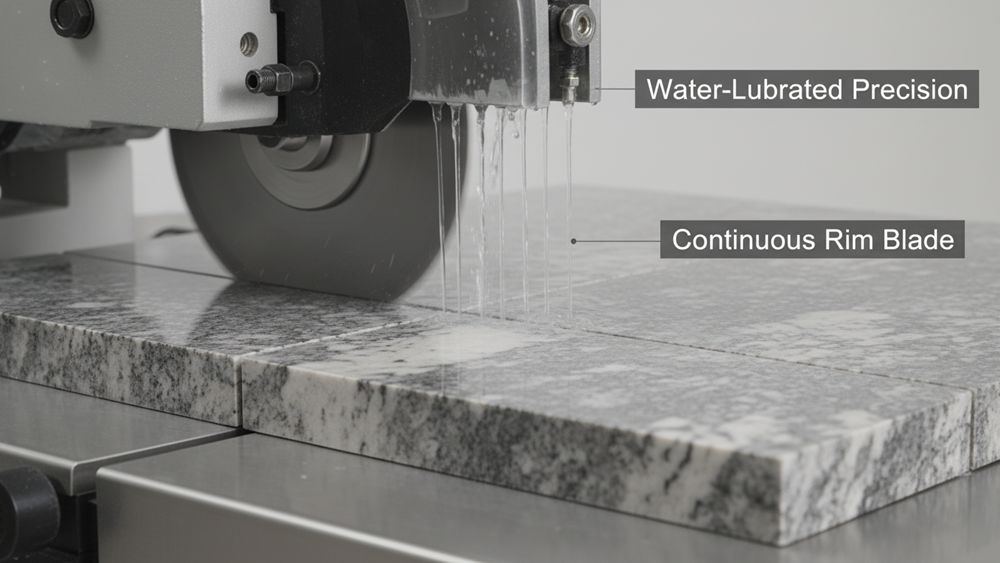
The Wet Saw: Essential for Straight Cuts and Dust Management
Professional installers rely on the wet saw as the workhorse for 6×24 inch panels. The constant water flow acts as both a coolant and a dust suppressant, which is critical when processing high volumes of natural slate or quartzite. Without water lubrication, the heat friction generated by the diamond blade quickly dulls the edge and risks cracking the stone panel before the cut completes.
Stability is the secondary benefit. Because natural stablet stein features a split-face or natural cleft surface, the material is inherently uneven. A wet saw equipped with a sliding tray ensures the stone remains stable during the pass, preventing the “stair-step” chipping common with handheld tools.
- Blade Type: Continuous rim diamond blades provide the cleanest edges on dense quartzite and slate.
- Safety: Wet-cutting captures silica dust at the source, significantly reducing respiratory hazards.
- Precision: Sliding tables allow for repeatable accuracy, which is vital for maintaining the linear alignment of the wall.
- Blade Longevity: Water cooling prevents the diamond bond from glazing, extending tool life across large-scale projects.
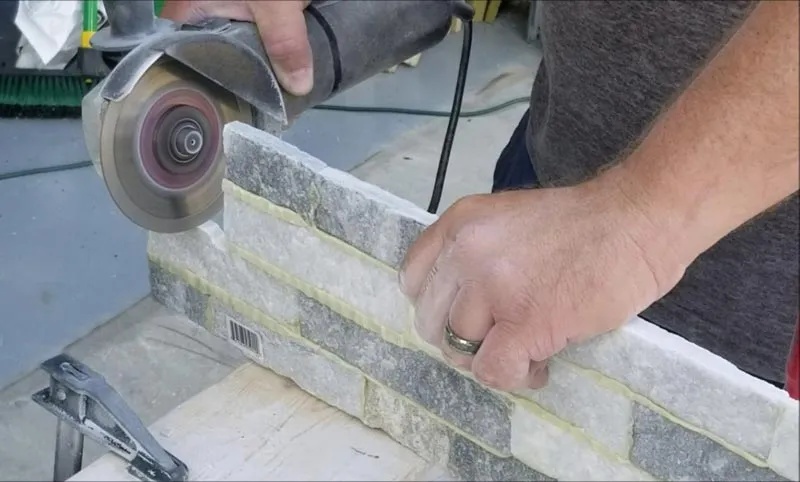
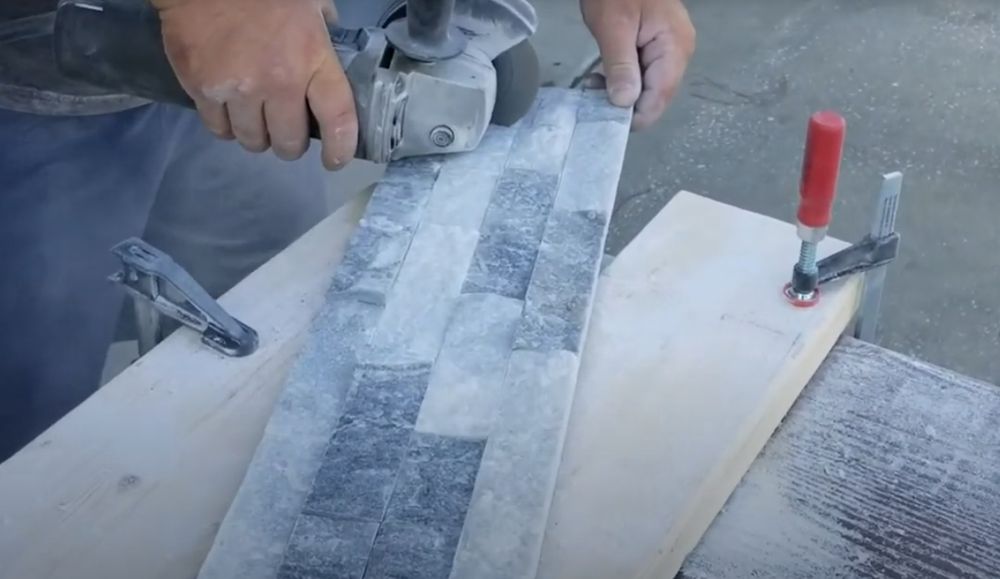
The Angle Grinder: Detailing for CNC-Precision Interlocking Systems
While the wet saw handles the bulk of the work, the angle grinder is indispensable for the details that a fixed blade cannot reach. In modern interlocking systems like Top Source Stone’s Z-shape or S-shape panels, installers use grinders to make micro-adjustments to the “male-female” connection. This ensures the modular pieces fit tightly, camouflaging vertical joints for a seamless architectural finish.
The grinder excels at interior cut-outs. If a project requires an opening for a GFI outlet or a circular notch for a plumbing pipe, the handheld grinder allows the installer to plunge into the center of the panel. For the best visual results, mark the back of the stone and cut from the rear to prevent overshooting the lines on the visible face.
- Specialty Cuts: Necessary for rectangular openings for electrical switches and circular notches for fixtures.
- Interlock Trimming: Quickly trims the edges of Z-shape panels to fit tight wall-to-ceiling transitions.
- Manual Refinement: Allows installers to shave small amounts of stone for perfect alignment on L-corner transitions.
- Environmental Note: Dry-grinding creates massive dust clouds; always operate outdoors with a P100 respirator and full eye protection.
Selecting Diamond Blades for Natural Quartzite and Slate
Quartzite requires high diamond concentration and hard bonds. Professionals use segmented or turbo rims to maintain edge integrity and ensure tight, seamless fits on dense natural stone panels.
Quartzite ranks as one of the hardest minerals used in architecture, demanding cutting tools that go beyond standard masonry blades. Because natural quartzite is exceptionally dense, the blade must actively manage heat and friction to prevent the stone from shattering or the tool from glazing over. Professionals focus on technical specifications that balance cutting speed with the structural preservation of the stone.
Diamond Concentration and Bond Requirements for Dense Quartzite
The relationship between the diamond grit and the metal bond determines the efficiency of every cut. For 100% natural quartzite, the technical requirements are non-negotiable:
- High Diamond Concentration: Essential for maintaining cutting torque through 100% natural quartzite without stalling.
- Bond Hardness: Use a specific hard bond designed to reveal new diamond layers at a controlled rate, extending tool life while cutting high-density minerals.
- Rim Configuration: Segmented rims provide aggressive cooling for deep cuts, while turbo rims offer a balance for smoother edges on visible transitions.
- Feed Pressure: A slow, controlled feed rate prevents blade deflection and ensures clean results for complex miter cuts.
CNC Precision Cutting for Seamless Z-Shape Panel Alignment
At Toppkildestein, we prioritize edge quality to support our interlocking design systems. The precision of the diamond blade directly impacts the speed and appearance of the final installation on-site.
- Interlocking Integrity: CNC-grade diamond blades ensure the “male-female” connection on Z-shape and S-shape panels fits tightly, camouflaging vertical joints.
- Visual Uniformity: Clean edges preserve the 95% hue uniformity of the batch, as jagged cuts create shadows that disrupt the stone’s natural flow.
- Delamination Prevention: High-spec diamond blades prevent 100% natural slate from splitting or flaking during resizing, protecting the split-face texture.
- Corner Synchronization: Precise cutting allows pre-fabricated L-corners to align flush with flat panels, meeting high-end 2026 architectural standards.
Using these specialized tools ensures that the raw material is not wasted and the installation maintains the premium aesthetic expected from direct quarry sources.
Premium Factory-Direct Stacked Stone Ledger Panels

Measuring and Marking: The “Measure Twice, Cut Once” Rule
Precise marking accounts for blade kerf and dimensions before cutting. Using painter’s tape and diagonal checks ensures square layouts and perfect interlocking joint alignment.
Layout Verification and Marking Techniques for Natural Stone
Layout accuracy dictates the final architectural finish. Even minor deviations amplify over large wall surfaces, leading to visible gaps or misaligned stone veins that frustrate installers and clients alike.
- Surface Protection: Apply painter’s tape to the stone surface. It provides a clear, high-contrast marking area and prevents permanent stains from graphite pencils or felt-tip markers.
- Squareness Verification: Perform diagonal measurements across both the wall substrate and the stone panels. Since natural stone varies, these checks confirm if the installation area is truly square before the first drop of adhesive hits the wall.
- Blade Kerf Allowance: Factor in a 1/8-inch to 3/16-inch allowance for the blade kerf. Accounting for the thickness of the diamond blade ensures the final pieces meet the intended dimensions exactly.
- Complex Cut-outs: Sketch intricate shapes or outlet positions directly onto the stone. Use chalk snap lines for long, linear runs to maintain precision over extended distances.
Precise Measurement for Interlocking Panels and L-Corners
Our modular systems, including Z-shape and S-shape panels, require a specific measurement strategy to camouflage joints and maintain structural integrity at the corners.
- Connection Planning: Calculate the starting point based on the male-female interlocking system. Proper planning prevents ending a wall with small, fragile stone slivers that compromise the aesthetic.
- Corner Transitioning: Measure transition points for matching L-corners. This ensures texture and color synchronization at 90-degree turns, providing a professional wrap-around look.
- CNC Precision: We utilize CNC diamond-blade edges on our 6-inch x 24-inch panels. Measurements must remain precise to ensure these interlocking pieces fit tightly without visible vertical joints.
- Batch Uniformity: Verify that all measurements and panel selections align with our Same-Batch Quarry Consistency standards. This maintains 95% hue uniformity across the entire installation surface.
How Do You Make Precision Cut-outs for Outlets and Switches?
Contractors achieve precision by marking both sides and performing back-face plunge cuts. Since natural stone varies up to 3.5cm, box extenders ensure switches sit flush for professional finishes.
Cutting into natural stone for electrical fixtures requires more control than standard straight cuts. Most installers rely on a hand-held angle grinder equipped with a diamond blade. This tool provides the maneuverability needed for tight, rectangular paths that a standard wet saw cannot reach without overcutting the corners.
Plunge Cutting and Back-Face Marking Techniques
Precision starts with the layout. Because natural stone has an irregular surface, marking only the front often leads to sloppy edges. We recommend a dual-marking approach to ensure the blade exits exactly where intended.
- Dual Marking: Mark cut lines on the front and back of the stone to prevent the blade from overshooting the corners.
- Back-Face Cutting: Perform plunge cuts from the back of the panel to keep the visible front surface clean and free of tool marks.
- Panel Termination: Terminate the stone panel flush against one side of the outlet box when possible to reduce the number of cuts required.
- Tool Choice: Use a hand-held angle grinder with a continuous rim diamond blade for maximum control on small, intricate cut-outs.
Managing Stone Thickness with Box Extenders
Natural stacked stone thickness fluctuates based on the specific material and quarry layer. At Top Source Stone, our panels range from 1cm to 3.5cm in depth. This heavy profile creates a gap between the electrical box and the stone face that standard switch screws cannot bridge safely.
- Box Extenders: Install 1/2-inch outlet box extenders to compensate for panel thicknesses reaching up to 3.5cm.
- Screw Length: Use long-screw mounting systems to secure switches firmly against the natural split-face texture.
- Edge Precision: We apply CNC diamond-blade edges to our panels, ensuring the stone sits tightly against the outlet flange for a gap-free fit.
- Cover Plate Integration: Complete the installation with stone or metal cover plates that camouflage the underlying wall substrate and match the architectural aesthetic.
Successful electrical integration relies on the “measure twice” rule. By using box extenders and back-side cutting, dealers and contractors ensure that the natural stone texture does not compromise the safety or functionality of the home’s electrical system.
How to Cut 45-Degree Mitered Corners On-Site? (A technical guide to seamless transitions)
Mark 45-degree lines with a square and use a dust-controlled masonry saw for custom cuts. Pre-fabricated L-corners remain the standard for batch consistency and reduced on-site labor.
Custom on-site adjustments are often necessary for non-standard wall angles or unique architectural features. Achieving a professional finish requires moving beyond basic tools to precision masonry equipment that can handle the density of natural slate and quartzite.
Precision Marking and Cutting Techniques for Custom Miters
Success in stone cutting depends on the quality of the layout and measurement phase. Small errors at the marking stage result in visible gaps that compromise the “Seamless Technology” look of the installation.
- Reference Lines: Align a carpenter’s square or combination square with the panel corner to mark a perfect 45-degree reference line. Use painter’s tape on the stone surface to make the marks more visible and protect the face from vibration.
- Tool Selection: Use a wet saw or a handheld masonry saw equipped with a continuous rim diamond blade. This is essential for 100% natural stone like quartzite, which ranks high on the Mohs scale and can easily chip if cut dry.
- Feed Rate Control: Maintain a steady, slow feed rate during the cut. Forcing the blade through dense stone causes heat buildup and edge chipping, preventing the two mitered faces from meeting flush.
Reducing Labor with Project-Ready L-Corners and CNC Precision
For standard 90-degree transitions, manual on-site cutting is rarely the most cost-effective choice for B2B projects. Pre-fabricated solutions significantly lower labor costs while improving the visual quality of the corner wrap.
- Pre-fabricated Solutions: Top Source Stone supplies matching L-shaped corners for every model in our “Big 10” inventory. These pieces eliminate the need for complex on-site miter sawing and specialized dust management setups.
- CNC Precision: We use CNC diamond-blade edges to ensure every pre-fabricated corner piece provides a seamless architectural finish. This precision allows the “male-female” interlocking system to hide the substrate and vertical joints.
- Color Synchronization: Utilizing pre-cut corners maintains Same-Batch Quarry Consistency. We source corner pieces and flat panels from the same quarry vein per order, preventing the patchy color shifts seen when manually piecing together stones from different crates.
For dealers and wholesalers, providing these “Project-Ready” solutions reduces installer frustration and guarantees a professional finish that reflects the quality of 100% natural stone.
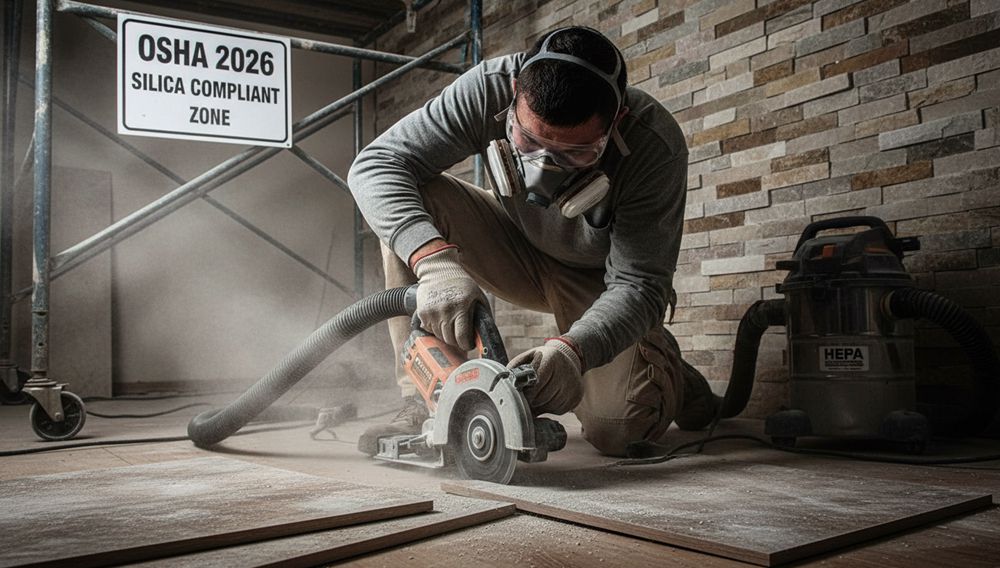
Safety First: Dust Management and Eye Protection
Modern safety focuses on wet-cutting and HEPA-filtered extraction to mitigate silica dust. Combine these engineering controls with N95 respirators and impact-resistant eyewear to prevent lung damage and injury.
Mitigating Respirable Crystalline Silica Risks
Cutting 100% natural slate and quartzite creates microscopic particulates known as respirable crystalline silica. These particles are dangerous because they are small enough to bypass the body’s upper respiratory defenses and settle deep within lung tissue, causing irreversible scarring or silicosis.
Adhering to 2026 workplace safety standards requires strict management of the air quality on-site. OSHA mandates an exposure limit of 25 μg/m³ over an 8-hour shift. Since the most hazardous dust is often invisible to the naked eye, relying on visual cues to determine safety is a mistake that leads to long-term health liabilities.
- Material Hazard: Natural quartzite and slate contain high concentrations of silica minerals.
- Regulatory Threshold: OSHA PEL (Permissible Exposure Limit) is 25 micrograms per cubic meter of air.
- Secondary Exposure: Dust settles on clothes and equipment, risking personnel not involved in the actual cutting.
Establishing regulated work areas prevents dust migration. By cordoning off cutting zones, contractors protect the broader job site from fine particulates that linger in the air long after the saws stop running.
Advanced Engineering Controls and PPE Standards
Engineering controls are the first line of defense. Wet-cutting techniques utilize water to trap silica dust before it becomes airborne. When processing Top Source Stone products, using CNC diamond-blades with continuous water lubrication ensures clean cuts while keeping the workspace compliant with environmental standards.
For dry-cutting scenarios where water is not feasible, high-efficiency extraction is mandatory. Multi-stage filtration systems capture particulates based on size, preventing the recirculation of fine dust into the breathing zone.
- Wet-Cutting: Diamond-blade saws with integrated water feeds to suppress 99% of dust.
- HEPA Extraction: MERV 13-rated vacuums or higher for dry-shaping and detailed trim work.
- Respiratory PPE: N95 or P100 respirators are necessary even when engineering controls are active.
- Eye Protection: Impact-resistant safety glasses (ANSI Z87+) protect against stone shards during split-face processing.
PPE serves as the final layer of protection. While extraction systems handle the bulk of the waste, respirators filter the remaining breathable air. Installers must also prioritize impact-resistant eyewear, as the natural cleft surface of stacked stone can produce sharp stone chips during precision adjustments or miter cutting.
How to Finish a Cut Edge: Should You Chisel or Grind for a Natural Look?
Chiseling restores a rugged, authentic profile for rustic designs, while grinding provides the precision needed for tight, seamless joints in modern architectural projects.
Manual Chiseling for Authentic Natural Cleft Textures
Machine saws leave straight, sterile lines that scream “manufactured.” You can fix this by lightly chipping away the cut edges with a hammer and chisel. This simple technique restores the stone’s organic character and hides the fact that a power tool ever touched the material.
- Grain Exposure: Works effectively on 100% natural slate and quartzite to reveal the internal grain without needing paint or sealants.
- Visual Camouflage: Eliminates the “stepped” appearance of vertical joints to mimic a traditional hand-stacked wall.
- Texture Matching: Creates an intentionally irregular profile that blends with the natural cleft surface of the rest of the installation.
Precision Grinding for Seamless Architectural Joints
High-precision refinement is mandatory for modern projects. Use hand grinders equipped with diamond-blade edges to handle detailed cuts around electrical outlets and 90-degree transitions. This ensures the modular pieces fit with factory-level accuracy.
- Interlocking Integrity: Ensures Z-shape and S-shape panels maintain their male-female connection for a gap-free finish.
- CNC Alignment: Supports the seamless technology in Top Source Stone panels by maintaining consistent panel thickness at the joints.
- Detail Accuracy: Provides the control needed for complex miter work where a chisel might be too aggressive or unpredictable.
Choose chiseling when you need a raw, hand-crafted aesthetic. Stick to grinding when the design requires clean geometry and the perfect modular fit of a professional architectural wall.
Strategies for Managing Stone Waste and Pallet Optimization
Minimize stone waste via CAD-optimized cutting and repurposing scrap. Maximize shipping efficiency by matching 48 or 60-box crates to strict 17.5-ton or 26.5-ton port weight limits.
Material Recovery and On-Site Waste Reduction
Natural stone fabrication historically sees 6% to 69% of raw material exit the plant as waste. Cutting these losses requires moving beyond manual layouts and adopting a hierarchical recovery approach that keeps material out of landfills while protecting project margins.
- Repurposing Off-cuts: Divert small natural stone scraps for use as mosaic infills or crushed landscape aggregate.
- CAD-Optimized Yields: Use computer-aided cutting patterns to maximize the output of 6×24 inch panels and reduce fabrication loss.
- Water Reclamation: Implement closed-loop systems to recycle 100% of production water and manage stone sludge generated during high-volume CNC cutting.
Precision matters at the source. At Top Source Stone, our CNC diamond-blade edges ensure every Z-shape and S-shape panel fits with modular accuracy. This reduces the need for aggressive on-site trimming, which is where most installation waste occurs.

Pallet Capacity Options and Port-Specific Weight Standards
Shipping natural stone is a weight-dominant logistics challenge. Effective container optimization prevents destination port penalties and ensures the structural integrity of the shipment during international transit. Dealers must select pallet configurations based on regional infrastructure limits.
- Option A (Standard): 48-box crates totaling approximately 30.24 m² (Standard) or 21.60 m² (Rough panels).
- Option B (High Capacity): 60-box crates totaling approximately 37.80 m² (Standard) or 27.00 m² (Rough panels).
- USA Port Standards: Adhere to the strict 17.5-ton limit for standard US ports to avoid overweight citations and transloading fees.
- Heavy-Weight Allowance: Utilize 24 to 26.5-ton limits only where destination ports and local trucking permits explicitly approve heavy-weight containers.
- Structural Packaging: Use 110cm x 110cm fumigation-free plywood or solid wood crates to meet international ISPM-15 standards.
We load 25 to 30 pallets per 20GP container depending on these weight targets. For B2B buyers, choosing the right pallet option at the time of order protects cash flow and prevents unexpected logistics surcharges at the point of delivery.
ofte stilte spørsmål
Which tool works best for bulk cutting natural stacked stone?
Professional installers prioritize wet masonry saws for high-volume cutting. The water-cooled diamond blade minimizes friction and eliminates hazardous silica dust. For detailed trimming or cuts around obstacles, an angle grinder provides better maneuverability and control.
Can I use a standard wet tile saw for stone veneer panels?
A standard wet tile saw handles natural stone veneer up to 3 centimeters thick effectively. Since materials like quartzite and slate are significantly harder than ceramic, use a high-quality diamond blade and ensure a constant water flow to prevent the stone from cracking during the process.
How do I create precision cut-outs for electrical outlets in stone?
Mark the outlet area 1/4 inch wider than the junction box and score the perimeter using a 4-inch angle grinder with a diamond wheel. After reaching the maximum safe depth with the grinder, use a masonry chisel to remove the center and clean the edges for a flush fit.
Is dry grinding stacked stone safe for indoor projects?
Dry grinding without specialized dust extraction is unsafe due to high concentrations of airborne silica. Always use a dust shroud attached to a HEPA vacuum and a P100 respirator if wet cutting is not an option to ensure job site safety.
What causes natural stone to chip during the cutting process?
Chipping results from a dull blade or forcing the stone through the saw too quickly. Use a dressing stone every 15 to 20 cuts to sharpen the diamond segments and apply steady, light pressure to maintain clean edges on dense quartzite and slate panels.
What blade specification is necessary for cutting hard quartzite?
Quartzite requires a diamond blade with a hard bond and a segment height of approximately 20mm to handle its density. Segmented blade designs are more effective than continuous rims for these hard minerals, providing the aggressive bite needed for a smooth finish.
Final Thoughts
Precision at the source eliminates the labor-heavy rework and high waste typical of inferior stone panels. Our CNC diamond-blade edges and 95% hue consistency safeguard your reputation by ensuring seamless interlocking joints on every project. Investing in quarry-direct quality reduces on-site trimming time and guarantees the architectural finish your professional clients demand.
Verify the density and fitment of our “Big 10” inventory by requesting a sample kit for your showroom. We support your market expansion with 300-square-meter trial orders, allowing you to mix colors while testing our interlocking Z-shape systems firsthand. Contact our logistics team today to review port-specific weight strategies and secure your territory’s inventory.
