
Stacked stone corners challenge even seasoned installers, requiring speed, precision, and lasting visual appeal. This guide delivers proven methods to produce clean, durable results that strengthen your brand reputation. You’ll evaluate pre-fabricated corner units versus miter cuts, follow substrate prep and exact alignment steps, integrate reliable waterproofing, and sidestep costly misalignments—ensuring every corner meets exacting standards for high-impact residential and commercial projects.
The Two Methods: Pre-fabricated Corner Units vs. Mitered Panels
For stacked stone corners in scaled B2B applications, choosing between pre-fabricated units and mitered panels directly affects efficiency, labor costs, and visual outcomes. The table outlines how each method impacts design execution, workforce requirements, overall budgets, and fit for different project profiles.
| Method | Key Considerations for B2B Projects |
|---|---|
| Overview of Pre-fabricated Corner Units: Design, Manufacturing, and Use Cases | Factory-produced L-shaped units align perfectly with face panels, removing on-site angle cutting. Offered in varied sizes and finishes, they guarantee consistent visuals. Installation is fast with minimal cutting, reducing skilled labor needs. Ideal for high-volume commercial projects where consistency and speed safeguard timelines and margins. |
| Mitered Panel Method: Tools, Techniques, and Skill Requirements | Panels are cut on-site at 45°, requiring precision measuring, wet saw operation, and exact alignment. This slow, labor-heavy process increases risk of visible seams and installation errors if skill is lacking. Best for unique or design-led projects where customization takes priority over speed and uniformity. |
| Comparative Analysis: Cost, Labor, and Quality Outcomes | Pre-fabricated units cost more per piece but cut total install costs via reduced labor hours. Mitering lowers material expenditure yet adds waste and labor overhead. Factory output ensures uniform finishes and fewer callbacks; mitered quality depends on installer expertise. Both are durable, though poor mitering can compromise corner integrity over time. |
| Choosing the Right Method: Project Scale, Aesthetic Goals, and B2B Implications | Large, repeatable installations such as multi-unit facades benefit from the speed and consistency of pre-fabricated corners. Mitering is suited to smaller or highly customized profiles. Tight deadlines or limited skilled crews favor factory-made solutions. Decision makers should weigh upfront material cost against labor savings, waste management, training needs, and workflow integration. |
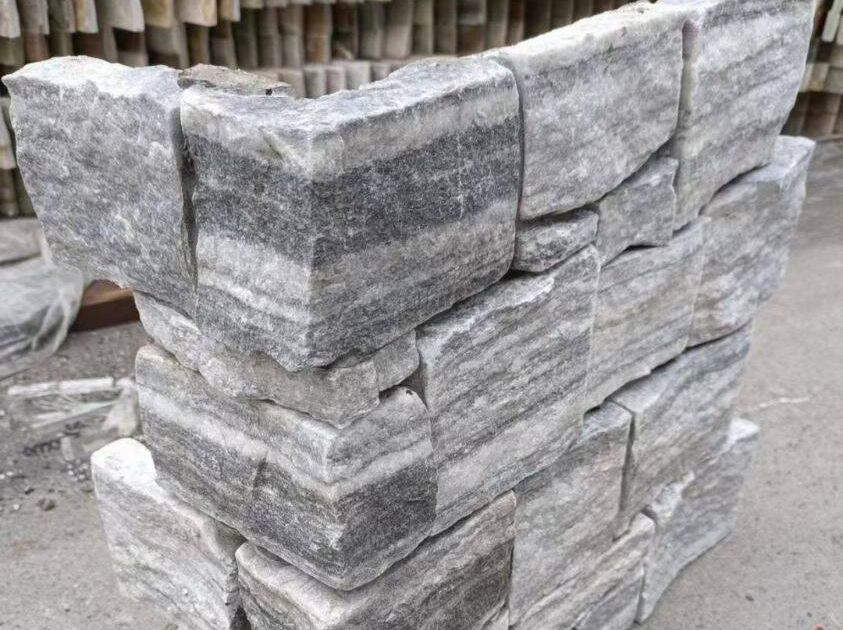
Method 1: Installing Interlocking Corner Pieces
For experienced masons and siding contractors handling stacked stone corners in complex B2B builds, the interlocking method delivers speed, structural reliability, and a premium finish. Precision from substrate prep through final alignment protects both aesthetics and margins.
Wall Preparation for Durable Installation
Ensure the substrate is clean, level, and load-capable. Where grip is insufficient, apply a scratch coat to boost adhesion and prevent loosening. Neglecting this step risks premature failures and expensive rework.
Precision Cutting Techniques
Use a wet saw with a diamond blade for clean, chip-free cuts. For naturstein, cut with the face down to protect its surface, then smooth edges for tight joints. Accuracy here streamlines placement and secures a high-caliber finish.
Installation Sequence and Alignment
Lay from the base upward, alternating long and short returns at corners to lock courses and conceal seams. Maintain uniform joints with spacers and verify plumb with regular level checks to avoid misalignment over extended runs.
Advantages of Interlocking Corner Pieces
Eliminating miter cuts reduces alignment errors and weak points. Z-shaped profiles lock firmly to adjacent panels, sustaining a continuous corner line. Crews gain speed and consistency—vital for multi-unit or commercial schedules where uniformity drives profit.

Addressing Common Installation Challenges
Correct uneven substrates before placement. Blend stones from multiple boxes to balance tonal variation, and use slight angle cuts for tight interior corners. These measures avert rework and keep visual quality intact on intricate projects.
Method 2: How to Miter Cut Flat Panels for a Seamless Corner
When corner detail governs the overall finish, miter cutting flat panels delivers precision and visual continuity unmatched by pre-fabricated units. It’s ideal for premium, high-visibility installations where perfect alignment and uninterrupted texture signal superior craftsmanship and drive project value. Seasoned installers use this method to achieve efficiency without compromising finish quality.
Understanding the Miter Cut Technique
Cut panel ends at a precise 45° so they meet cleanly at a 90° corner. Done correctly, the seam is tight, texture remains consistent, and the wall reads as a single, unified surface. This is the preferred approach for modern, clean-lined designs where any misalignment is obvious. While it requires greater skill and control than using corner pieces, it eliminates the “zipper effect” — the visual break from alternating panel ends — and produces a finish that clients and inspectors instantly recognize as first-class work.
Key Steps for Accurate and Professional Miter Cuts
Measure panels precisely to avoid rework and waste. Mark lines clearly, then use a wet saw or grinder with a diamond blade to achieve the 45° angle. For thicker panels, a double-miter cut can aid alignment. Dry-fit before installation to confirm seam tightness and flushness; adjust individual stones or back-miter to handle thickness variance. Once fit is optimized, apply high-strength epoxy or adhesive to lock panels during final install.
Challenges and Best Practices for Miter Cutting Flat Panels
This process demands sharp tools and an experienced operator, as angled cuts on naturstein risk chipping or breakage. It’s slower than installing pre-made corners, but the bespoke finish justifies the added time for premium projects. Ensure a stable substrate with cement boards and alkali-resistant mesh tape, and use high-bond mortar to prevent slippage. Plan corner layouts to maintain naturstein pattern flow, so transitions look effortless. In high-profile applications such as showroom entries or commercial facades, perfectly executed mitered corners elevate perceived quality and can support higher contract pricing.
Forbedre prosjektene dine med autentisk Ledger Stone
Bring natural texture and lasting elegance to any design with our versatile Ledger steinpaneler. Perfect for contractors, designers, and distributors seeking quality craftsmanship and efficient installation without compromising style or durability.

The Stone Guru’s Verdict: When to Use Each Method
Choosing between miter cuts and pre-fabricated corner units directly affects speed, appearance, and durability. Contractors and masons must balance visual goals with crew skill, material availability, and long-term corner performance. Knowing how each method behaves on-site helps avoid labor overruns and safeguard margins.
Miter Cuts: Precision and Custom Aesthetics
Miter cuts trim stone at a precise 45-degree angle to form a seamless corner, preserving uninterrupted pattern and color—ideal when aesthetic perfection is a must or when no matching corner unit exists. This method requires advanced skill, specialized equipment, and more labor hours, and mistakes lead to chipped edges and faster weathering. Factor in higher costs and added time if quality is paramount.
Pre-fabricated Corner Units: Speed and Consistency
Pre-fabricated corners wrap around edges with continuous texture on both faces, simplifying alignment and eliminating visible seams. Crews work faster and with greater accuracy, a clear advantage under tight deadlines or limited cutting skills. With no exposed cuts, these units resist chipping and weather better, making them ideal for large-scale projects demanding uniformity. Design flexibility is limited if your stone profile lacks a corner option.

Key Considerations for Choosing the Right Method
Scale and schedule often dictate the approach—fast-track sites favor corner units, while high-end designs lean on miter cuts. Crew capability matters: mitering tolerates no error without expert tools, while corner units accommodate broader skill levels. Material supply can restrict choices, and durability favors corner units for extended service life.
Installation Best Practices for Both Methods
Begin with a stable, level substrate. Maintain tight alignment and stagger joints to strengthen and hide seams. Use the right tools to ensure precise miter angles or flush-fitting corner units for lasting results. Set clear expectations with clients about trade-offs so the selected method delivers both aesthetic and practical performance without surprise compromises.
Waterproofing Exterior Corners: Flashing and Sealants
Exterior corners in stacked stone veneer installations demand precise waterproofing to prevent long-term moisture damage. Failures commonly stem from rushed sequencing or mismatched materials. Skilled masons and installers should focus on the right order of work, compatible products, and thorough substrate preparation to deliver a watertight, durable result.
Best Practices for Installing Exterior Corner Flashing
Use a two-step overlapping flashing method: adhere the first layer to one substrate with its vertical leg wrapped at least 6 inches around the corner, then install the second layer from the opposite direction to overlap and create redundancy, blocking any direct water path. Before adding reinforcement, run a continuous bead of compatible sealant at the corner to form an extra moisture barrier beneath the flashing. Follow the manufacturer’s specified sequence for membrane and flashing layers, working only on clean, dry, structurally sound surfaces to ensure lasting adhesion.
Selecting Flashing Materials for Exterior Corners
Prefabricated corner flashings are available in PVC, TPO, galvanized steel, and stainless steel, each suited to different site conditions. For masonry and stone veneer, galvanized or stainless options offer superior durability and impermeability, ideal for areas exposed to wind-driven rain. Match material compatibility to both residential and commercial requirements, and for non-standard dimensions, commission custom-fabricated metal flashing to avoid patchwork assemblies that can compromise waterproofing.
Sealant Compatibility and Application Techniques
Select sealants chemically compatible with your flashing material—rubberized asphalt flashings, for example, may degrade when paired with certain plasticizers. Butyl-based and high-performance polyurethane sealants provide reliable flexibility, adhesion, and weather resistance after curing. Apply sealant at every flashing joint and visible gap to reinforce moisture protection, strictly following manufacturer prep and cure guidelines; rushing curing leaves joints vulnerable and negates the sealant’s benefit.

Common Failure Points and Quality Assurance
Flat, unwrapped flashing can buckle or bridge at corners, creating channels for water ingress. Inadequate overlaps or incorrect sequencing are frequent causes of failure, as are incompatible sealants that lead to adhesion loss or degradation in high-exposure areas. Implement thorough on-site inspections before sign-off to confirm continuous corner coverage, tight seals, and full adhesion per specification. Addressing problems during installation minimizes rework and safeguards the project’s reputation.
Aligning Courses for a Continuous Look Around the Corner
Precise corner work is a direct marker of installation quality. A corner that blends cleanly into the adjoining wall reflects both craftsmanship and attention to detail. This section outlines actionable steps to keep stone courses aligned and visual lines uninterrupted, helping you avoid mismatched seams and repetitive patterns.
Preparing the Substrate and Planning Layout
Ensure the substrate is clean, level, and structurally sound—any irregularities will disrupt corner alignment and create gaps clients will spot instantly. Dry‑lay several courses to test the layout before committing with adhesive. Alternate long and short returns at the corner to form a natural interlock, concealing vertical joints and preventing the zipper effect. Investing time in this stage minimizes on‑site corrections once installation begins.
Installation Techniques for Seamless Corners
Install from the bottom up, securing each piece horizontally and vertically with adjacent runs. Keep a level and spacers in use to maintain consistent course alignment. For outside corners, vary the orientation of corner units and stagger joints to disrupt repetitive patterns and achieve a build that mirrors naturstein placement.
Precision Cutting and Managing Challenges
Use a wet saw with a diamond blade for clean, accurate cuts that allow tight fits. Slightly angling inside‑corner cuts draws pieces together for a snug bond without excess adhesive. Address uneven substrates or color variation by adding adhesive where needed and mixing stones from multiple cartons to achieve consistent tone and texture across both faces.
Following Manufacturer-Specific Requirements for Manufactured Stone Systems
Strictly follow the manufacturer’s fastening guidelines, including required screw counts and placement along corner panels, to ensure long‑term alignment and weather resistance. Maintain joint staggering and smooth transitions throughout every layer, as consistent detail work enhances aesthetic impact and reinforces structural integrity in high‑demand conditions.
Common Corner Installation Mistakes
Small errors in stacked stone corner work can escalate quickly into costly rework. Corners combine structural stresses with high visual focus, so precision here directly impacts durability, aesthetics, and client confidence. Address these frequent issues to protect margins, minimize callbacks, and deliver the premium finish expected in natural stone veneer projects.
Inadequate Surface Preparation
Failing to fully clean and level the substrate leads to early adhesion failure. Dust, paint residue, or uneven backing can cause cracking or separation, especially under temperature or moisture cycles. Corner units require a perfectly flat, bondable base—remove contaminants, check with a straightedge, and eliminate dips or high spots before setting stone.
Incorrect Cutting and Alignment
Using unsuitable tools or sloppy technique compromises corner precision. A wet saw with a diamond blade produces clean, accurate cuts; imprecise angles create gaps and ragged transitions that draw attention. Misaligned pieces disrupt veneer interlock, weakening stability in load-bearing zones. Treat each corner cut as a showcase—measure twice, cut once, and dry-fit before bonding.
Improper Joint Staggering and Stone Selection
Stacking vertical seams at a corner creates the distracting “zipper effect.” Vary stone lengths and alternate returns to achieve natural variation and stronger bonds where stress concentrates. Plan joint patterns before installation, combining long and short returns for a cohesive, professional finish.
Inadequate Adhesives and Fasteners
Generic or insufficient adhesive application often results in stones sliding or detaching, especially at corners. Use bonding agents designed for natural stone and compatible with the substrate, and add mechanical fasteners where specified. Follow manufacturer instructions and apply generously—preventing failure is far cheaper than rework.
Neglecting Color Mixing and Sequential Completion
Installing from a single box creates visible color bands, more pronounced at corners. Mix stones from multiple cartons to balance tone. Finish each corner in sequence after mixing to avoid joint and placement inconsistencies, ensuring continuous quality in both color and craftsmanship.
FAQs for Installers
These answers address corner-specific challenges that can delay stacked stone projects. Drawing on extensive experience with veneer installations, the focus is on techniques that improve accuracy, minimize wasted labor, and ensure a consistent finish across all faces.
Is it better to use corner pieces or cut my own?
Pre-made L-shaped corner pieces accelerate installation, deliver a uniform finish, and eliminate on-site miter cutting—ideal for tight timelines or teams with mixed skill levels. If matching corners are unavailable, custom-cut panels offer flexibility for nonstandard heights or angles but require precise execution to preserve the visual flow and often take longer.
How do you get a tight fit on a mitered corner?
Measure and mark with precision before cutting—minor angle errors are highly visible in natural stone. Use sharp tools, such as an angle grinder with a diamond blade, to achieve clean edges, then dry-fit pieces before applying adhesive to adjust and eliminate gaps that could weaken the joint or disrupt the pattern.
How do you waterproof an outside corner?
Naturlig stone sheds water, but the panel system is not a waterproof barrier. Protect the substrate by installing flashing or a waterproof membrane beneath exterior corners, then sealing all exposed edges with a premium stone sealant to guard against moisture intrusion in freeze-thaw and coastal environments.
What do I do if my wall isn’t perfectly 90 degrees?
For non-right angles, use adjustable corner pieces or custom-cut panels to match the precise layout, preventing stress points and visible gaps. Measure accurately, dry-fit before securing, and where gaps are minor, use filler and grout to blend seamlessly without reducing structural integrity.
How do you continue the pattern around a corner?
Interlocking corner pieces maintain uninterrupted pattern flow, avoiding misalignment common with improvised transitions. Plan the layout so horizontal lines and textures meet exactly at the corner, and if cutting is required, match stone size and texture to adjacent panels to preserve the natural rhythm.
Closing Insights for Precision Corner Work
For flawless stacked stone corners, match your installation method to project scale, crew capability, and design intent. Pre‑fabricated units speed alignment and reduce chipping; miter cuts deliver seamless continuity on high‑visibility edges when performed with precision tools. Prepare substrates carefully, cut accurately, stagger joints, and blend colors across faces. Incorporate flashing and sealant on exterior corners to prevent moisture damage, ensuring each corner retains both structural integrity and visual impact.
