Installing Stacked Stone Corners correctly is the primary defense against costly project callbacks and wasted material. On-site mitering requires specialized labor that inflates installation time, eroding the 25% cost savings that pre-fabricated systems are designed to provide.
This analysis benchmarks the manual method against a “Project-Ready Full Solution.” We evaluate how matching L-Corners, produced with same-batch quarry consistency, guarantee a seamless finish while reducing on-site labor complexity and expenses.
Why Corners Make or Break the Professionalism of Your Project
Corners are the most visible part of any stacked stone job. Exposed cuts, misaligned stones, or vertical seams instantly signal amateur work. A professional look depends entirely on clean, seamless corners.
First Impressions: Common Failures that Expose Amateur Work
Even with perfectly installed wall panels, the entire project’s credibility is judged at the corners. These are the most common mistakes that immediately cheapen the result and tell a client the job was rushed or handled by an amateur.
- Improper Mitering: Inaccurate 45-degree cuts leave exposed, unfinished stone edges. This is a clear sign of poor workmanship and the wrong tools for the job.
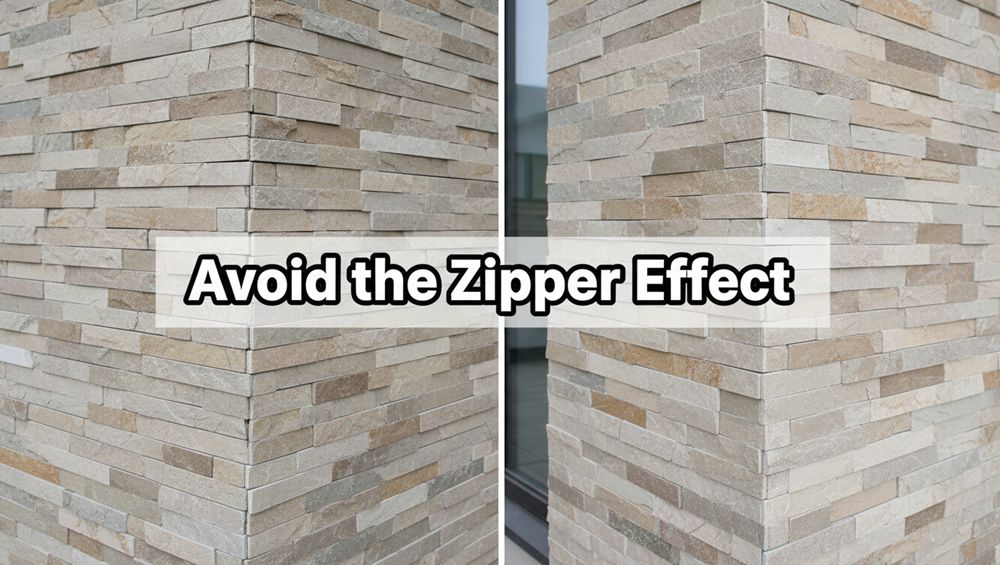
- The ‘Zipper Effect’: When installers use identically sized stones at a corner, the joints line up. This creates an unnatural vertical seam that looks like a zipper, destroying the random, authentic appearance of naturstein.
- Alignment Errors: Misaligned or uneven corners are highly visible and throw off the lines of the entire wall. It’s a small mistake that has a massive negative impact on the final look.
The Solution: Using Pre-Fabricated L-Corners for a Seamless Finish
Attempting to miter natural stone panels on-site is slow, requires highly skilled labor, and creates a lot of expensive waste. One bad cut can ruin an entire panel. The most efficient and reliable method is to use a system designed for perfection from the start.
Top Source Stone provides a “Project-Ready Full Solution” with matching L-Corners for every stone panel model we produce. These are pre-fabricated 90-degree corner pieces, not separate products that are a “close enough” match. This system guarantees a clean, wrap-around finish by eliminating the risks of field fabrication. For dealers and contractors, this means lower labor costs, faster installations, and consistently professional results for your clients.
1-Piece L-Corners vs. On-site Mitering: A Cost and Labor Comparison
Pre-fabricated L-corners slash installation time and labor costs by removing complex on-site cuts. Mitering demands expert skill and is less forgiving, often driving up total project expenses.
| Trekk | On-Site Mitering | Pre-Fabricated L-Corners |
|---|---|---|
| Labor & Skill | Requires highly skilled installers with precision cutting tools. High margin for error. | Eliminates the need for specialized cutting skills, reducing on-site labor complexity. |
| Installation Time | Significantly slower due to manual cutting, fitting, and adjustments for each corner. | Dramatically faster. A project-ready solution that installs just like a flat panel. |
| Wall Forgiveness | Demands perfectly square 90-degree walls. Minor imperfections create visible gaps. | More forgiving of slight wall imperfections, ensuring a clean, professional finish. |
| Consistency | Risk of color and texture mismatch if pieces aren’t carefully selected. | Guaranteed match, as corners are sourced from the same quarry vein as the flat panels. |
The Demands of On-Site Mitering
Manually mitering corners on the job site is a specialized task. It requires a skilled installer who can operate precision cutting tools to create clean, accurate 45-degree angles. This process is time-consuming and directly increases labor expenses. The final result also depends heavily on the quality of the framing. If a wall isn’t a perfect 90-degree angle, the mitered joint will have noticeable gaps, compromising the entire project’s finish.
The Efficiency of Pre-Fabricated L-Corners
Our matching L-corners are a project-ready solution that bypasses the complexities of on-site cutting. Because we fabricate them from the same quarry vein as our flat panels, you get perfect color and texture synchronization every time. The pre-formed 90-degree shape is also more forgiving of minor wall imperfections, helping installers achieve a professional finish without the extra labor. This approach saves significant time and money on site, turning corner installation from a specialized craft into a straightforward process.
The Premium Stacked Stone Your Customers Demand

What is the “Zipper Effect” and How Do You Avoid Visible Vertical Seams?
The “zipper effect” is visible vertical lines created when stacked stone panels of the same length are aligned at the joints. This is best avoided by using interlocking Z-Shape panels engineered to camouflage seams.
Defining the “Zipper Effect” in Stacked Stone Walls
The “zipper effect” is a common installation flaw that instantly signals an amateur job. It occurs when the vertical seams of adjacent stacked stone panels line up perfectly, creating distracting vertical lines down the wall. This breaks the intended illusion of a natural, random stone surface.
The problem typically happens when installers use basic, straight-edge panels of a uniform length without properly staggering the joints. The eye is drawn directly to these aligned seams, making the installation look manufactured and patterned, not organic.
The Engineered Solution: Interlocking Z-Shape and S-Shape Panels
We engineered our Z-Shape and S-Shape panels to eliminate this problem entirely. These panels use a “male-female” connection system where the edges interlock, effectively camouflaging the vertical joints. You get a continuous stone finish without obvious breaks.
Each panel edge is cut with CNC diamond blades to ensure a tight, modular fit. This precision means the interlocking pieces join together without gaps. The design not only prevents the zipper effect but also creates a seamless architectural finish that completely conceals the installation substrate behind it.

Staggering Joints: The Key to Natural Seamless Walls
Offsetting seams between stone panels, or staggering joints, distributes structural stress and breaks up visible lines. This creates a stronger, more natural-looking monolithic wall.
Why Aligned Seams Weaken a Wall’s Appearance
When vertical joints between stone panels line up, they create an unnatural “zipper effect.” This visible pattern immediately detracts from the organic, monolithic look of natural stone and signals poor workmanship. The eye is drawn to the repetitive lines instead of the stone’s texture.
Beyond aesthetics, staggering is a fundamental technique for structural integrity. Offsetting the joints distributes the panel weight and any structural stress more evenly across the entire wall. This simple practice is standard for professional finishes because it prevents long-term cracks from developing along weak, aligned seams.
How Interlocking Z-Shape Panels Automate the Process
We engineered our Interlocking Series panels to solve this problem for installers. Both our Z-Shape and S-Shape panels feature offset edges that are designed to fit together in a non-linear pattern. This design automatically forces a staggered layout during installation, effectively camouflaging the vertical joints between each panel.
The precision of these panels is key. Using CNC diamond-blade cutting, we create “male-female” connections that ensure a tight, secure fit. The result is a seamless architectural finish that looks authentic and performs reliably, without the manual effort of planning a staggered layout from scratch.
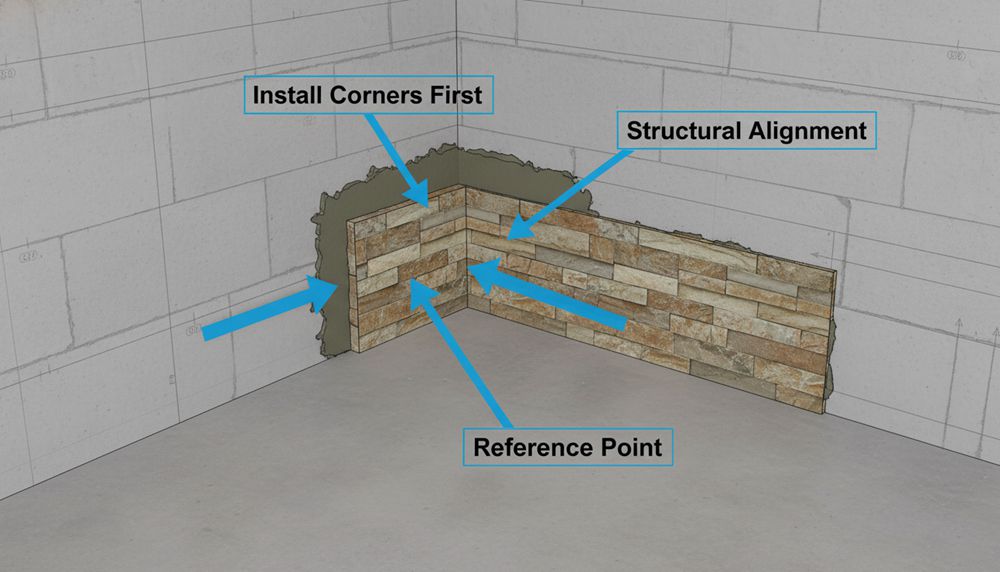
Sequence: Why External 90-Degree Corners Must Be Installed First
External 90-degree corners must be installed first because they create a stable structural frame and a precise reference point. This sequence ensures flat panels align perfectly and sit flush for clean, seamless joints.
Establishing a Structural Framework for Alignment
Installing corner pieces first is a non-negotiable step for a professional result. These corners create a fixed, stable frame for the entire wall. Think of them as the goalposts; every flat panel installed afterward must align with these starting points. This method isn’t just a suggestion, it’s the core procedure for guaranteeing a clean, defined edge where the walls meet.
The flat panels are engineered to sit securely *behind* the corner pieces. When the corners are set correctly, the panels naturally fall into a flush, level position. Attempting to install panels first and then add corners later invites misalignment, gaps, and an amateur finish that’s impossible to hide.
The Advantage of Matching L-Shaped Corners
We designed our system to eliminate the most common point of failure: on-site corner fabrication. Instead of forcing installers to perform complex mitering, we offer a ‘Project-Ready Full Solution’ with pre-fabricated 90-degree L-Corners for every stone model we produce.
Using our matching L-Corners directly addresses the labor and skill challenges of a project. It reduces installation time and removes the risk of costly cutting errors. Most importantly, it ensures perfect texture and color synchronization at the wall transitions, delivering the seamless architectural finish that clients expect.
What Are the Best Adhesive Strategies for Heavy Corner Piece Stability?
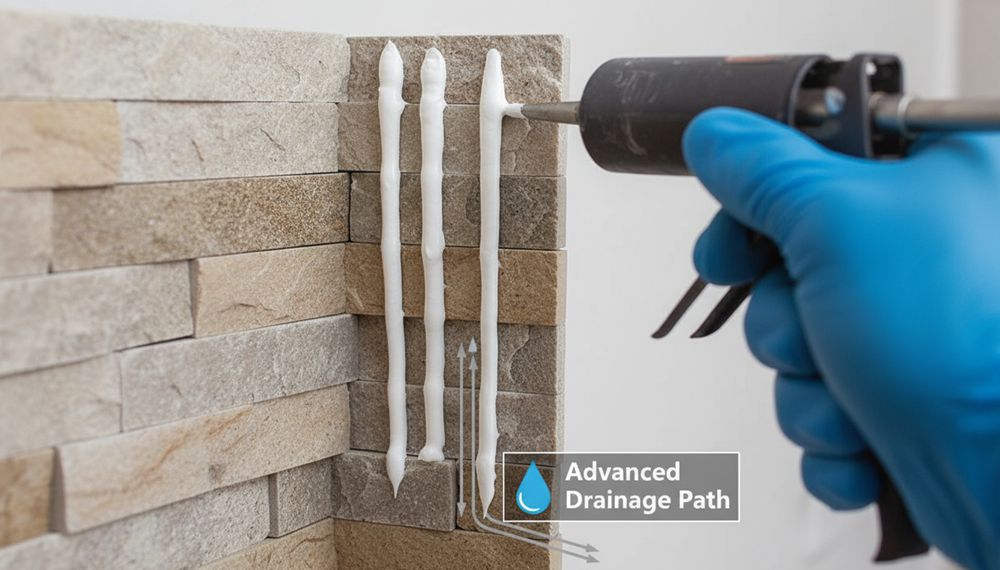
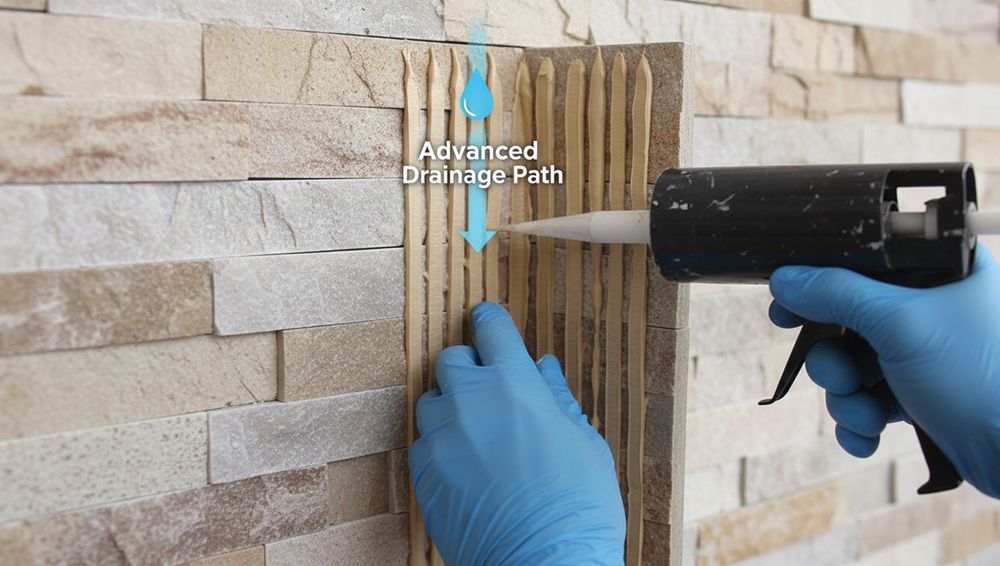
Heavy stone corners demand high-grab adhesives like cement or polymer formulas. Correct application in parallel lines is critical for drainage, preventing failure and ensuring L-corners remain stable.
Selecting High-Grab Adhesives and Proper Application
The adhesive you choose does most of the work. Natural stone panels, especially our rough-profile series, can weigh up to 55kg/m². This weight requires an adhesive specifically engineered for high initial grab and long-term strength. Standard construction glues won’t prevent slippage during curing or delamination over time.
- Choose the right formula: Stick to high-strength adhesives. Cement-based, epoxy, or hybrid polymer formulas are designed to support the panel’s weight without sagging.
- Apply for drainage: Always apply the adhesive in parallel vertical lines on the back of the panel. This creates channels that allow any moisture behind the stone to drain downwards, preventing water buildup.
- Avoid trapping moisture: Never apply adhesive in a closed loop, circle, or “picture frame” pattern. This traps water inside the wall assembly, which can compromise the bond and cause failure.
Anchoring Pre-Fabricated L-Corners for a Seamless Finish
Our matching L-Corners are engineered to provide a seamless wrap-around finish, eliminating the need for time-consuming on-site mitering. But their 90-degree shape creates concentrated load points at the corner joint. This makes superior adhesion non-negotiable for a professional, lasting installation.
- Prep the surfaces: Before applying any adhesive, make sure the wall substrate and the back of the stone corner piece are completely clean, dry, and free of dust or grease. A clean surface is essential for maximum bond strength.
- Press for full contact: Push each corner piece firmly into the adhesive with even pressure. A slight side-to-side wiggle helps spread the adhesive and achieve maximum contact, ensuring the unit doesn’t sag while it cures.
Professional Finishing: How to Color Match and Caulk Corner Joints
The best way to finish corners is to use pre-fabricated L-corners from the same stone batch. This guarantees a perfect color match and eliminates the need for caulking.
Sealing and Texturing Mitered Joints
When pre-fabricated corners aren’t available, installers have to create a finish on-site. This traditional method involves mitering two flat panels at a 45-degree angle and then concealing the seam with mortar and sealant. It’s a labor-intensive process that introduces a high risk of color mismatch.
The goal is to make the joint look like a natural part of the stone. This requires a few steps:
- First, apply a polymer-modified thinset mortar along the inside of the mitered joint.
- Next, texture the wet adhesive at the joint with a chisel or waffle-faced hammer to blend it with the naturstein face.
- Finally, apply a quality stone sealant over the textured area. This protects the joint and helps restore some of the stone’s natural color vibrancy.
Why Matching L-Corners Are the Superior Solution
The field texturing method is a workaround, not a solution. The only way to guarantee a perfect corner is to use a piece of stone that was made for it. Our pre-fabricated 90-degree L-corners are sourced from the exact same quarry vein as your flat panels.
This isn’t just about getting a close color match. Our same-batch sourcing process guarantees texture and color synchronization, achieving a 95% hue uniformity within a single order. The result is a seamless architectural finish that looks like a solid block of stone. Using matching L-corners completely removes the need for on-site color matching, texturing, or caulking, which saves significant labor and eliminates the risk of a poor finish.
ofte stilte spørsmål
How do I install stacked stone on outside corners?
Always install our matching L-Corner pieces first for each row, starting from the bottom of the wall. Once the corner is in place, work outward by installing the flat interlocking panels. This ensures a stable and professional foundation for the rest of the wall.
What are pre-fabricated L-Corners?
Our L-Corners are single-piece, 90-degree corner units manufactured from the same natural stone batch as our flat panels. They eliminate the need for time-consuming and difficult on-site miter cuts, guaranteeing a perfect color and texture match for a seamless wraparound look.
Can I miter cut panels instead of using L-Corners?
While it is possible to miter cut panels with a wet saw, the process is labor-intensive and it is very difficult to achieve a clean, professional seam. Our pre-fabricated L-Corners save significant labor costs and time, ensuring a perfect finish without the risk of chipping or misalignment.
How do your panels hide the vertical seams at corners?
Our Z-Shape and S-Shape panels feature a precision-cut interlocking design. This system, combined with our matching L-Corners, allows the stone patterns to continue around the corner without interruption, effectively camouflaging the vertical joint for a monolithic appearance.
Do you offer corners for every stone type you sell?
Yes, we provide matching L-Corners for every single stacked stone model we manufacture, including all ten of our in-stock best-sellers. This ensures you can create a consistent and professional finish for any project.
Can stacked stone panels be installed on curved walls or columns?
Yes, our panels can be installed on curved surfaces. For a smooth application on a tight radius, the standard 6″ x 24″ panels can be cut into smaller sections. This allows the stone to conform more easily to the wall’s contour.
Final Thoughts
Attempting to miter panels on-site introduces unacceptable risks to your labor costs and project timelines. Our “Project-Ready Full Solution” with matching L-corners is the only way to protect your margins and safeguard your reputation against amateur finishes. Dependable inventory that guarantees a professional result builds long-term dealer trust.
Don’t leave project outcomes to chance—verify the system yourself. We recommend ordering a sample kit to evaluate our “Same-Batch Quarry Consistency” and the precision of our interlocking corners. Contact our team to get your samples shipped and discuss how our in-stock inventory can support your business.
