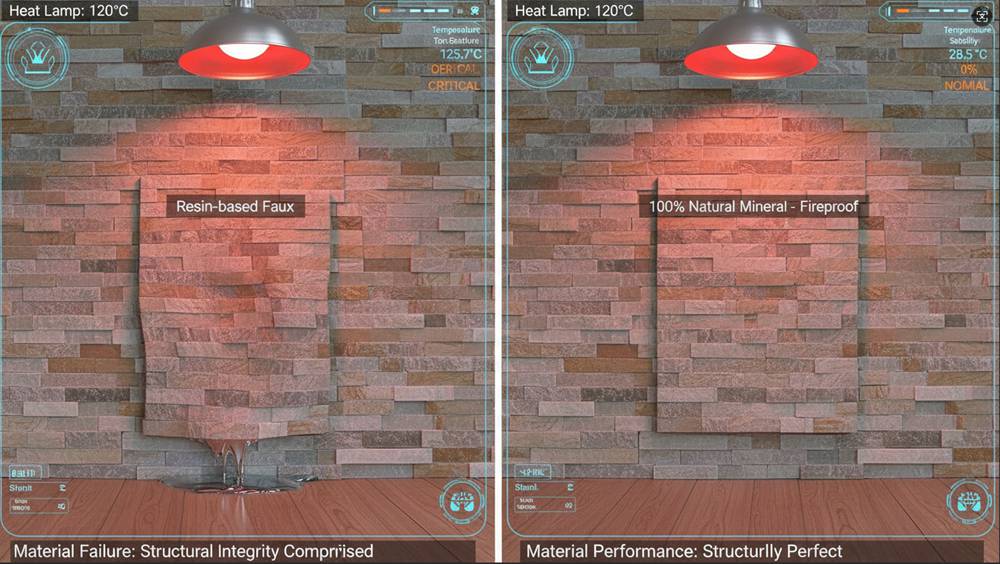
Specifying high-performance stacked stone fireplace veneer prevents the warping and toxic off-gassing common in resin-based faux alternatives. Using unstable materials near heat sources leads to structural fatigue and costly liability risks that erode dealer margins.
We use 100% natural minerals stable up to 120°C to ensure non-combustible safety and zero chemical off-gassing. Our 8-12 lbs per square foot engineering and CNC diamond-blade interlocking systems allow dealers to offer high-margin showroom displays that meet strict building safety standards.
Is Natural Stacked Stone Heat-Resistant and Safe for Fireplace Surrounds?
Natural stone panels are inherently fireproof and sustain radiant temperatures up to 120°C (248°F), making them a safer, more stable alternative to resin-based falsk stein surrounds.
Thermal Stability and Radiant Heat Thresholds
Naturstein handles the constant expansion and contraction of fireplace heat cycles without structural fatigue. While synthetic “faux” stone often delaminates or warps when exposed to long-term radiant heat, our natural quartzite and slate remain dimensionally stable. This thermal endurance comes from the density of the minerals we source directly from our quarry layers.
- Radiant Heat Limit: Stable up to 120°C (248°F).
- Adhesive Thermal Rating: Typical high-quality mortars support up to 90°C (194°F).
- Material Integrity: Resists cracking or sagging during rapid temperature shifts.
Non-Combustible Integrity of 100% Natural Minerals
Toppkildestein products consist entirely of natural minerals like quartzite and slate, ensuring the material is fire-rated and non-combustible. Because these panels contain zero chemical resins or artificial pigments, they do not produce smoke or toxic off-gassing when the fireplace is in use. This purity makes naturstein the ideal choice for meeting strict 2026 building safety standards for residential interiors.
- Zero Resins: No plastic binders that melt or emit odors.
- Mineral Composition: 100% natural quartzite, slate, and granite.
- Safety Compliance: Meets non-combustible requirements for zero-clearance fireplace facades.
- UV Stability: Natural minerals do not fade or discolor from heat exposure over time.
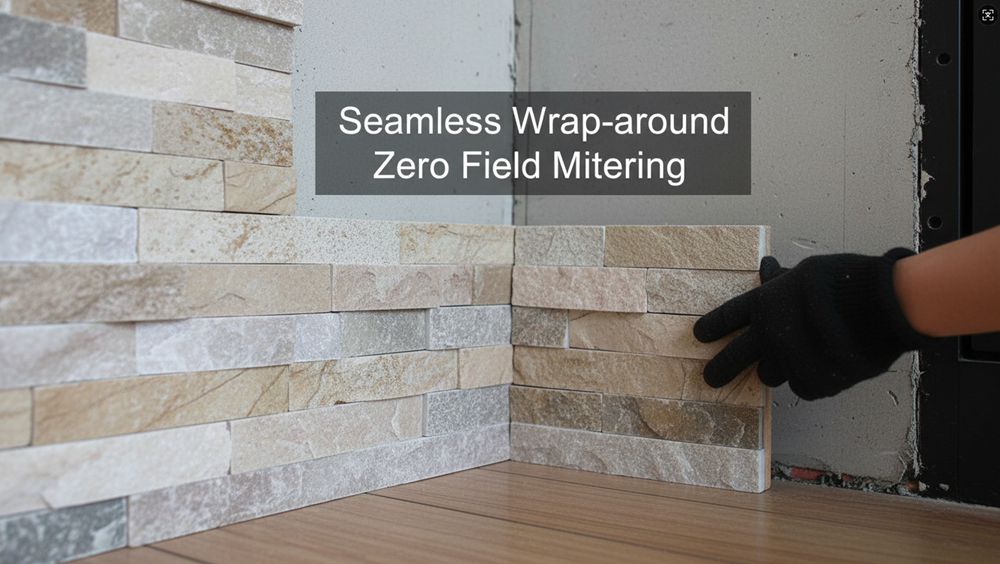
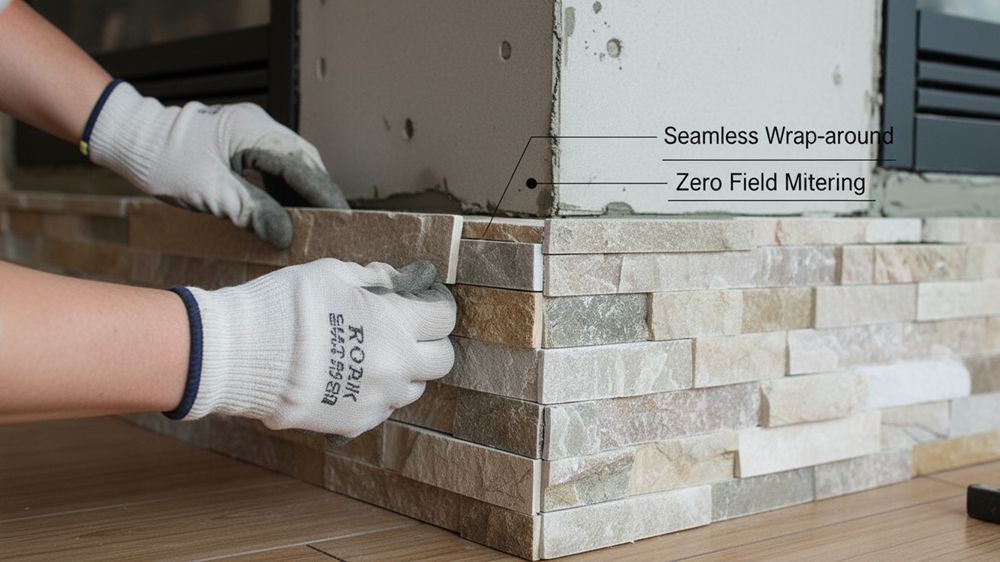
We recommend installing these panels on fire-rated substrates like cement board rather than standard drywall. For professional results, our matching L-shaped corners provide a seamless wrap-around finish that protects the fireplace edges while maintaining the authentic look of full-thickness stone.
Can Your Fireplace Support the Weight? Assessing Substrate Strength and Structural Integrity
Natural stone veneer adds 8–13 lbs per square foot. While 75% lighter than full masonry, heights over 10 feet require structural verification of the underlying framing.
Calculating Total Dead Load and Framing Capacity
Calculating the vertical load on a fireplace wall requires looking past the stone panels. You must account for the cumulative mass of the entire assembly to prevent substrate deflection or wall bowing over time.
- Load Variables: Include the weight of the stone panels, high-heat thinset, wire mesh, and the mortar scratch coat in your final calculation.
- Framing Standards: Verify that existing 2×4 wood framing follows the 16-inch on-center standard to provide adequate rigid support.
- Height Limits: Assess any installation exceeding 10 feet for potential structural reinforcement or professional engineering approval.
- Substrate Integrity: Use moisture-resistant cement board rather than standard drywall to ensure a high-strength bond for heavy stone applications.
Lightweight Engineering: The 8-12 lbs/sq.ft Specification
Top Source Stone engineers 100% natural stone panels to maintain a slim architectural profile without sacrificing authentic texture. This specific weight range eliminates the need for expensive concrete footings or structural ledges.
- Dead Load: Flat panels maintain a profile of 30-40kg/m² (8-12 lbs/sq.ft), significantly reducing structural requirements compared to traditional masonry.
- Precision Edges: CNC diamond-blade edges ensure tight joints, which reduces the volume of heavy mortar required to fill gaps.
- Veneer Profile: Standard thickness ranges from 1cm to 2.5cm, providing a professional finish with minimal wall projection.
- Masonry Comparison: Traditional full-dimension stone reaches 40-60 lbs/sq.ft and requires complex structural supports that thin veneer avoids.
Using these lightweight specifications allows for faster installation on standard residential framing while providing the durability of real slate and quartzite. This engineering focus ensures that the fireplace remains a permanent architectural feature without risking structural failure.
Scale Your Business With Premium Ledger Panels

How to Install Stacked Stone Over Existing Brick or Drywall
Successful installasjon av stein requires a clean, cement-based substrate; use a skim coat for brick or cement board for drywall to handle the 8-12 lbs/sq.ft load.
| Substrate Type | Preparation Method | Critical Requirement |
|---|---|---|
| Unpainted Brick | Masonry Skim Coat | Level surface texture |
| Painted Brick | Paint removal or Cement Board | Mortar bond integrity |
| Interior Drywall | Cement Board / Metal Lath | Support 8-12 lbs/sq.ft |
Surface Preparation for Brick and Drywall Substrates
Directly attaching stone to a finished wall often leads to bond failure. Natural stone panels exert a dead load of 8-12 lbs/sq.ft, which standard drywall paper cannot support. You must replace the drywall with 1/2-inch cement board or install a metal lath system with a scratch coat to create a rigid, cementitious foundation.
For existing brick, the priority is verifying the surface finish. Paint and sealants act as bond breakers, preventing mortar from grabbing the masonry. If the brick is unpainted, apply a masonry skim coat—also known as a brown coat—to fill recessed grout lines and level the plane. If the brick is painted, you must either strip the finish or anchor cement board through the brick into the underlying studs.
- Brick Assessment: Remove paint or install cement board to ensure a bondable surface.
- Masonry Skim Coat: Apply to unpainted brick to create a flat, textured plane for the adhesive.
- Drywall Reinforcement: Use cement board to meet structural weight requirements and resist moisture.
- Scratch Coat: Apply over metal lath on uneven surfaces to create a mechanical key for the stone.
Precision Installation with CNC Diamond-Blade Interlocking Panels
Top Source Stone utilizes CNC diamond-blade cutting to produce panels with high dimensional accuracy. This precision engineering ensures that the “male-female” connections in our Z-Shape and S-Shape panels fit tightly, effectively camouflaging vertical joints. This system eliminates the visible “stepped” gaps often found in lower-quality hand-cut stones.
A professional finish also requires color consistency. We source our natural stone from the same quarry vein for each order, maintaining 95% hue uniformity. This prevents the “patchy” appearance that occurs when mixing different stone batches. To simplify the installation at corners, we provide matching L-Corners for every model, removing the need for difficult field mitering.
- Interlocking Design: Z-Shape and S-Shape panels conceal vertical joints for a seamless appearance.
- CNC Precision: Diamond-blade edges ensure tight connections without visible gaps.
- Pre-fabricated L-Corners: Use matching 90-degree transitions to maintain texture synchronization.
- Quarry Consistency: Single-vein sourcing ensures 95% hue uniformity across the installation area.
Layout Planning for Perfectly Symmetric Firebox Surrounds
Modern fireplace symmetry relies on horizontal joint staggering and CNC-precision interlocking panels to eliminate vertical seams and ensure batch-consistent color flow around the firebox.
Strategic Joint Staggering and Dry-Run Layouts
Professional installers prevent an artificial “ladder” effect by strictly avoiding vertical joint alignment between rows. Aligning these seams draws the eye to the panel edges rather than the stone texture. Instead, stagger every joint horizontally to maintain the visual weight of a solid stone structure.
Before applying mortar, perform a dry-run by laying the steinpaneler on the floor directly in front of the hearth. This step is vital for verifying color distribution. At Top Source Stone, we pull inventory from the same quarry vein per order to achieve 95% hue uniformity, but a manual dry-run ensures the natural variations flow logically across the facade.
- Foundation: Start installation at the bottom corner to establish a level base for the entire surround.
- Batch Management: Blend panels from multiple crates to avoid concentrated color patches.
- Visual Alignment: Use chalk lines to verify horizontal levels every three rows.
Seamless Execution with CNC Precision Interlocking Panels and L-Corners
Our Z-shape and S-shape interlocking panels utilize a male-female connection system designed to camouflage vertical seams. We use CNC diamond-blade edges to ensure these modular pieces fit tightly. This precision eliminates the stepped gaps often found in hand-cut alternatives and keeps the architectural lines clean around the firebox opening.
Corners often reveal the “veneer” nature of a project if not handled correctly. We provide pre-fabricated 90-degree matching L-corners for every model in our Big 10 inventory. These units ensure texture and color synchronization at wall transitions, removing the need for complex field mitering that often results in visible mortar gaps or exposed stone backs.
- Panel Geometry: Z-Shape or S-Shape interlocking designs.
- Edge Finish: CNC diamond-blade precision for tight tolerances.
- Corner Solutions: Matching L-corners (Available for Slate, Quartzite, and Granite).
- Symmetry Control: Measure and cut each row individually around the firebox to maintain the focal point’s balance.
Mortar vs. High-Heat Thinset: Which Adhesive Is Best for Fireplaces?
Refractory mortar withstands 3,000°F for firebox use, while high-heat thinset provides the necessary bond for naturstein surrounds not exposed to direct flames.
Thermal Thresholds and ASTM C-199 Compliance
Standard polymer-modified thinsets often degrade at temperatures as low as 120°F. This thermal breakdown is a leading cause of stone delamination during peak heating seasons. For high-traffic commercial or residential fireplace projects, selecting an adhesive based on the specific heat zone is the only way to prevent long-term liability.
- Refractory Mortar: Contains specialized fireclay and calcium aluminate to withstand direct heat up to 3,000°F.
- ASTM C-199: This industry standard defines the performance required for adhesives used in fireboxes and smoke chambers.
- Temperature Limit: While standard mortars fail early, refractory versions remain non-water-soluble and structurally sound under extreme thermal cycles.
Ensuring Panel Stability with High-Strength Epoxy Bonding
Top Source Stone utilizes a high-strength epoxy resin to bond individual stone pieces into our 6×24 panels. This factory-engineered process ensures each component remains fixed within the panel, even when the substrate undergoes the inevitable thermal expansion caused by proximity to a heat source.
This permanent stone-to-substrate bond acts as a critical safety feature. It prevents individual pieces from shifting or dropping over time, which is a common failure point in hand-stacked installations using inferior adhesives. By combining high-heat installation mortar with our epoxy-bonded panels, we provide a double layer of protection against facade failure.
Our CNC diamond-blade precision ensures that these 6×24 and 6×22 panels fit tightly, further reducing the amount of exposed adhesive and protecting the bond from direct radiant heat. This professional-grade engineering is essential for maintaining the architectural finish in both high-heat residential surrounds and large-scale commercial fireplace installations.
Finishing the Edges: Corner Pieces vs. Field Mitering
Finish fireplace corners with matching L-shaped pieces to cut labor by 50% and hide the substrate. Use field mitering only for non-standard angles or custom retrofits.
Efficiency and Aesthetics of Prefabricated Corner Units
A professional fireplace installation lives or dies by the corners. If a viewer sees a thin seam or the edge of a veneer panel, the high-end architectural effect is lost. Prefabricated corners solve this by mimicking the depth of structural stone while speeding up the job site timeline.
- Structural Appearance: L-shaped units wrap around 90-degree edges to replicate the heavy-duty look of structural stone blocks.
- Labor Reduction: Factory-made pieces cut installation time on fireplace returns by up to 50% compared to manual site mitering.
- Interlocking Design: Pre-tested interlocking “fingers” create a tight fit that hides the cement board or brick substrate from view.
Matching L-Corners for Synchronized Texture and Color
Top Source Stone provides a project-ready solution by manufacturing dedicated corner pieces for every series in our inventory. This ensures that the texture and geological hue of the corner perfectly match the flat wall panels, a common pain point when sourcing from multiple suppliers or different batches.
- Big 10 Inventory Availability: Matching 90-degree L-Corners are available for every model, including Glacier White and Midnight Slate.
- CNC Precision: We use CNC diamond-blade edges to guarantee clean lines and professional transitions without excessive on-site material waste.
- Batch Uniformity: We source corner stock from the same quarry vein as the flat panels to prevent color shifts at the transition points.
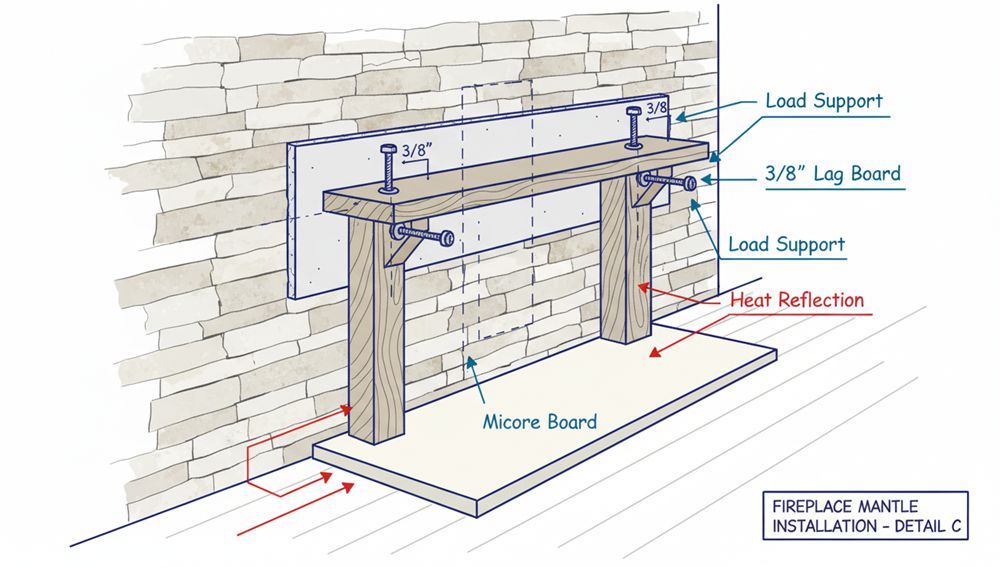
Protecting Your Hearth and Mantel During the Installation Process
Protect your hearth with Micore board. Maintain 54-inch mantel heights. Use 3/8-inch lag bolts and high-heat adhesives to ensure structural safety and code compliance.
Thermal Management and Surface Buffering Strategies
Protecting the hearth starts with a buffer layer. Place Micore board or heavy-duty floor protection over the surface before starting the veneer application. This layer absorbs impact from tools and stone chips, distributing weight across the subfloor to prevent cracks in the finished masonry.
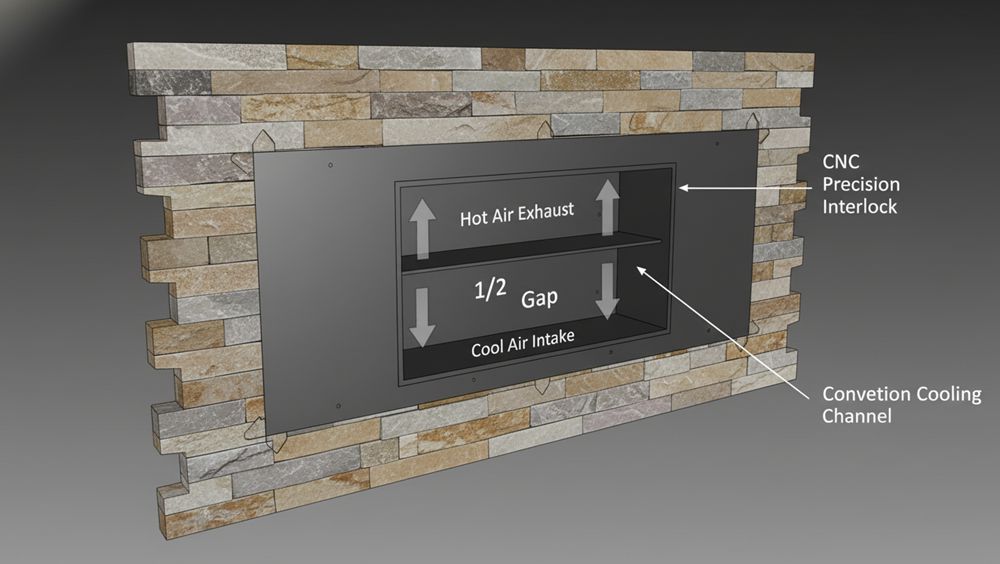
Heat mitigation requires strict adherence to vertical clearances. We recommend a minimum 54-inch height from the hearth to the bottom of the mantel. This distance keeps surface temperatures within safe limits for combustible materials and sensitive electronics like wall-mounted televisions.
- Heat Shields: Install shields with 1-inch non-combustible spacers under wooden mantels to redirect thermal energy.
- Air Circulation: Maintain a 1/2-inch air gap below mantel surfaces to facilitate cooling and reduce ignition risks.
- Buffer Materials: Use impact-resistant boards during the entire installation phase to safeguard existing stonework.
Structural Anchoring with Non-Combustible Natural Stone
Top Source Stone provides 100% natural slate and quartzite panels that offer inherent UV stability and zero flammability. These materials handle high-heat environments without the warping or toxic off-gassing common in synthetic alternatives. When working around firebox surrounds, using a direct quarry source ensures material consistency and structural reliability.
Secure heavy mantels by driving 3/8-inch lag bolts directly into wall studs. This mechanical connection supports the combined dead load of the steinfiner and decorative mantel items. To prevent stone delamination over time, apply polyurethane construction adhesive to distribute shear loads across the substrate.
- Edge Transitions: Utilize matching L-Corners to ensure a seamless wrap-around finish, eliminating exposed joints where heat could penetrate.
- Fastener Specs: 3/8-inch lag bolts with washers are the professional standard for mantel anchoring.
- Material Performance: Natural quartzite and slate remain stable under radiant heat without cracking or color shifting.
- Shear Protection: Polyurethane adhesives provide the necessary flex and strength for high-temperature zones.
How to Clean Soot and Construction Debris from New Fireplace Stone
Clean new stone by vacuuming dry debris first, then applying a pH-neutral cleaner. Use baking soda pastes for oily soot on porous surfaces to protect natural mineral integrity.
Removing Construction Dust and Soot Stains
New fireplace installations often trap fine drywall dust and mortar residue within the natural cleft of the stone. If you apply liquid cleaners before removing this dry debris, you risk creating a muddy slurry that settles deeper into the pores. A systematic approach ensures the stone maintains its original quarry color without hazing.
- Dry Surface Prep: Clear all loose ashes and construction dust using a high-suction vacuum or a soft-bristle brush before introducing any moisture.
- Standard Solution: Mix warm water with a mild, pH-neutral dish soap to penetrate common soot and grime without reacting with the stone’s mineral composition.
- Spot Treatment: Apply a paste made of baking soda and water to limestone or porous slate. This drawing action lifts oily soot stains out of the stone rather than spreading them.
- Scrubbing Technique: Use a soft brush in circular motions. This reaches into the natural crevices of the split-face texture more effectively than linear wiping.
- Final Rinse: Wipe the surface with a damp sponge and fresh warm water. This prevents soap film buildup, which can dull the appearance of the stone over time.
Maintaining Natural Cleft and Precision Interlocking Joints
Top Source Stone panels utilize CNC diamond-blade edges to ensure our Z-shape and S-shape designs interlock with high precision. Maintaining these tight joints is essential for preserving the seamless architectural finish and camouflaging the installation substrate. Proper cleaning prevents debris from compromising the visual transition between panels.
- Joint Integrity: Focus your cleaning efforts on the interlocking edges. Removing trapped mortar or grout residue from these tight vertical joints keeps the connection points invisible.
- Mineral Preservation: Only use pH-neutral cleaners on 100% natural quartzite and slate. This preserves the same-batch quarry consistency and prevents the discoloration often caused by harsh chemicals.
- Structural Safety: Avoid acidic cleaners and high-pressure washers. These can degrade the natural mineral bonds and damage the structural integrity of the split-face surface.
- Detailing: Use a soft toothbrush to reach into the nooks and crannies of the interlocking system. This is especially effective for removing stubborn construction debris without scratching the face of the stone.
- UV Stability: Naturstein is inherently UV-stable. Ensure all cleaning agents are thoroughly rinsed away to prevent chemical residues from yellowing when exposed to heat or ambient light.
ofte stilte spørsmål
Is natural stacked stone safe for use inside the fireplace firebox?
No. Natural stone is ideal for the exterior surround and hearth but cannot withstand the direct, extreme heat of the firebox chamber. For the inner firebox where flames make contact, always use refractory firebricks and specialized refractory mortar rated for temperatures up to 3,000°F.
Can I install new stacked stone directly over an old brick fireplace?
Yes, you can install stone over existing brick if the surface is clean and structurally sound. For painted or uneven brick, attach wire lath with masonry anchors first to provide a secure bonding surface. Use Type S mortar with a latex additive to handle the thermal expansion near the heat source. Since Top Source Stone panels weigh only 8-12 lbs/sq.ft, they integrate easily with existing masonry substrates.
Does fireplace stone require a specific heat-rated mortar?
For the exterior decorative cladding, standard Type N mortar or high-strength thinset is sufficient. However, if the stone is near high-heat zones or the smoke chamber, you must use non-water-soluble refractory mortar to prevent the bond from softening under thermal stress.
How do I safely mount a television over a stacked stone fireplace?
You must anchor the TV mount directly into the wall studs or concrete block behind the stone veneer using extra-long lag bolts. Never anchor into the stone or mortar joints alone. A pull-down mantel mount is recommended to protect the screen from rising heat and provide a better viewing angle.
What are the clearance requirements for stone veneer near wood stoves?
Maintain a clearance of 12 to 36 inches between the stove and the steinfiner depending on the stove model and local fire codes. Ensure the substrate behind the stone is a non-combustible cement board rather than standard drywall to meet safety regulations.
Will the heat from the fireplace cause my stone sealer to turn yellow?
Standard topical sealers can yellow, peel, or scorch when temperatures exceed 400°F. To prevent discoloration, apply a breathable penetrating sealer rather than a film-forming topical sealer. Penetrating sealers live inside the stone pores and are much more resistant to heat-induced degradation.
Final Thoughts
Fireplace safety relies on non-combustible materials that handle thermal cycles without the warping or off-gassing found in resin-based synthetic stone. Our natural quartzite and slate panels provide 100% mineral stability and maintain their structural integrity up to 120°C (248°F). Utilizing CNC diamond-blade edges and same-batch quarry sourcing eliminates visible joints and protects your reputation from the patchy appearance of low-quality alternatives.
Verify our material density and interlocking fitment by requesting a physical sample kit for your showroom. We strictly support B2B dealers and wholesalers, providing high-definition pre-shipment photos to ensure your inventory meets our 95% hue uniformity standard. Contact our team today to review the Big 10 inventory and discuss trial order options for your next project.
