Panels vs Loose Pieces determine installation throughput and rework exposure; choose wrong and you risk schedule overruns, higher labor bills, and missed occupancy deadlines. On commercial and multifamily projects where daily progress ties directly to lease revenue and warranty liability, every hour of rework multiplies cost and client escalation.
This guide serves as a practical SOP: it breaks down interlocking ledgestone veneer panels (6×24), quantifies the speed advantage that lets panels cover walls up to three times faster, walks through techniques to hide the Z-joint seam, and explains when loose ledgestone delivers the authentic, customizable finish owners expect. You’ll get a clear labor-versus-material cost model, step-by-step installation checks, panel cutting tips, and concise answers to common questions like panel sizes, installation methods, and seam-hiding strategies.
Understanding Interlocking Ledgestone Veneer Panels (6×24)
A 6″×24″ interlocking ledgestone panel system combines a Z-shaped mechanical interlock with thin veneer massing to minimize visible vertical joints while keeping installed weights under 13 lbs/ft² for most series.
Panel design and specifications
Manufacturers produce the 6″ × 24″ format as a nominal module that stacks horizontally and uses a Z-shaped interlock to hide vertical seams and lock courses together. That interlock lets installers run continuous elevations with reduced visible joints and repeatable coursing; matching L-shaped corner pieces simplify outside and inside corners without complex mitering.
Series-specific thickness and mass vary by finish and stone type. Typical thickness bands and installed mass guide structural planning and adhesive selection; panels ship stacked and protected to cut on-site waste and speed layout staging.
| Panel Series | Nominal Thickness | Typical Weight (lbs/sqft) |
|---|---|---|
| Flat; Rough; Pencil; Marble | 0.75″–1.25″; 1.0″–1.75″; 0.75″–1.5″; 0.75″–1.25″ | 8–10; 10–13; 9–12; 10–12 lbs/ft² |
Materials and finish options
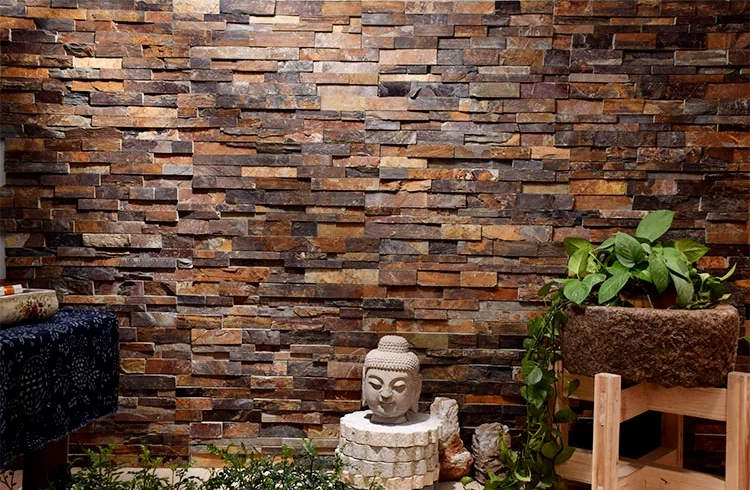
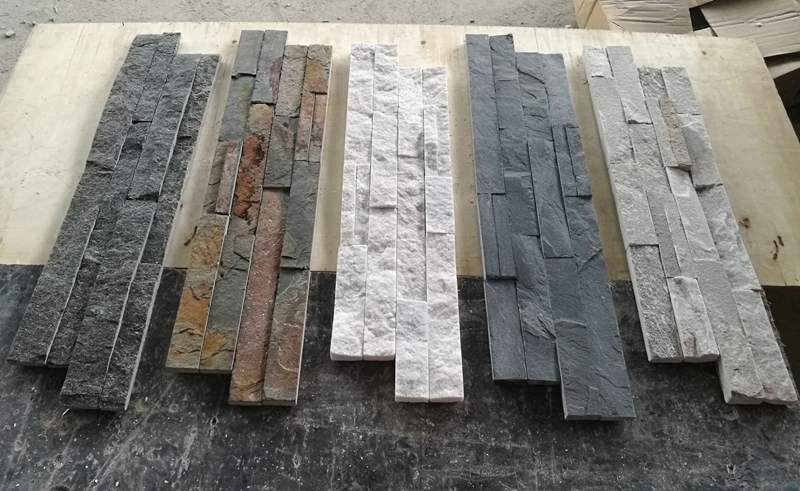
Producers offer ledgestone panels in quarried stone types—slate, quartzite and marble dominate because each gives distinct veining, microtexture and color permanence. Fabrication choices range from low-relief sawn faces to deep split-face cuts that emphasize shadow and depth.
- Flat — clean, modern lines for contemporary interiors and tight mortar joints.
- Rough (split-face) — strong texture and shadow for rustic façades or feature walls.
- Pencil — narrow, detailed profiles for high-resolution feature walls.
- Marble — upscale veining and polish options for interiors and focal points.
Installation system and best practices
Specify structurally appropriate substrates: cement board, cast-in-place concrete or masonry. For drywall applications, install cement board over the drywall first. Use a high-strength epoxy or factory-recommended thin-set mortar formulated for natural stone; factory-bonded backing and controlled assembly reduce field failure risk.
Interlocking panels reduce field cutting and align quickly; use matching L-corners to get clean corner returns without miters. Treat the panel system as a cladding layer, not a waterproof membrane—install continuous WRB, flashing and weep paths on exterior walls and behind wet-area installations. Finish with a stone sealer appropriate for the stone type to protect against staining.
- Substrates: cement board, concrete, masonry (cement board over drywall).
- Adhesive: high-strength epoxy or manufacturer-specified mortar; verify coverage with adhesion tests.
- Corners: use matching L-shaped pieces for clean transitions and fewer cuts.
- Water management: continuous moisture barrier, flashing at penetrations and proper drainage.
Performance, durability and maintenance
Natural stone holds color under UV exposure and delivers long-term durability with low routine maintenance compared with many manufactured alternatives. Proper factory QC and strong adhesive bonding reduce the risk of delamination and keep panels stable over decades.
- Cleaning: soft brush and water; use pH-neutral stone cleaners for stubborn soils; avoid acids and high-pressure washing.
- Fire safety: natural stone is noncombustible and suits fireplace surrounds when installed to code.
- Sealing: apply a quality natural-stone sealer post-install to reduce staining and simplify maintenance.
Commercial benefits: speed, cost and manufacturing controls
For contractors and distributors, interlocking 6″×24″ panels reduce on-site labor and schedule risk. At roughly 8–13 lbs/ft² installed mass, most panels avoid special structural reinforcement, letting teams install higher surface area per day compared with full-thickness stone.
- Installation speed: faster layout and fewer cuts reduce labor hours and project timelines.
- Weight advantage: low installed mass minimizes structural requirements on framed walls.
- Manufacturing controls: in-house quarry sourcing, precision sawing and multi-stage inspection deliver consistent module sizing.
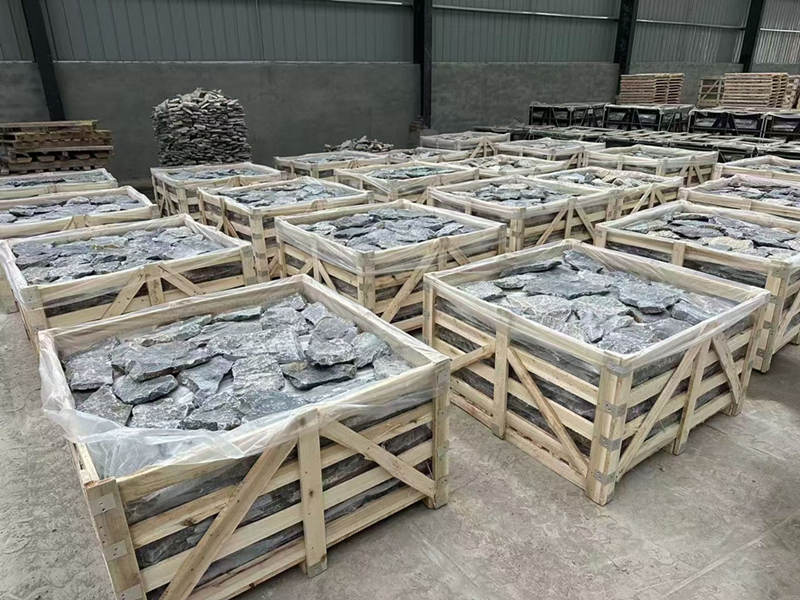
- Packaging & logistics: factory-reinforced cartons and crates, plus optimized loading, cut transit damage and on-site waste.
- Commercial options: OEM packaging, custom panel sizing and MOQ-based selections support distributor and project needs.
The Speed Advantage: Covering Walls 3x Faster
Pre-assembled 6″ x 24″ ledgestone panels convert hundreds of individual placements into single-piece installs, routinely cutting onsite labor time by roughly two to three times compared with hand-laid loose stone under typical conditions.
Panels vs loose pieces: installation time and workflow
A 6″ x 24″ panel effectively behaves like ~1 sq ft of finished veneer that arrives factory-assembled. Installers place one panel rather than setting a dozen small stones, which removes repetitive sorting, individual bonding and the micro-adjustments each loose unit requires. That single-piece workflow shortens layout time and simplifies inventory handling on site.
Loose-piece installs demand more cutting, fitting and leveling per unit and therefore more skilled masonry time. In real projects, standard accent walls installed with panels commonly finish in a fraction of the labor hours needed for loose stone—the practical range runs from two to three times faster depending on site conditions and crew experience.
Interlocking Z-profile and matched corners: alignment and fewer finishing steps
An interlocking Z-profile speeds alignment: installers stack panels and the profile self-registers vertical and horizontal placement, removing the need for precise individual stone alignment and constant leveling checks. Factory-matched L-corners eliminate field mitering and complex corner assemblies, so teams save the time usually spent cutting and refitting corner pieces.
Because panels produce tight joints and, in many systems, no visible grout lines, finish tasks like pointing, joint cleaning and touch-up shrink substantially. Fewer seams and reduced finishing requirements translate to measurable time savings on both small features and long runs.
Weight, handling and crew productivity
Panelized ledgestone typically weighs about 8–13 lbs per sq ft, much less than full-thickness stone. That lower weight speeds lifting, reduces installer fatigue and often removes the need for cranes or other heavy lifting gear, which shortens mobilization and setup time.
Because handling per unit drops, a two-person crew can maintain a fast, continuous workflow on panels where loose or full-thickness stone would require three to four people. When you multiply reduced handling time across hundreds of square feet, the productivity gains create the core of the ‘3x faster’ outcome.
Practical steps and best practices to achieve maximum speed
Follow a predictable sequence and keep common tools staged to avoid interruptions. Planning and staging turn the theoretical speed advantage into a repeatable delivery metric.
- Pre-install checklist: verify the substrate (cement board, concrete or masonry) is secure and flat; mark reference lines and panel layout before any adhesive goes on the wall.
- Stage panels by elevation and stack them in install order; place a hand truck and stable staging platform close to the wall to cut travel time between stacks and the work face.
- Use the manufacturer-recommended fasteners and adhesive application; keep the wet saw, angle grinder and common cutting blades within arm’s reach to minimize downtime for cuts.
- Leverage factory-matched corners and finished edges to avoid onsite corner fabrication; plan vertical courses to reduce the number of partial panels and waste.
- Adopt a two-person workflow on typical accent walls: one installer places and aligns panels, the other verifies levels and secures them. That division of labor keeps cadence high while preserving quality control.
Premium Stacked Stone, Built for Profit

The Seam Problem: Hiding the “Z-Joint” on Panel Walls
A Z-joint is a narrow re-entrant seam whose tiny depth and texture differences create a permanent light-and-shadow line unless you control fit, layout, and surface treatment from the start.
What the ‘Z-Joint’ is
A Z-joint is the interlocking profile at the edges of ledgestone veneer panels that produces a thin, re-entrant seam where two panels meet. Even when manufacturers hold tight tolerances, the joint still creates a visible line because small depth offsets, edge relief, or adjacent texture differences pick up light and cast a shadow.
Variation in panel manufacturing, imperfect alignment during installation, and substrate irregularities amplify seam visibility. Knowing the exact joint geometry matters: some concealment steps change fit and gap, while others focus on surface treatments like pigmented fillers or sealants to visually erase the line.
| Characteristic | Typical Interlocking Panel | Top Source Loose Veneer |
|---|---|---|
| Seam behavior and concealment needs | Creates a narrow re-entrant seam that shows a shadow line from tiny depth or edge differences; requires precise fit, full-bed adhesion, and surface filling or color-matching to hide. | No factory interlock; individually laid stones produce staggered, irregular joints. Sawn-back pieces (25–40mm thickness) blend naturally and rely on grout/filling and L-corners to maintain continuous appearance. |
Common causes of visible seams
Seams appear when any step in the manufacturing or installation chain introduces mismatch. You should diagnose which of these applies before you pick a fix—treatment for a manufacturing tolerance issue differs from treatment for substrate or layout problems.
- Panel-to-panel dimensional variation from cutting or molding, which produces uneven edges.
- An uneven substrate or improper fastening that prevents full engagement of the interlock.
- Insufficient adhesive bed or inconsistent back-buttering that lets edges float instead of locking tight.
- Poor layout planning that concentrates joints along main sightlines instead of staggering them.
- Texture and color variation between adjacent panels that increases contrast at the joint.
Installation techniques to conceal the Z-joint
Address the seam during set-out and fastening. Control layout, substrate flatness, and adhesive technique so panels compress evenly and the interlock closes under consistent pressure. Treat fit as a systems problem, not a cosmetic one.
- Plan layout to stagger vertical seams and avoid long continuous joint lines across primary sightlines.
- Flatten the substrate and shim high or low spots so each panel sits flush; use a straightedge to verify before setting adhesive.
- Use a full, consistent bed of adhesive or back-butter each panel so the mating edges compress into the interlock instead of leaving a gap.
- Apply steady, controlled pressure while engaging interlocks; clamp or brace panels briefly when necessary to close stubborn gaps.
- Cut and trim edge stones at transitions to create irregular, natural-looking breaks rather than a straight repeating seam.
Finishes and repairs to hide seams long-term
If seams remain visible after installation, use surface-level treatments that match color and texture while allowing movement. Choose materials that bond to stone and remain low-profile under natural light to avoid calling attention to the repair.
- Fill narrow gaps with pigmented epoxy or a high-strength stone filler matched to the stone tone and texture; cure then texture the fill with stone dust or fine tooling.
- Use color-matched, flexible mineral-compatible sealants where movement risks reopening seams; avoid high-gloss products that highlight joints.
- Install matching L-corners or trim at predictable transitions so visible sightlines don’t cross factory seams.
- Schedule an annual seam inspection and reapply pigment or sealant where weathering or settling exposes lines.

Loose Ledgestone Veneer: The Ultimate Authentic Customization
Loose ledgestone delivers unmatched tactile authenticity and long-term color stability while enabling field-fit detailing that factory assemblies cannot replicate.
Design and aesthetic benefits
Loose ledgestone gives designers real quarry-sourced texture and one-of-a-kind variation that elevates perceived value. Because each stone arrives as an individual piece with a sawn back, teams create organic, non-repeating facades that read as authentic masonry rather than manufactured repeats.
- Each piece shows unique grain and texture, adding authenticity and perceived value.
- Works across applications: fireplaces, accent walls, commercial façades and landscaping.
- Pairs with the product series (Flat, Rough, Pencil, Marble) to achieve distinct visual effects.
- Natural stone resists UV fade, so color and contrast remain stable long term.
Loose pieces versus preassembled panels: trade-offs
Choose loose pieces when the project demands custom fitting, irregular geometry or artisanal appearance; pick preassembled systems when schedule and repeatability dominate. Loose installation increases on-site decision-making and requires skilled masons, but it yields a bespoke surface that factory modules can’t match in depth or randomness.
- Loose pieces enable precise fit around openings, curved surfaces and complex corners.
- Panels (interlocking/Z systems) install faster and reduce labor on large, flat surfaces.
- Loose installation typically takes more time and skilled labor but supports bespoke patterns.
- Weight and substrate needs are similar per sqft; typical ledgestone ranges 8–13 lbs/sqft, often avoiding heavy footings.
Installation methods and best practices
Reliable performance starts with substrate and adhesive selection. Install loose ledgestone on stable substrates—cement board, masonry or concrete—and match the adhesive to natural stone properties to prevent delamination. Treat exterior terminations and wet areas with proper flashing and a continuous moisture barrier; stone veneer does not replace a membrane.
Save time on corners by using matching L-shaped corners or preformed corner pieces rather than field-mitering every unit. Follow manufacturer guidance for mortar or epoxy strength, and verify coverage with pull tests on sample areas before full-scale installation.
- Install on stable substrates such as cement board, masonry or concrete; add cement board over gypsum when required.
- Use high-strength, stone-specific epoxy or modified mortars per the manufacturer’s guidance to prevent delamination.
- Provide an appropriate moisture barrier and flashings on exterior and wet-area installations; panels themselves are not a waterproof membrane.
- Use matching L-shaped corners or preformed corner pieces to avoid complex field mitering and ensure clean transitions.
Material options, series and specifications
Loose ledgestone comes in slate, quartzite and marble variants and in defined series tuned to different aesthetics and performance needs. Standard nominal format simplifies planning, while custom sizing and OEM packaging support larger B2B orders that need quarry-to-project color consistency.
Specify series by profile and weight when budgeting structural loads and substrate design; the sawn-back finish guarantees a flat bonding surface and reduces field fitting time compared with rough-backed stone.
- Standard nominal panel size: 6″ x 24″; thickness ranges by series (approx. 0.75″–1.75″).
- Flat Series: clean lines and subtle texture for modern minimalism (approx. 8–10 lbs/sqft).
- Rough Series: deep profiles and dramatic shadow for rustic or mountain styles (approx. 10–13 lbs/sqft).
- Pencil Series: thin linear strips for detailed, high-end feature walls; Marble Series: classic white and veined options for luxury interiors.
- OEM packaging and custom panel sizes available for qualifying B2B orders.
Maintenance, durability and long-term value
Natural ledgestone resists weathering and UV, keeps its color, and stands up to freeze-thaw cycles when installed correctly. Apply a quality natural-stone sealer after installation to reduce staining and simplify cleaning; routine care uses a soft brush, water, and pH-neutral cleaners for tougher soils.
Specify supplier quality controls—sawn-back precision, multi-stage inspection and high-strength bonding—to reduce risk of detachments and maintain consistent appearance across large orders. Those controls protect long-term asset value and minimize lifecycle repair costs.
- Natural stone resists weathering and will not fade from UV exposure; it is noncombustible and suitable for fireplace surrounds.
- Recommend applying a quality natural-stone sealer after installation to guard against stains and ease cleaning.
- Daily cleaning: soft brush and water; use a pH-neutral stone cleaner for stubborn stains; avoid acids and high-pressure washing.
- Quality control in manufacturing (infrared cutting, multi-stage inspection, high-strength epoxy bonding) reduces risk of stone detachments and ensures consistency across large orders.
Cost Analysis: Labor Savings vs Material Price
Higher material cost for interlocking ledgestone panels converts to savings when labor rates, schedule pressure, or repetitive volumes push installed-hours down enough to cover the unit premium.
Material Cost Comparison: Panels vs Loose Pieces
Interlocking panels carry added manufacturing steps that raise unit price: precision sawing, epoxy bonding to a rigid substrate, three-stage quality inspection and reinforced export packaging. Those steps produce a consistent, ready-to-install product but move cost from the job site into the factory.
Loose pieces cost less per raw pound, yet they shift work—and costs—into installation: sorting, field cutting, and matching. For large, repeat orders panels reduce per-unit freight and damage risk because they stack and secure predictably; small loose-piece orders can incur higher per-unit shipping and repacking fees. OEM packaging or custom panel sizes raise per-unit material cost but cut on-site sorting time.
| Cost Category | Interlocking Panels | Top Source Stone — Loose Veneer |
|---|---|---|
| Unit price drivers & logistics | Higher unit cost from factory cutting, epoxy backing, QA and reinforced export crates; stacks efficiently for container shipping; lowers field breakage and handling time. | Lower raw-material cost per pound; precision sawn-backs reduce on-site bonding time vs random natural pieces; pallet/crate freight can be less efficient for small orders but supports quarry-to-quarry color consistency for large runs. |
Labor Time and Installation Efficiency
Panels shorten layout and placement steps: their interlocking geometry and pre-assembled faces cut aligning, leveling and joint work. Install crews cover wall area faster and reduce skilled masonry hours per square foot; that speed matters when local labor rates exceed material premiums.
Panels typically weigh about 8–13 lbs/sqft, which simplifies handling and often removes the need for heavy structural reinforcement. Loose-piece installations demand more cutting, incremental fitting and constant leveling, which raises the probability of rework and extends skilled labor time. Pre-formed corners for panels further trim finishing hours compared with custom-cut loose corners.
Total Installed Cost and Break-even Calculation
Use a simple break-even check: (Hours saved per sqft × labor rate) ≥ (Panel unit price − Loose unit price) + incremental panel costs (shipping, custom packaging). Plug project-specific values to see whether panels recover their premium within the schedule and budget constraints.
Project scale pushes the result. Larger façades or multiple repeat units favor panels because factory setup and shipping economies scale. Tight schedules or high local labor rates shorten the payback window. Always include common ancillary tasks—waterproofing, substrate prep, sealing—in the installed cost to avoid underestimating total spend.
Conclusion: Selecting the Optimal System for Your Project
The choice between 6″ x 24″ interlocking ledgestone panels and loose stone pieces ultimately depends on your project’s balance between installation efficiency and artisanal customization:
-
Choose Panels for large-scale facades, multifamily developments, or high-traffic commercial interiors where meeting occupancy deadlines is critical. Panels significantly reduce reliance on high-cost skilled masonry and ensure a consistent, repeatable finish across large elevations.
-
Choose Loose Pieces for high-end custom residential projects, curved architectural features, or focal points where the owner demands a bespoke, non-repeating natural aesthetic that only hand-laid stones can provide.
As a direct-from-quarry manufacturer, Top Source Stone recommends performing a total-installed-cost audit during the design phase—factoring in local labor rates alongside material premiums. When the schedule is tight, the labor savings from a panelized system almost always outweigh the higher unit price.
Ready to accelerate your project timeline?
Contact Coco Yang today to request a Technical Specification Packet or a Sample Box featuring our 6″ x 24″ series and matching L-corners. Let us help you lock in your margins with factory-direct pricing and precision-engineered stone solutions.
