
When you install stone veneer corner units, the difference between a tight job and a callback often comes down to the first ten minutes of prep. Veteran installers know that a corner that looks clean at the end of day one can delaminate by spring if the substrate and adhesive details are skipped. The real cost isn’t the stone—it’s the rework. That’s why more contractors are switching to prefabricated corner units: they cut installation time by 50 percent and eliminate the waste and skill required for field miter cuts.
But speed isn’t the only reason. Field-mitered corners expose raw stone edges that trap moisture, and the repeated-length pattern—the “zipper effect”—is the number-one sign of amateur work. Factory assembled corners from suppliers like Top Source Stone pre-solve both problems: randomized stone lengths hide the pattern, and pre-drilled weep holes let drainage happen without intervention. The numbers on a typical 10-foot run bear this out: miter cutting takes two to three hours and generates 5 to 10 percent waste, while prefab corners go in under 30 minutes with zero waste. At $85 per hour crew cost, that’s $170 to $255 saved per corner—plus you dodge the blade changes and the risk of a rejected facade.
Why Most Installing Stone Veneer Corners Deliver an Unprofessional Zipper Effect Seam Line
The zipper effect is the #1 giveaway of amateur stone veneer work.
Most corner installations look unprofessional because of three predictable failures: repeating stone patterns (the zipper effect), exposed raw edges from miter cuts, and inconsistent gaps that invite moisture. These are not cosmetic quibbles — they create structural weak points that lead to warranty calls and schedule delays.
Unprofessional Field Cutting Visual Fails:
- The Repeating Zipper Line Effect: When field-cut or mismatched corner pieces repeat the same stone length in a row, the eye catches a vertical seam rather than a natural stack. Suppliers who do not actively randomize stone lengths in their prefab corners guarantee this defect.
- Exposed Masonry Miter-Cut Edges: Mitering stacked stone exposes the unfinished side of the stone, which often has a different color and texture. These edges absorb moisture faster than the faced surface, leading to efflorescence and freeze-thaw spalling within two winters in freeze-thaw zones.
- Uneven Gaps from Improper Layout: Field-cut corners rarely account for cumulative measurement error. A 1/8-inch gap at the base becomes 1/2 inch at the top after 8 feet. Gaps over 1/4 inch crack the mortar in the first freeze cycle — a common callback trigger for exterior cladding contractors.
Corners are the most exposed part of any facade. Even hairline cracks at miter joints or between mismatched pieces allow water behind the veneer. Without pre-drilled weep holes (standard on prefab units), trapped water expands during freezing and pops stones off the wall.
ASTM C67 Cost Breakdown: Field Miter Cutting vs Prefabricated Corner Units Wholesale Overhead Analysis
Miter cuts cost $170–$255 per corner in labor alone before blade and waste costs are calculated into the project bid.
On a typical 10-ft corner, field-mitering 20 pieces takes a crew 2–3 hours and generates 5–10% waste from breakage (ASTM C67). Prefabricated corner units install in under 30 minutes with zero waste. That difference hits the bottom line immediately.
Project Material Waste and Crew Labor Projections:
- Miter Cut Labor Time Tracker: Takes 2–3 hours for 10 linear feet of corner (20 pieces cut at a strict 45° angle framework).
- Prefab Installation Speed Limits: Consumes under 30 minutes total for the identical 10-ft corner vertical run.
- Material Waste Ratios (Field Cuts): Suffers 5–10% scrap loss per corner due to immediate masonry breakage and miscuts.
- Material Waste Ratios (Prefab Units): Zero – factory assembled utilizing tight mechanical alignment matrix lines natively.
- Net Labor Cost Savings: Saves $170–$255 per corner (assuming a $85/hr crew cost), equivalent to pocketing $3–$5 per linear foot premium margins.
- Diamond Blade Cost Ratios: Demands approximately $50 per blade change; a miter-cut corner routinely exhausts a fresh blade to preserve alignment accuracy.
| Category | Miter Cut | Prefab Corner | Savings |
|---|---|---|---|
| Labor Time per 10 LF | 2–3 hours | Under 30 minutes | Up to $255 per corner |
| Material Waste Rate | 5–10% (ASTM C67) | 0% (factory-assembled) | No field breakage |
| Diamond Blade Cost per Job | $50 per blade change | $0 (no cutting) | $50+ per corner executed |
| Labor Cost per Linear Foot | $17–$25.50 | $12–$19 | $3–$5 per linear ft |
| Color Consistency | Batch-to-batch variance risk | 95% hue uniformity guaranteed | No rework from mismatched batches |
Prefabricated Manufactured Corner Modules vs Field Miter Trimming Technical Compliance
Prefab corner units eliminate miter cuts, saving 50% time and preventing moisture barrier delamination paths.
Field-mitered corners demand a precise 45° cut on a tilting saw. Even a 2° deviation creates visible gaps that trap moisture. On a 10-ft corner, that’s 20 cuts, each with a 5–10% breakage risk per ASTM C67. The real failure isn’t just aesthetics — those gaps freeze and thaw, spalling the stone within one winter.
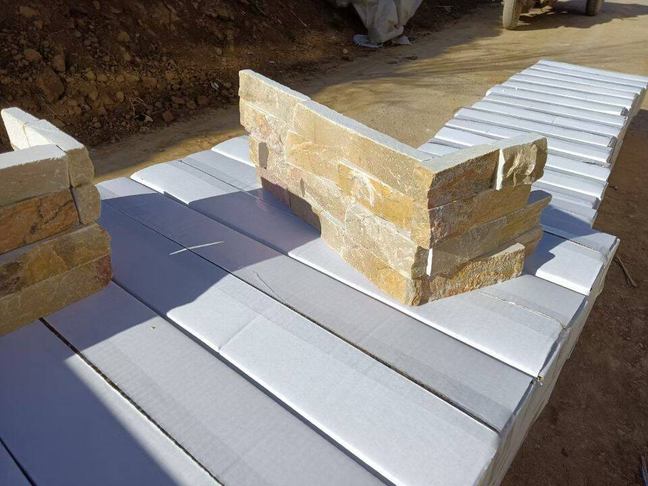
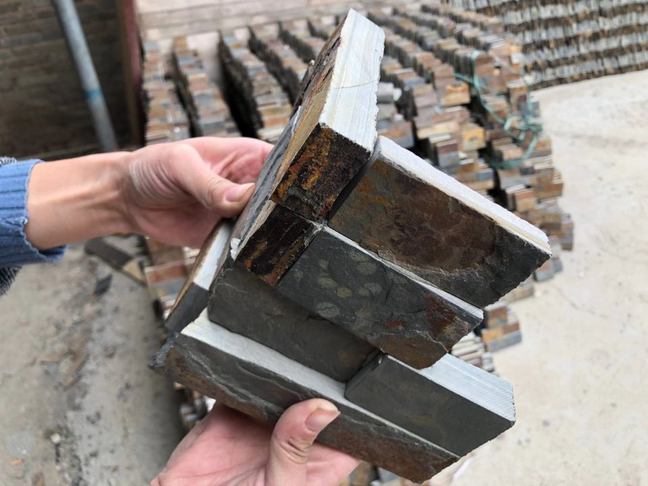
Prefabricated units from Top Source Stone are pre-assembled with random stone lengths, so you never fight the “zipper effect” that plagues mitered installations. Each corner comes with pre-sealed joints and weep holes for drainage — no caulk gun needed. Weight: 6–8 lbs per linear foot, easy one-person carry.
Engineering Performance Advantages:
- Time Optimization Ratios: Miter cuts take 2–3 hours for 10 linear feet. Prefab units drop this to 30 minutes, saving $170–$255 per corner setup line.
- Scrap Mitigation Limits: Field trimming scraps 5–10% of raw stones; factory units land 100% pre-sized and optimized for tight installation parameters.
- Moisture Control Protection: Hand mitered profiles expose low-density stone backing lines. Prefabricated joints stay pre-sealed to conform fully with modern rainscreen codes.
- Zero SAW Friction Overhead: Eliminates continuous field saw re-calibrations and costly diamond blade changes, protecting overall site safety margins.
The decision comes down to site conditions versus a proven solution. If your crew has a calibrated saw, dust control, and time, miter cuts work. But for speed, zero rework, and a corner that won’t fail in freeze-thaw, prefab units are the standard. Dampen the back of each stone before thinset application — engineering data shows this step is critical but widely skipped.
How to Install Polymer-Modified ANSI A118.4 Thinset Mortar on Prefabricated Corner Structures
Prefab corners cut install time by half – if you follow the ANSI-standard structural adhesion methods.
Start with a level starter strip at the base. This sets the reference plane for the entire corner. If the strip is off, every row above will compound the error — you’ll waste time shimming later. Screw it into the substrate at 12-inch centers, check level across its full length.
ANSI Structural Adhesion Milestones:
- Mortar Mix Selection: Enforce polymer-modified thin-sets meeting ANSI A118.4 and A118.11 criteria. Traditional unmodified Type S mixes fail rapidly under cyclic exterior freeze-thaw expansions.
- Trowel Size Parameters: A heavy 1/2-inch square-notched trowel profile is mandatory. Smaller notches skip necessary transfer boundaries required to carry thin veneer loads.
- Plumb and Level Checks: Verify alignment immediately utilizing a 4-foot vertical spirit level. Shim behind mesh backers utilizing thin plastic segments rather than filling deep cavities with thin-set mortar.
Before applying thinset, dampen the back of the corner unit lightly with a sponge. Dry natural stone will suck moisture out of the mortar instantly, weakening the bond. Then butter the back of the unit and the wall, press into place, and rotate the unit slightly — the rotation ensures full contact against both planes of the corner. Work alternating sides — left leg, then right leg, then left again. This forces the stone lengths to randomize naturally.

Avoiding Common Corner Installation Mistakes: A Contractor Checklist
Three corner installation mistakes that generate costly long-term warranty callbacks.
Masonry Failure Avoidance Checklist:
- 1. Structural Substrate Failures Over Non-Compliant Backing Matrix Lines: Exterior thin stone veneer requires continuous cement board or metal lath over a scratch coat. Gypsum drywall lacks the tensile strength to hold dead load limits, prompting micro-cracking and complete delamination after a single winter cycle.
- 2. Installing Unwetted Dry Stone to Thin-set Mortar: Raw quarried metamorphic stone is inherently porous. Pressing panels dry draws hydration out of the adhesive prematurely before crystal interlocking finishes. Lightly damp individual pieces to secure structural bond integrity.
- 3. Specifying Generic Interior Mastics: Standard organic glues possess near-zero flexural frost cycling threshold limits. Enforce continuous modified polymer thinset mortar applications to safely distribute localized masonry shear stress.
Conclusion
Miter cutting corners on site costs you 2–3 hours per 10 linear feet and throws away 5–10% of material. Prefabricated units cut that time in half and eliminate the waste. The real win is avoiding callbacks caused by the zipper effect or exposed cut edges—problems that show up mid-project and never go away.
Check the product specs and batch-matching options at the supplier’s catalog. A 30-minute review on the front end saves a full day of rework on the wall.
Frequently Asked Questions
Do I need to miter corner pieces if I use prefab units?
No, prefab corner units eliminate the need for miter cuts and install directly over the substrate. They are pre-assembled with randomized stone placement to avoid the zipper effect. Simply apply thinset and set them in place.
What thinset is recommended for exterior stacked stone corners?
Use a polymer-modified thinset rated for exterior and freeze-thaw conditions, such as Type S or Laticrete 254. This ensures bond strength and flexibility against temperature cycles. Always verify that your thinset meets ASTM C627 requirements.
How do I ensure color consistency across corner units and field panels?
Blend corner units and field panels from multiple boxes during installation to distribute natural color variation. Factory quality control ensures batch-to-batch consistency, but on-site blending guarantees a seamless look. Order extra material to allow proper blending.
What is the maximum weight per square foot for corner units?
Natural stone veneer corner units typically weigh 15 to 20 pounds per square foot when installed. Always confirm the exact weight with your supplier’s spec sheet and ensure your substrate can support it. Verify with a structural engineer for exterior applications.
How long does the thinset need to cure before grouting?
Allow the thinset to cure for at least 24 hours before grouting to prevent stone movement. In cold or humid conditions, extend curing to 48 hours for full adhesion. Follow the specific cure time recommended by your thinset manufacturer.
