
Mastering the art of cutting & hiding edges on natural stone is the only way to prevent a high-end masonry project from looking like a cheap DIY failure that tanked your profit margins. When installers rely solely on wet saws, they leave behind unnatural, smooth surfaces that scream imitation, often forcing expensive tear-outs when the client realizes the organic aesthetic is lost. For stone contractors, failing to mask these mechanical marks leads to project delays, reputational damage, and a breakdown in the premium quality standards expected in luxury landscape architecture.
This guide establishes a clear technical protocol for maintaining the integrity of fieldstone veneer through manual pitching and strategic joint placement. We break down the exact hammer and chisel techniques required to restore a rough face to sawn edges and provide a step-by-step workflow for tucking cuts into deep mortar beds. By following these onsite procedures for trimming irregular shapes and crafting L-shaped corners, your crew can ensure every joint looks hand-set and every stone appears structural rather than applied.
The Problem with Wet Saws on Organic Fieldstone
Wet saws often compromise the “Bespoke Random-Lay Pattern” by introducing mechanical precision that conflicts with the natural geological profile of authentic fieldstone veneer.
The Destruction of Natural Texture
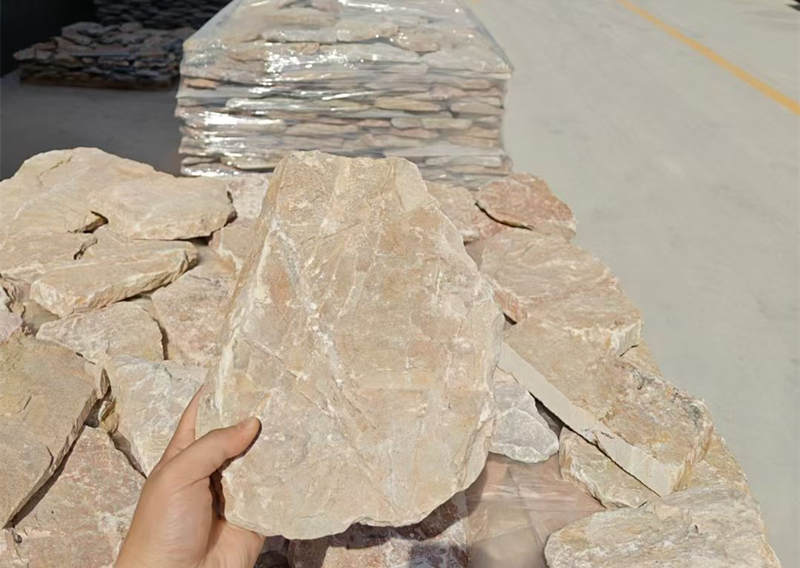
Diamond blades create perfectly smooth, mechanical edges that contrast sharply with the rugged, weathered face of organic fieldstone. These precision cuts remove the unique edge character that allows stones to nestle together naturally, leaving visible tracking marks and a “factory” finish that looks out of place in rustic masonry. Because smooth surfaces reflect light differently than the natural stone face, the eye gravitates toward the artificial joints rather than the stone itself.
- Mechanical tracking marks destroy the “Zero-Repeat Natural Variation” sought by high-end architects.
- Straight edges prevent the “nestling” effect required for a true dry-stack aesthetic.
- Light reflection on sawn surfaces highlights the veneer’s thinness, breaking the “Full-Depth Visual Integrity.
Color Discrepancy and Slurry Staining
Cutting exposes the “fresh” interior of the stone, which often displays a brighter or different hue than the aged exterior patina. This color shift reveals the “veneer” nature of the project. Furthermore, wet cutting creates a fine stone slurry. This liquid waste penetrates the porous surface of organic stone like sandstone or quartzite, leaving permanent dull streaks that are difficult to remove after the stone dries.
Structural Geometry and Fit Issues
The irregular shapes of organic fieldstone make it difficult to hold the stone steady against a arrow fence, which increases the risk of blade binding. Variable thickness across a single piece means the blade may not cut through in one pass, often requiring awkward manual flipping that results in uneven “steps” in the cut line. These rigid, 90-degree lines create “dead spots” in the layout where the organic flow of the wall is interrupted by unnatural geometry.
Would you like me to draft the next section on why straight cuts destroy the masonry illusion and how to avoid them?
Why Straight Cuts Destroy the Natural Masonry Illusion
Mechanical precision in stone cutting creates a visual “tell” that reveals the veneer’s thin profile, stripping away the rugged, structural authenticity of a true fieldstone wall.
The Visual Impact of Mechanical Precision
Standard wet saws produce perfectly linear, smooth edges that never occur in nature. When these machine-cut stones sit side-by-side, the human eye immediately detects the repetitive geometric patterns. This contrast breaks the organic variance expected from a premium installation. Natural fieldstone relies on irregular shadows and varied textures to create depth; a straight saw cut flattens this effect and highlights the boundary of every individual piece.
- Machine-cut edges create artificial symmetry that contradicts natural stone formations.
- Straight lines disrupt the bespoke random-lay pattern, making the installation look like a grid.
- Smooth surfaces fail to reflect light naturally, losing the characteristic “chiseled” shadow depth.
Exposing the Internal Composition
Cutting directly through the face of a thin stone veneer often exposes the unweathered interior of the mineral. This internal core frequently lacks the rich patina developed on the stone’s exterior over centuries. In many quartzite or sandstone varieties, the freshly sawn edge appears significantly lighter or more vibrant than the face, drawing the eye directly to the joint rather than the stone itself.
- Saw blades reveal the internal “fresh” color of the stone, clashing with the weathered surface.
- High-speed blades can cause micro-chipping along the top coat, signaling a non-traditional masonry process.
- Visible cut marks on the edge emphasize the 25–40mm thickness, reminding viewers that the stone is a veneer rather than a full-depth block.
Compromising the Seamless Interlock
While Top Source Stone products feature an individually sawn-back for flat bonding, the face edges must remain irregular to achieve a tight, hand-laid fit. A traditional straight cut removes the subtle protrusions and recesses that allow stones to nestle together. This often leaves installers with a “butt joint”—a vertical or horizontal gap that requires excessive mortar to fill, shifting the aesthetic from a sophisticated dry-stack look to a heavy, traditional mortared style.
- Removing the natural edge forces a reliance on grout to hide gaps, destroying the zero-repeat natural variation.
- Straight cuts create long, vertical lines that telegraph the installation substrate on large facades.
- Loss of irregular edges prevents the “interlocking” visual flow necessary for a bespoke feature wall.
Would you like me to detail the specific “back-cutting” technique used to maintain a natural edge while using power tools?
Boost Profitability with
Premium Stacked Stone
Secure factory-direct pricing on durable, interlocking panels that significantly reduce labor costs and installation time. Our rigorous quality control and direct quarry ownership ensure a consistent supply for your high-volume commercial and residential projects.

The “Pitching” Technique: Using a Masonry Hammer and Chisel
Pitching transforms a flat, sawn edge into a textured, rock-faced profile by using controlled impact to shear the stone along its natural mineral grain.
Selecting Professional Grade Pitching Tools
Modern masonry requires tools that handle the high density of natural quartzite and granite without frequent regrinding. Traditional steel chisels dull quickly against these materials, leading to crushed edges rather than clean chips. Professionals now prioritize tungsten carbide-tipped pitching tools. These inserts maintain a sharp, 90-degree striking face, which is essential for directing the kinetic energy of the hammer into the stone’s body rather than dissipating it across the surface.
| Tool Component | Standard Grade | Top Source Stone Spec |
|---|---|---|
| Chisel Tip Material | Hardened Carbon Steel | Industrial Tungsten Carbide |
| Hammer Weight | 16 oz – 24 oz (Light) | 2 lb – 4 lb (High Momentum) |
| Handle Ergonomics | Steel / Plastic | Anti-Vibe Wood or Fiberglass |
Effective tool selection also involves matching the hammer weight to the stone thickness. For our 25–40mm thin stone veneer, a 2-to-4-pound masonry hammer provides the necessary momentum to break the stone face without requiring excessive swing velocity. Wooden handles remain a favorite for many masons in 2026 due to their natural vibration damping, though high-quality fiberglass serves as a durable alternative for high-volume job sites.
The Mechanics of the Pitching Stroke
The goal of pitching is to remove the “flatness” of a saw cut and restore the stone’s natural, rugged character. To achieve this, we place the chisel blade about 1/4 inch back from the sawn edge and angle the tool slightly toward the rear of the stone. This orientation creates a forward-sloping break that mimics a natural quarry split. Striking the chisel with a single, authoritative blow is more effective than repeated light taps; a single impact sends a clean shockwave through the material, resulting in a crisp fracture rather than messy crumbling.
- Place the stone on a sandbag or a bed of stone dust to absorb excess vibration and prevent the back of the stone from cracking.
- Work the chisel progressively along the edge to ensure a uniform “rock-faced” texture across the entire piece.
- Inspect the bedding plane of the stone before striking; always pitch in a direction that respects the natural layers of the mineral.
Safety Standards and Ergonomic Positioning
Pitching generates high-velocity stone shards, making high-impact safety goggles and heavy-duty gloves mandatory. Beyond basic PPE, 2026 ergonomic standards emphasize the “athletic stance”—feet shoulder-width apart and knees slightly bent. This posture provides the stability needed to drive the hammer using the larger muscles of the shoulder and elbow, rather than relying solely on the wrist. Keeping the wrist straight during the strike minimizes the risk of repetitive strain injuries, a common issue in large-scale commercial masonry.
Would you like me to detail the specific mortar mixing ratios required to ensure these pitched stones bond permanently to exterior substrates?

Hiding Sawn Edges Within the Deep Mortar Joints
Effective stone masonry in 2026 relies on shadow-gap geometry and specific joint profiles to eliminate the “manufactured” look caused by mechanical saw cuts on natural fieldstone veneer.
Strategic Recessing Techniques
Architectural standards now emphasize deep-set mortar profiles to mask the mechanical uniformity of sawn stone edges. We remove mortar to a depth of at least twice the joint width. This creates a natural shadow line that effectively obscures the cut face of the stone. Masons must maintain a strict 90-degree profile during the raking process. This precision ensures the secondary mortar application bonds securely to the stone substrate without slipping or cracking over time.
| Finishing Technique | Visual Impact | Technical Benefit |
|---|---|---|
| Deep Raking (2x Width) | High-contrast shadow lines | Obscures flat saw-cut profiles |
| Concave/Grapevine Joint | Traditional hand-laid aesthetic | Compacts mortar for water shedding |
| Multi-Coat Pointing | Seamless texture integration | Unifies surface across varied cuts |
Deep raking allows the natural face of Top Source Stone’s individually sawn-back veneer to project forward. This projection makes the flat, sawn sides of the interior pieces invisible to the observer, maintaining the “Full-Depth Visual Integrity” that B2B clients demand for high-end feature walls.
Concealing Cut Lines with Concave Profiles
Using specific jointing tools helps blend the transition between the natural stone surface and the mortar bed. Concave and grapevine jointing tools compress the mortar against the sawn edges, creating a tight seal that hides the transition point. The curved finish of a concave joint directs light away from the flat cut surface. This optical trick maintains the illusion of full-thickness, hand-dressed stone even when using thin veneer.
In moisture-prone areas, we apply a high-strength epoxy resin or specialized stone caulk. This prevents condensation patterns from revealing the underlying joint geometry. Without this protection, moisture often “telegraphs” the straight lines of a saw cut through the mortar during damp weather, breaking the organic illusion.
Color Matching and Finishing Applications
Strategic material selection ensures the final mortar coat provides a uniform texture across the entire facade. We use a multi-coat finishing strategy, often involving a brown coat stucco application, to unify the surface before the final pointing. This layered approach fills small voids and creates a consistent base that masks any over-cuts or micro-chips from the installation process.
Matching the mortar pigment to the secondary tones of the natural slate or quartzite draws the eye toward the stone’s texture rather than its edges. After installation, our team applies pH-neutral natural stone sealants. These protect the joints and prevent staining that could otherwise highlight mechanical cuts by trapping dirt in the fine grooves of a sawed edge.
- Use iron oxide pigments to match the mortar to the stone’s “vein” color.
- Apply sealants only after the mortar has fully cured to avoid efflorescence.
- Maintain consistency in joint depth across the entire project to ensure uniform shadow casting.
Would you like me to draft the next section on “Trimming Stones for Perfect L-Shaped Corners,” focusing on the technical specs of our Authentic Masonry Corner Wraps?
Trimming Stones for Perfect L-Shaped Corners
Matching L-shaped corners are the only way to achieve full-depth visual integrity, transforming a thin veneer application into a structure that is indistinguishable from traditional, heavy-duty masonry.
Utilizing L-Shaped Corner Pieces for Seamless Transitions
Top Source Stone provides specialized L-shaped corner units to eliminate the amateur look of mitered joints or exposed sawn edges. These pieces wrap around the substrate to maintain a continuous natural texture, mimicking the appearance of full-sized structural blocks. By installing these units first, you establish a square, stable foundation that dictates the alignment for the rest of the loose stone run.
To avoid the “zipper effect”—a predictable vertical line that screams “artificial”—installers must alternate the long and short returns of the L-shaped pieces. Our corner units feature long sides of 150–250mm and short sides of 50–100mm, allowing for a bespoke random-lay pattern that breaks up vertical seams and reinforces the authentic masonry illusion.
| Corner Specification | Standard L-Shape | Installation Benefit |
|---|---|---|
| Dimensions | 150-250mm (Long) / 50-100mm (Short) | Eliminates visible vertical seams |
| Average Weight | ~25 kg per lineal meter | Balanced load for modern substrates |
| Backing Finish | 100% Individually Sawn-Back | Reduces on-site labor by 30% |
Precision Trimming Techniques for Custom Fits
Field adjustments are inevitable when working with random-sized fieldstone. When you must cut a stone, use a wet tile saw with a continuous rim diamond blade to minimize chipping. However, a clean saw cut looks out of place next to the rugged face of natural quartzite or sandstone. Masons use a “back-cutting” technique: cut from the rear of the stone and stop just before the front face, then snap the remainder with a masonry hammer to create a natural, textured edge.
- Use carbide-tipped pitching tools to “dress” any exposed saw marks, restoring the rugged character of the stone.
- Analyze the bedding plane before striking; always work perpendicular to the grain to prevent the stone from splitting unpredictably.
- Maintain the 25–40mm thickness profile during trimming to ensure the stone remains within weight tolerances for the wall substrate.
Adhesion and Finishing for Corner Longevity
The structural integrity of a corner relies on the bond between the sawn back of the stone and the substrate. Because our veneer is 100% sawn-back, it provides a flat, high-friction surface that maximizes adhesive contact. We recommend high-strength epoxy resins or specialized stone mortars that can handle the specific weight distribution of L-shaped units, which average 25 kg per lineal meter.
Finalizing the corner requires more than just placement. Once the mortar cures, apply a pH-neutral sealer to protect the natural minerals from moisture ingress. This is especially critical in freeze-thaw climates where water trapped in the corner joints could lead to spalling. This climate-tested durability ensures that the feature wall retains its structural and aesthetic value for decades.
Would you like me to draft the “Frequently Asked Questions” section next to address specific tool recommendations for these cuts?
Conclusion
Mastering the pitching technique and utilizing sawn-back fieldstone ensures your projects maintain the authentic look of a traditional full-depth dry stack wall. By hiding cut edges within deep mortar joints and using matching L-shaped corners, you preserve the natural masonry illusion while benefiting from modern, lightweight installation standards. These methods prevent the repetitive, artificial appearance often found in pre-glued panels and guarantee a bespoke finish that stands up to close inspection.
Review your current stone inventory to ensure you have the necessary loose pieces and corner wraps for a seamless installation. You can also contact our team to request a technical catalog or a sample of our quarry-sourced thin stone veneer for your next large-scale project.
Frequently Asked Questions
How to cut irregular fieldstone veneer?
Cutting irregular fieldstone veneer requires a combination of power tools for speed and hand tools for authenticity. Use a circular saw or wet saw equipped with a diamond blade to score the back of the stone or make straight cuts. For a more natural, “rock-faced” look, score the stone approximately 1/3 of the way through and then use a hammer and wide masonry chisel to snap the stone along the score line, which preserves the textured edge.
Can you cut fieldstone with an angle grinder?
Yes, an angle grinder is one of the most versatile tools for cutting fieldstone, especially for making curved cuts or trimming small sections. Use a 4.5-inch or 7-inch grinder fitted with a continuous rim or segmented diamond blade. Always work in a well-ventilated area and use a vacuum attachment or a light stream of water to manage the significant amount of silica dust generated during dry cutting.
How to hide cut edges on stone veneer?
To hide unsightly saw marks, use a masonry hammer or “pitching” tool to chip away at the sharp, smooth edge of the cut until it matches the natural texture of the stone face. Additionally, you can miter the edges at 45-degree angles for corners, or use a color-matched mortar to “over-grout” or tuck-point around the cut edges, effectively blending them into the surrounding joints.
What is a pitching chisel used for?
A pitching chisel is designed specifically for “squaring up” or dressing the edges of a stone to create a clean, yet natural-looking border. Unlike a standard chisel, it has a thick, offset blade that is struck while held against the edge of the stone. This action forces a controlled flake or “spall” to break off from the face, removing the smooth sawn surface and replacing it with a rugged, pitched texture.
Shaping natural stone for a tight fit?
Achieving a tight fit (often called a “dry-stack” look) involves a process called “tracing.” Place the stone to be cut over the installed stones and trace the contours of the gap onto the back of the new stone. Use a point chisel or a small grinder to remove excess material slowly, frequently “dry-fitting” the piece and trimming high spots until the stones lock together with minimal joint spacing.
