
Corner pieces are the only reliable method for achieving a convincing full-bed look with thin stone veneer, and skipping them is the fastest way to expose your project as a facade that lacks depth, durability, and aesthetic integrity. Every exposed outside corner that receives a flat-cut seam or miter joint creates a visible weak point that calls the entire installation into question. For architects, masonry contractors, and builders who stake their reputation on authentic appearances, the decision to use manufactured corner stones or cut custom returns from flat pieces directly impacts how a project is perceived long after completion.
This guide walks through the technical decisions behind selecting, measuring, and installing L-shaped corner veneer pieces so you can avoid the unnatural pancake look that plagues rushed jobs. You will learn how to calculate linear footage for corner returns, alternate long and short legs for visual variety, and cut custom corners from flat thin stone veneer when preformed options fall short. By the end, you will have a clear workflow for treating outside corners as intentional design elements rather than afterthoughts.
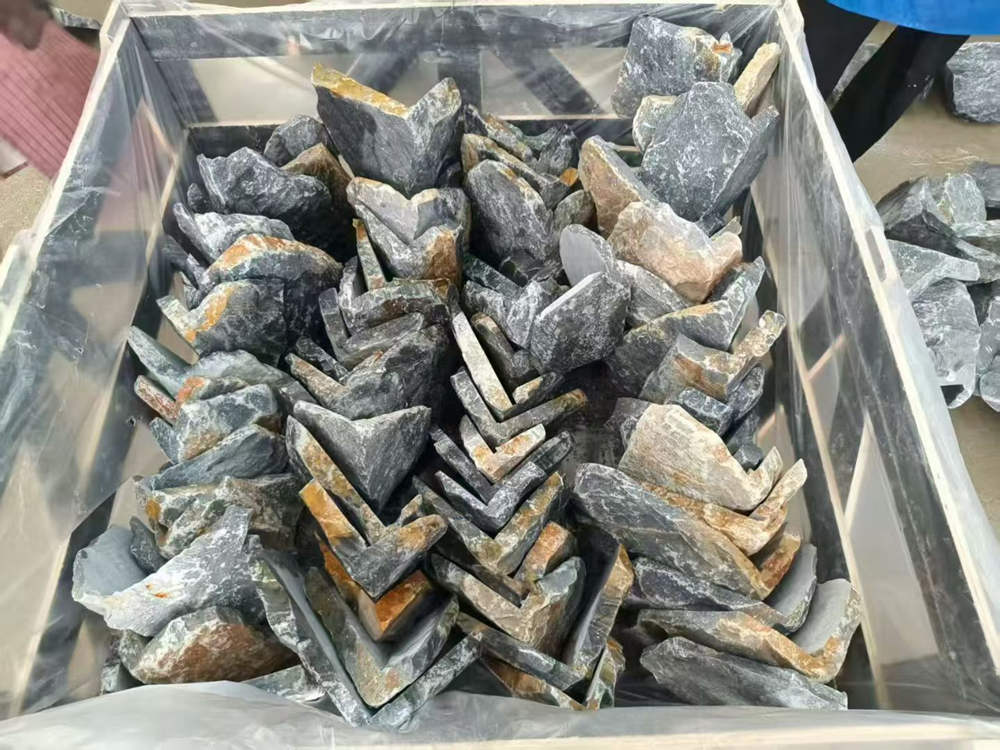
L‑shaped corner stones are the difference between a wall that reads as thin veneer and one that reads as solid, quarried stone.
The Secret to Authentic Appearance: L-Shaped Corner Stones
Why L-Shaped Corners Matter for Visual Depth
L‑shaped corner stones eliminate visible seams at wall edges. When you butt two flat pieces together at a corner, you get a sharp, manufactured line that screams “veneer.” An L‑shaped piece wraps the face around the corner in one continuous form, creating the illusion that the stone is full depth—like a block that was quarried and split in place. This is non‑negotiable for high‑end residential or commercial facades where corners are the first thing the eye hits.
The effect is more than cosmetic. The uninterrupted L‑shape preserves the natural texture and shadow lines of the stone across the corner. On exterior facades and feature walls, this visual continuity adds the kind of weight and substance that separates a premium install from a DIY job. If you spec thin veneer without dedicated corners, you are accepting a flat, cut‑off appearance at every wall end, chimney, and column.
| Corner Method | Visual Impact | Installation Complexity |
|---|---|---|
| Butted flats (no corner piece) | Flat, “tile‑like”; visible seam at edge | Low (but looks bad) |
| Mitered flats (field‑cut 45°) | Clean line; can mimic depth but lacks natural wrap | Medium‑high (requires precise jig) |
| Factory L‑shaped corner | Full‑depth illusion; natural edge on both faces | Low (pre‑formed, consistent) |
Matching Color and Texture with Corner Pieces
Color and texture mismatch is a dead giveaway that the stone is veneer. Our approach at Top Source Stone is simple: L‑shaped corners are cut from the same quarry vein as the flat panels. We pull the entire order from one block, so the veining, tone, and surface character carry across the corner without a visual break. This matters on every project, but it matters most on large‑format walls where the corner is a dominant vertical line.
We also align texture patterns during fabrication. The corner piece is not just a block of stone cut into an L—it is positioned so that the cleavage, grain, or ledge lines flow naturally from the flat face. Our quality control team visually inspects every corner‑to‑panel transition. If the flow breaks, the piece gets rejected. You do not get a shipment where a random corner clashes with the field stone.
Modular Sizing and Installation Efficiency
Standardized L‑shaped corner sizes reduce site labor. Our corners are dimensioned to match our flat panels—long side 150–250 mm, short side 50–100 mm—so the installer can pull a corner, butter it, and set it without measuring, cutting, or adjusting. This modular approach eliminates complex field cuts that slow down crews and introduce error. On a typical house with four outside corners, we cut corner installation time by at least 30% compared to field‑mitered solutions.
The weight profile also helps. Our L‑shaped corners run about 25 kg per linear meter. That is light enough for a single mason to handle without a lift, yet heavy enough to feel solid. No additional structural support is needed beyond the standard cement board or concrete substrate. For B2B clients, this translates directly to faster completion times and lower labor costs per square foot.
Improved Anchoring Systems for Durability
An L‑shaped corner that shifts or loosens over time destroys the aesthetic. Our anchoring system uses high‑strength epoxy adhesive applied to the sawn‑back surface of the corner, bonding it directly to the substrate. The result is a permanent connection that resists wind loads, thermal cycling, and structural movement. We do not rely on mechanical fasteners; the bond is chemical and rated for exterior‑grade exposure.
For projects in freeze‑thaw zones or high‑wind regions, this matters even more. The corner piece remains flush with the wall surface, maintaining the continuous shadow line and depth effect for the life of the building. If you are specifying thin stone for a commercial facade or a multi‑family development, this durability is what protects your reputation and your client’s investment.
Calculating Linear Footage for Corner Veneer Pieces
Getting the corner quantity wrong is a costly mistake. Standardizing your measurement method is the only way to align designer intent, supplier orders, and installer reality.
Standard Measurement Conventions for Corner Veneers
The industry has moved past guesswork. Linear footage for corner pieces is now calculated by summing both leg lengths of each L-shaped piece, not just the visible face. For example, a standard corner piece with a 6-inch leg on one face and a 4-inch leg on the return contributes 10 linear inches of corner coverage, not just 6. Industry defaults often assume a 4-inch return per leg for quick estimates, but any custom project demands actual leg lengths pulled from the plans.
This standardized approach reduces waste by ensuring the corner pieces match both the wall heights and corner counts precisely. If you’re using a supplier’s linear-footage rating for their prefabricated L-corners, verify their exact conversion rule. Some manufacturers define one “linear foot of corner” differently—usually based on the sum of the two legs—but the key is to confirm that your takeoff unit aligns with their packaging.
Below is a practical comparison of how measurement accuracy affects material ordering:
| Method | Example Calculation | Ordering Outcome |
|---|---|---|
| Single-face measurement (error) | Corner height = 9 ft → order 9 lf | Under-order by roughly 30% |
| Standard two-leg convention (correct) | Corner height = 9 ft; each 6″ leg → 18 lf total | Accurate order, minimal waste |
Digital Takeoff and BIM Integration for Precision
Manual calculations are obsolete on any serious commercial or custom residential project. Estimators now use digital takeoff tools—Bluebeam, PlanSwift, or similar—to trace wall edges and generate linear footage counts for corners in seconds. These tools automatically convert wall heights and corner quantities into exact linear footage, and they eliminate the arithmetic errors that happen when you’re dealing with two-dozen corners across three elevations.
BIM integration takes it further. With a 3D model of the facade, the software captures complex corner geometries—like bay windows, stair-step walls, or angled returns—that manual calculations typically miss. Consistency across digital platforms is critical: your takeoff measurement convention (two-leg sum per corner) must match what the supplier uses in their packaging specs. If the model says 52.8 lf of corners and the supplier’s box rating is 8 lf per box, you get 7 boxes, not 6.6. That precision avoids the wasted time and freight cost of a second order for a shortfall.
Best Practices for Contractors and Estimators
Three rules hold up in the field. First, double-check your linear footage by converting wall height and corner count into a total footage figure, then add the waste factor—5-10% extra for a typical job, 15% for complex facades with lots of openings and steps. Second, use the same measurement units across all project documents. If your takeoff is in feet but the supplier’s product sheet uses inches, convert everything to one unit before ordering. Third, request the supplier’s specific conversion chart. Top Source Stone, for example, rates its L-shaped corners at a weight of approximately 25 kg per lineal meter with a long side between 150-250 mm and a short side between 50-100 mm. Different manufacturers define linear footage slightly differently for L-shaped corners, so you need the exact figure, not a guess.
Boost Profits with Premium Stacked Stone

Alternating Long and Short Returns for a Natural Look
Alternating return lengths on corner pieces is the single most effective technique for breaking the visual monotony of modular veneer systems, directly replicating the organic variation found in quarried full-bed stone.
Why Alternating Return Lengths Matter
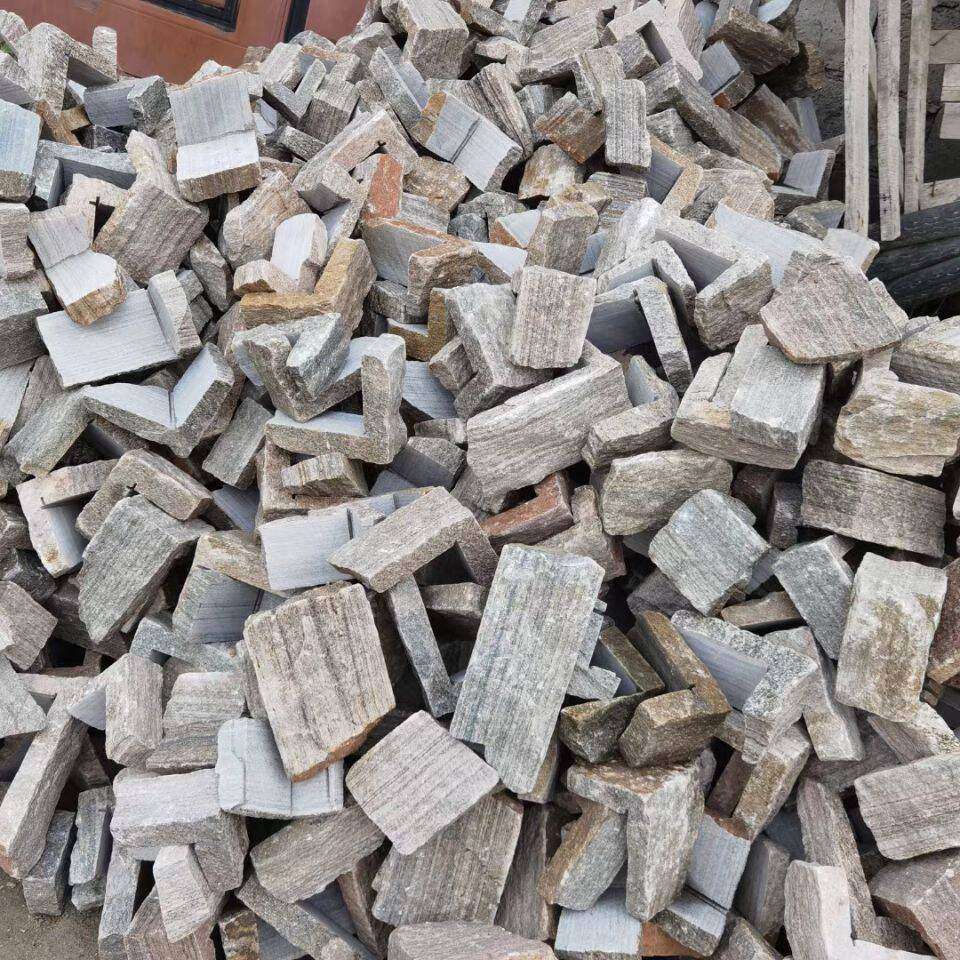
The core principle behind alternating long and short returns on corner pieces is direct: break the visual monotony that screams “manufactured.” In full-bed natural stone, corner stones are rarely uniform in depth. They vary naturally. By replicating this irregularity, the veneer system gains an authentic, hand-laid appearance. Uniform return lengths create a repetitive, geometric pattern that signals to the eye that the material is fake. Alternating lengths mimic the organic variation found in quarried stone, where each piece has a unique shape and depth. This technique is most effective when combined with random color blending and varied stone sizes across the panel. Architects and designers increasingly specify this approach for high-end residential and commercial projects to avoid the ‘pancake’ look.
Manufacturing Techniques for Randomization
Producing convincing alternating returns requires precise engineering and manufacturing control. Digital modeling and CNC cutting allow manufacturers to create ‘L’ corner pieces with predetermined but non-repeating leg lengths. The goal is to create a system that appears random but is structurally consistent. Digital molding software calculates variations in leg length, ensuring no two adjacent corners share the same return dimension. CNC cutting equipment maintains tight tolerances so that while lengths vary, the interlocking system remains seamless. Color-blending technology matches the varied stone shades to the return pieces, so the visual transition from face to corner is natural. Quality control checks every corner set to guarantee the pattern does not repeat across the entire panel stack.
| Technique | Outcome | Why It Matters |
|---|---|---|
| Uniform return lengths | Repetitive, geometric pattern | Signals manufactured product |
| Alternating long/short returns | Organic, varied depth | Mimics natural quarried stone |
| Digital modeling + CNC cutting | Non-repeating leg lengths | Structural consistency with visual randomness |
| Color-blending technology | Seamless face-to-corner transition | Removes visual break at corner |
Installation Best Practices for Installers
Even the best-engineered corner pieces require proper installation to achieve the intended natural look. Installers must be trained to treat the alternating returns not as random but as a deliberate design pattern to avoid accidental repeat sequences. Always dry-lay the first row of corners before applying adhesive to check for visual balance and pattern repetition. Mix corner pieces from multiple boxes during installation to ensure color and texture variation across the wall. Avoid placing two short returns or two long returns directly next to each other unless the natural stone source would allow it. Use a consistent mortar joint width (typically 1/4 to 3/8 inch) to prevent the pattern from looking crowded or disjointed.
Common Mistakes That Ruin the Effect
Several installation habits can quickly undermine the alternating return technique, making the wall look staged or artificial. Understanding these pitfalls helps both installers and specifiers ensure the final project meets the aesthetic goal of authentic natural stone. Using all the long returns in one section creates a pronounced, heavy shadow line that draws attention to the corner. Failing to rotate corner pieces by 180 degrees can inadvertently align the long side of one piece with the short side of another, creating a visible seam. Applying adhesive too heavily can force the corner piece to sit flush against the wall, flattening the depth variation that the alternating lengths provide. Skipping the final visual inspection after the first course is set is a critical error; small adjustments right after placement can fix pattern errors before the adhesive sets.
Material and Structural Considerations
While the aesthetic benefit of alternating returns is clear, the technique must also account for material properties and structural performance. The corner pieces must remain durable and easy to install without sacrificing the visual goal. Thinner veneer stones (around 0.75–1.25 inches thick) are ideal for alternating returns because they allow for more variation in leg length without creating weak points. Thicker stones (1–1.75 inches) require more careful cutting to maintain structural integrity at the corner joint. The interlocking system must be designed to accommodate varied leg lengths without reducing the bond strength at the wall edge. For external corners, ensure the longer return faces the prevailing weather direction to minimize water ingress risk.
Cutting Custom Corners from Flat Thin Stone Veneer
When factory L-shaped corners aren’t an option, mitering flat veneer on site with a wet saw and diamond blade is the standard method for achieving that full-bed masonry look at any angle.
On-Site Mitering Techniques for Thin Veneer
When you’re working with flat thin stone veneer and need custom corners, the wet saw with a diamond blade is your primary tool for clean, precise 45-degree miters. This method works consistently across both Flat series (0.75-1.25 inches thick) and Rough series (1-1.75 inches thick) panels. The key is letting the blade do the work—forcing the cut cracks the stone. For fine-tuning edges, especially on irregular stone surfaces where depth varies, an angle grinder fitted with a diamond cup or blade gives you the flexibility to adjust on the fly.
Jigs and miter boxes improve repeatability and alignment, which matters when you’re cutting multiple corner pieces for large-scale projects or commercial facades. The goal is to create matching miters—typically 45° + 45° = 90°—where the sawn faces meet on the inside of the corner and the natural faces show on both sides of the wall. For non-standard angles like bay windows, follow the same logic: 22.5° + 22.5° = 45° for a 45° corner, 67.5° + 67.5° = 135° for a 135° corner. Always dry fit every pair before setting them.
| Technique | Primary Tool | Best Use Case |
|---|---|---|
| Standard 90° miter | Wet saw with continuous rim diamond blade | Outside corners for Flat series veneer |
| Fine-tuning and back-cutting | Angle grinder with diamond cup or blade | Irregular stone surfaces, Rough series |
| Custom angles (45°, 135°) | Wet saw with adjustable jig | Bay windows, angled walls, non-standard returns |
Key Edge Alignment and Structural Considerations
Consistent stone thickness is non-negotiable for tight miter joints without lippage. For the Flat series, maintaining 0.75-1.25 inches ensures the faces align flush across the corner. When thickness varies, you end up with visible steps at the joint—a quality control issue that immediately undermines the full-bed masonry look. This is where sawn-back veneer from a single quarry vein gives you an edge: precision-cut backs mean consistent thickness across every piece.
Water management matters more than most installers realize. The veneer system itself isn’t a waterproof barrier, so sealed miter joints and a vapor barrier behind the veneer prevent moisture infiltration. On the structural side, strong adhesive bonds at mitered edges are critical. Use epoxy formulated specifically for natural stone—something like the high-strength type designed for corner applications—to prevent pieces from delaminating over time. Back-cutting the miter slightly with an angle grinder creates a V-shaped mortar space, letting the outside edges close tightly while the interior joint holds more mortar for a stronger bond.
Trends in Custom Corner Solutions for 2026
The demand for on-site miter systems and pre-scored corner panels is climbing, especially in high-end residential and light commercial projects where authentic stone aesthetics without visible joint lines are the expectation. Training programs now emphasize both structural integrity and aesthetic continuity. Installers are being taught to alternate long and short returns—similar to how the Rough series achieves its high-dimension effect—to avoid the repeating patterns that reveal the product’s modular nature.
The lightweight advantage (8-13 lbs/sqft) makes custom corners from flat veneer cost-effective compared to full-thickness stone while eliminating the need for footings. For dealers and contractors, this means you can offer clients the look of quarried L-pieces without the weight or cost penalties. The trend is clear: on-site mitering with proper tools and training is becoming standard practice, not a workaround.
Avoiding the Unnatural “Pancake” Look on Wall Edges
A thin, architectural edge is the difference between a wall that looks like real masonry and one that screams “veneer” from across the street.
Pre-Formed Corner Profiles and Trims
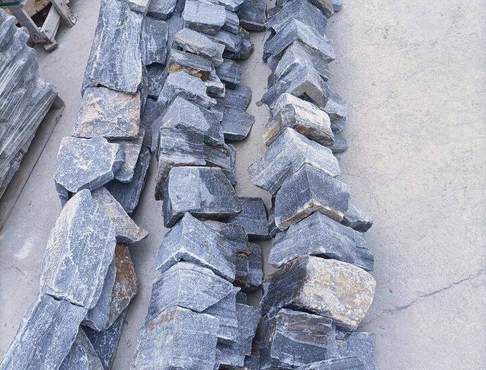
The “pancake” look happens when installers build up too much material at the edge to compensate for a lack of proper corner pieces. Pre-formed L-shaped corner stones are the primary fix for this. They eliminate the need for miter cuts or extra layers of material at wall edges by providing a factory-made return that matches the thickness of the flat veneer. Standardized corner kits from suppliers maintain consistent edge profiles across the entire project, and slimmer profiles allow the veneer to sit closer to the wall surface, avoiding bulky, unnatural seams.
Reducing On-Site Buildup and Compound Layering
Experienced installers know that compound layering and excessive sanding at corners is a recipe for the pancake effect. Prefabricated corner pieces directly reduce the need for multiple layers of adhesive or mortar at edge transitions. Digital detailing through BIM tools allows for precise planning of corner assemblies before any material touches the wall. Best practices now emphasize using corner trims that match the panel thickness exactly to avoid stepped edges that require build-up to level.
The table below compares the traditional on-site method with a modern system using pre-formed corners.
| Detail | Traditional On-Site Build-Up | Pre-Formed Corner System |
|---|---|---|
| Edge Thickness | Inconsistent; often thicker due to mortar layering | Consistent; matches flat veneer thickness |
| Install Time | Higher; requires cutting, fitting, and sanding | Lower; pre-formed pieces install quickly |
| Visual Result | Can lead to “pancake” look and uneven edges | Slim, architectural lines, no visible buildup |
| Waste | Higher; material loss from cutting and grinding | Lower; minimal cutting on site |
Digital Detailing and Standardized Kits
Consistency is key to avoiding the pancake look, and digital tools are making that more achievable. BIM-compatible corner components allow architects to specify exact trim profiles for clean edges from the start. Standardized kits include pre-measured corner pieces that align perfectly with panel dimensions, removing guesswork on site. Training on using these digital tools helps installers replicate clean transitions across multiple walls, which is critical for large commercial projects where any inconsistency is magnified.
Training for Aesthetic and Durability Focus
The industry is expanding training and best-practice guidelines to treat the pancake look as both a visual and structural issue. Training modules now cover proper corner preparation techniques to avoid overbuilding edges. Guidelines emphasize using corner profiles designed for the specific panel system to maintain thin lines. Durability testing ensures these slimmer profiles still meet structural requirements for edge protection, so you don’t have to trade aesthetics for strength.
Conclusion
Mastering thin stone veneer corners is the key to achieving that full-bed, authentic masonry look that separates professional installations from amateur work. By carefully calculating linear footage, alternating long and short returns, and cutting custom L-shaped pieces from flat veneer, you eliminate the unnatural pancake appearance on wall edges and deliver a project with full-depth visual integrity.
For your next project, review your current corner stock and consider ordering matching L-corners from our quarry-direct inventory. Contact our B2B team to request a sample kit or to discuss bulk pricing for consistent, vein-matched corners across your entire order.
Frequently Asked Questions
Does thin stone veneer have corner pieces?
Yes, L-shaped corner pieces are a standard and critical component in thin stone veneer systems. They are specifically manufactured to wrap around external corners, eliminating the need for miter cuts and providing the visual illusion of full-depth stone. These prefabricated corners are available in matching color and texture blends, ensuring a seamless, high-end architectural finish on wood or steel-framed structures.
How to measure for stone veneer corners?
Measure the total vertical height of each outside corner from the bottom of the starter row to the top termination point. Then, count the number of corner pieces required by dividing the total height by the exposed height of a single corner unit (typically 4–6 inches, depending on the manufacturer). Always account for a 3/8″ to 1/2″ mortar joint between pieces. For inside corners, measure the same way but plan for overlapping returns. Add 5–10% extra for waste and complex angles.
How to cut thin stone veneer for corners?
For standard L-shaped corner pieces, no cutting of the corner itself is needed — they are factory-formed. However, for top row termination or inside corner returns, use a diamond-blade wet saw (recommended) or an angle grinder with a masonry cutting wheel. Score the stone on the back side first to prevent chipping, then snap cleanly. Always wear a respirator and eye protection, as thin stone dust contains silica. For tight radius curves, use a tile saw with a continuous rim blade.
Do you install corner stones first?
Absolutely. Industry best practice is to install L-shaped corner stones first, before any flat field units. This establishes the vertical corner plumb line and creates a uniform reveal for the field stone to run into. Install one corner unit at a time from bottom to top, checking for level and alignment. Setting the corners first ensures that all subsequent flat pieces have a clean, consistent termination point, dramatically reducing the appearance of cut edges.
Why are stone veneer corners important for aesthetics?
Corners are the single most critical visual element in thin stone veneer because they are the highest‑traffic focal point of the eye. L‑shaped corners eliminate unsightly miter joints or exposed raw edges that immediately “break” the realistic, full-depth stone illusion. Precisely matched corner pieces maintain continuous color, texture, and stacking patterns around the building edge, which architects and high‑end homeowners demand for a premium, monolithic appearance. Without proper corners, the entire cladding system reads as a thin veneer rather than solid masonry.
SEO
Title: Using Thin Stone Veneer Corners for a Full-Bed Look
Description: Thin stone veneer corners from a direct quarry factory. L-shaped returns, sawn-back, natural stone. Wholesale for dealers & contractors. MOQ 300m².
URL: thin-stone-veneer-corners-factory-direct
Keywords: thin stone veneer corners
