Bathroom Stone installations can be the difference between passing building inspections and facing expensive mold remediation, warranty claims, and project delays. On many jobs the visual choice is simple, but moisture management is not: the wrong stone, unsupported substrates, or gaps in waterproof detailing create hidden leak paths that turn a premium finish into a long‑term liability for contractors, designers, and facilities teams.
This guide serves as a field‑ready SOP. It shows how to build a spa‑like interior with natural stone, tests whether stacked stone is safe in showers and high‑humidity zones (the core technical decision), explains liquid membranes and substrate prep behind stone, compares the best stone types for vanity backdrops, and lays out methods to remove hard‑water and soap‑scum from textured surfaces. Each chapter provides installation tolerances, inspection checkpoints, approved material cues, and maintenance steps you can use in specifications to cut call‑backs and limit long‑term risk.
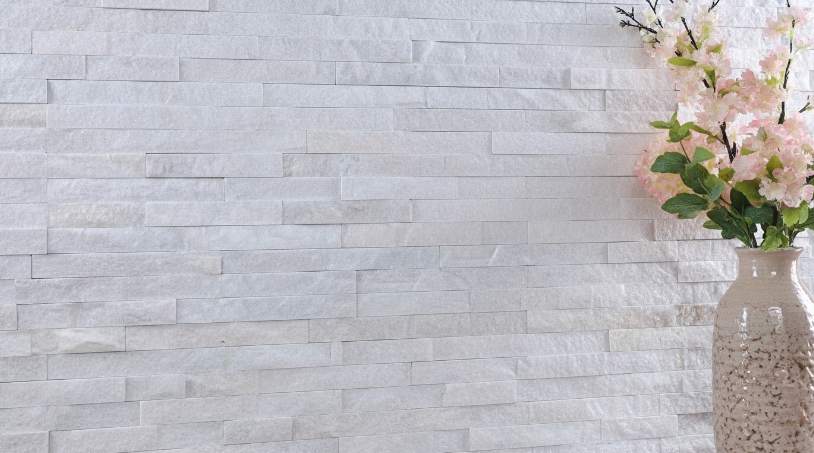
Creating a Spa Sanctuary with Natural Interior Stone
Specify stone by function, batch consistency, and waterproofing to protect margins and avoid costly rework on spa projects.
Selecting stone types and surface finishes for spa functions
Match stone to the role you need it to perform: use quartzite or slate for textured feature walls that resist abrasion, marble or travertine for freestanding tubs and vanity tops when you want a refined surface, and soapstone where tactile warmth and heat retention matter. Choose finishes by exposure: natural cleft or split-face adds tactile depth on accent walls, seamless or interlocking finishes work for flush wet-area walls, and reserve polished finishes for low-moisture vanities only.
- Thermal & porosity: select soapstone for heat retention; expect marble and travertine to need penetrating sealers and more frequent maintenance.
- Sealing cadence: reseal porous stones every 1–3 years; marble commonly needs resealing every 6–12 months depending on use.
- Durability: specify UV-stable, high salinity/humidity resistant material for GCC/coastal projects and ASTM freeze‑thaw resistant material for cold climates.
- Color control: order same-batch quarry consistency to avoid visible shifts on large walls and favor neutral palettes (ivory, taupe, pale gray) for a calming spa tone.
- Routine care: use pH-neutral cleaners and plan sealing into the maintenance contract to protect finish performance.
Design layouts, panel formats, and modular detailing
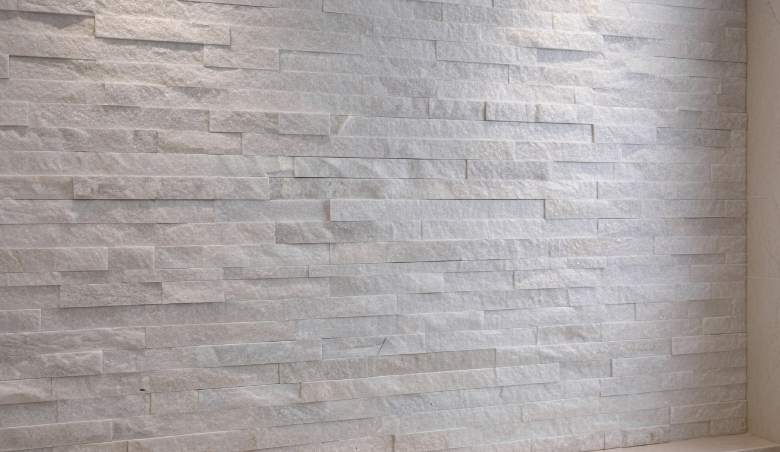
Design panels as modular building blocks so installers can work predictably and reduce on-site cutting. Standard rectangle sizes run 150 x 600 mm and 150 x 550 mm (6″ x 24″ and 6″ x 22″); specify thickness from 10–25 mm for most applications and up to 35 mm for rough or premium profiles. Use interlocking Z-shape or S-shape panels where you must hide vertical joints and achieve a flush look; CNC diamond-blade precision ensures repeatable male-female fits that minimize visible substrate lines.
- Weights & structure: flat panels weigh ~30–40 kg/m²; rough stacked profiles approach ~55 kg/m²—verify substrate load capacity and structural anchors before specifying full-height cladding.
- Corners & wraps: specify matching pre-fabricated L-corners to maintain texture and color continuity and cut onsite labor time.
- Layout rules: run horizontal courses to emphasize length, stagger vertical joints for visual stability, and plan panel orientation and cutting prior to shipment to reduce waste.
- Ordering allowance: allocate 5–10% overage for standard panels and 10–15% for rough or complex layouts; require same-batch quarry sourcing on the purchase order.
Installation, waterproofing and maintenance protocols for wet spa areas
Prepare the substrate to manage moisture before you set stone. Install cement backer board or masonry substrate and apply a full-coverage waterproof membrane that overlaps the shower pan and directs water to drains. Slope wet floors correctly to the drain and confirm residual substrate moisture below manufacturer limits—liquid membranes work on slightly immature screeds and still cure to form an elastomeric barrier when applied in the specified coats.
Set stone with polymer-modified thinset rated for natural stone in high-moisture environments; for panels taller than 1.2 m or heavy profiles, combine mortar with mechanical anchors. Use flexible silicone at perimeters and movement joints and limit grout exposure by specifying interlocking or dry-stack details where appropriate. Allow full cure time per adhesive instructions, perform adhesion pull-tests on sample panels, and verify each interlock fully engages. For steam rooms and saunas, choose thicker, lower-porosity panels and add mechanical fixing, and ensure HVAC removes prolonged condensation. Clean daily with pH-neutral products, avoid acidic or abrasive cleaners on calcareous stones, and reseal according to porosity and traffic. On procurement, demand pre-shipment visual verification for same-batch consistency and plan crate handling for pallet weights around 900–1000 kg; a 20GP container holds roughly 25–30 pallets and meet the MOQ of ~300 m² where applicable, with lead times from 10–25 days depending on stock or production status.
Is Stacked Stone Safe for Showers and High-Humidity Areas?
Stacked stone performs in wet zones when you design a complete moisture-management system and follow verified installation and maintenance steps.
Material selection: stone types, finishes and panel specs suited for wet zones
Choose dense, low-absorption stones—quartzite, slate or granite—for primary wet-wall surfaces because their mineral density reduces capillary uptake and staining risk. Pick finishes that balance texture and cleanability: natural cleft or split-face works visually, but use smoother split-face where daily cleaning access matters. Specify interlocking Z/S panels or matching L-corners where possible to hide vertical joints and improve water-shedding at corners.
- Panel sizes: standard 150 × 600 mm (6″×24″) or 150 × 550 mm (6″×22″).
- Thickness: 10–25 mm for typical shower walls; up to 35 mm for premium or rough textures when you plan mechanical support.
- Weight: expect ~30–40 kg/m² for flat panels and ~55 kg/m² for rough-texture panels—account for dead load in framing and fasteners.
- Batch control: specify same-batch quarry consistency (Top Source Stone: ~95% hue uniformity) to avoid visible color shifts on large walls.
Substrate and waterproofing: approved assemblies and verification steps
Start with a cementitious backer or a tiling board rated for wet areas and fasten per the substrate manufacturer. Cover the entire wet zone with a bonded waterproofing membrane—sheet or liquid-applied—and extend it behind stone panels, into niches, and across transitions to the shower pan to direct water downward. Use liquid membranes when substrates show higher residual moisture; confirm surface moisture falls below 3% before application where the manufacturer requires it.
- Membrane application: typical coverage uses two coats at ~20 mils each; for fully submerged conditions apply three coats and allow 6–7 days cure as per product data.
- Detailing: flash membranes at floor drains, curbs, control joints and pipe penetrations with manufacturer tapes/flanges to maintain a continuous barrier.
- Verification: perform a 24–72 hour flood/water test of the waterproofing and repair leaks before stone installation.
- Planarity: verify substrate flatness and correct deviations with a cementitious leveling compound compatible with the membrane before setting panels.
Adhesives, mechanical fixing and installation workflow for wet environments
Set stacked stone with a polymer-modified thinset mortar rated for natural stone and the specific substrate. Achieve full contact behind heavy panels using a full-butter or notch-and-butter technique to eliminate voids that trap moisture or allow deflection. For large or rough panels, provide temporary mechanical support—stainless steel clips, anchors or shims—until the adhesive cures; use corrosion-resistant fixings for coastal or saline environments.
- Apply thinset to both substrate and panel where required; create continuous bedding to reach full-bond coverage.
- Install interlocking Z/S panels using CNC-cut male/female edges to conceal vertical joints and reduce paths for water intrusion.
- Follow adhesive open/working time and cure windows; allow full cure before routing joints, applying sealant or returning the shower to service.
Grouting, joint detailing and sealing strategy for durability and hygiene
Choose grout and sealants for continuous wet use: epoxy grout for aggressive chemical or permanent-moisture areas, or enhanced cementitious grout with additives where field repairs are likely. Place movement joints at substrate transitions, around fixtures and at long runs; use a neutral-cure, paintable silicone or polyurethane sealant compatible with natural stone. Apply a breathable impregnating sealer to reduce staining while allowing vapor transmission, and schedule reseal intervals based on stone type and exposure.
- Sealing cadence: general guidance—reseal every 1–2 years; marble may need 6–12 month intervals depending on use and product data.
- Reduce exposed caulk by using matching L-corners and interlocking panels to lower maintenance points and mold risk.
- Maintenance cleaning: prohibit acidic or abrasive cleaners; specify pH‑neutral stone-safe products in the facility maintenance manual.
Inspection, performance testing and maintenance protocols for long-term safety
Complete a post-installation checklist that includes a full waterproofing flood test, visual inspection for voids or loose panels, and spot adhesion checks following installer guidance. Set a routine inspection cadence and act on deterioration quickly: check grout and sealant lines every 6–12 months, reseal stone per schedule, and replace failed sealant without delay to prevent hidden moisture buildup.
- Monitor for delamination, efflorescence or persistent moisture; remove affected panels and verify substrate and membrane integrity when you detect these signs.
- Ventilation: require continuous extraction per local code and run exhaust fans during and after showers to lower surface humidity.
- Handover documentation: record manufacturer, model, quarry batch, panel specs and close‑up photos to support warranty claims and ensure same-batch replacements for future repairs.
Premium Stone Panels — Faster Install, Higher ROI

Waterproofing the Substrate: Liquid Membranes Behind Stone
Use the right liquid membrane and substrate prep to stop hidden moisture, reduce repairs, and ensure long-term adhesion for stacked stone installations.
Liquid membrane selection: membrane chemistry, minimum dry-film thickness and coverage
Select membrane chemistry to match the exposure and expected movement. Use polyurethane elastomeric membranes where flexibility matters—showers and high-movement walls—specifying a dry-film thickness (DFT) of 1.5–2.0 mm. Choose polymer-modified cementitious membranes for tiled wet areas where you need a cement-compatible surface; specify two coats totaling 1.5–3.0 mm DFT. For chemical exposure or continuous immersion, specify 100% solids epoxy systems with a DFT of 0.8–1.5 mm depending on the product.
- Coverage rule of thumb: ~1.5–2.5 kg/m² per 1 mm wet-film thickness—confirm exact yield on the product data sheet.
- For general reference, expect ≈250 ft²/gal at two coats of 20 mils each on many liquid membranes; always verify with manufacturer data.
- Specify UV and salt resistance for Gulf or coastal projects and use stainless or polymeric ancillary materials where recommended.
Confirm adhesive and stone compatibility before you commit. Specify membranes that bond to the intended substrate and that remain compatible with polymer‑modified thin‑set or specified epoxy adhesives to avoid bond-break between membrane and stone. Require manufacturer compatibility letters or tested system data where adhesive and membrane systems meet on the same project.
Substrate preparation and priming tailored to natural stacked stone panels
Prepare the substrate to accept both membrane and stone. Limit deflection to L/360 for adhered stone cladding; replace or stiffen any substrate that fails this limit before you apply the membrane. Use concrete, cement backer board, or a cementitious render as your preferred substrate and avoid exposing timber unless you install a suitable cement board and a decoupling layer over it.
Remove contaminants and control surface texture: mechanically roughen smooth concrete and apply the manufacturer‑approved primer—typically a solvent‑free acrylic or epoxy primer—to improve bond and control suction. Seal penetrations and fastener heads with a compatible sealant and embed the membrane into transition coves and details before full‑field application. Factor panel weight (standard panels ~30–40 kg/m²; rough panels ~55 kg/m²) into your fixing strategy and plan mechanical anchors where adhesive alone looks marginal.
Application, reinforcement and joint treatment for interlocking and panelized stone systems
Apply liquid membranes in multiple coats and use reinforcement where movement concentrates. Recess alkali‑resistant fiberglass mesh into the first wet coat at corners, coves and over known cracks, then finish with the second coat to achieve specified DFT. Protect interlocking edges: avoid heavy build‑up across Z/S male‑female connectors and keep local membrane thickness at mating edges low—recommend less than 1.5 mm where connectors engage to maintain panel fit and tolerances.
- Reinforce movement and control joints with a bond‑breaker or compressible joint filler, then seal with an elastic sealant rated for stone and salt exposure.
- Cure per product data—typically 24–72 hours—and perform a 24‑hour flood or leak test to validate continuity and adhesion before setting stone.
- For panel retention, use polymer‑modified thin‑set for standard adhered panels; where panels exceed ~30–40 kg/m² or on heavy vertical work, specify epoxy adhesive or mechanical anchors (stainless steel 316 in marine conditions) spaced roughly 300–400 mm on center unless the structural engineer specifies otherwise.
Coordinate the membrane, adhesive and anchorage strategy in the contract documents and require submittals showing DFT verification, compatibility statements and test evidence for leak testing. That approach prevents field conflicts and limits callbacks once you install the stacked stone system.

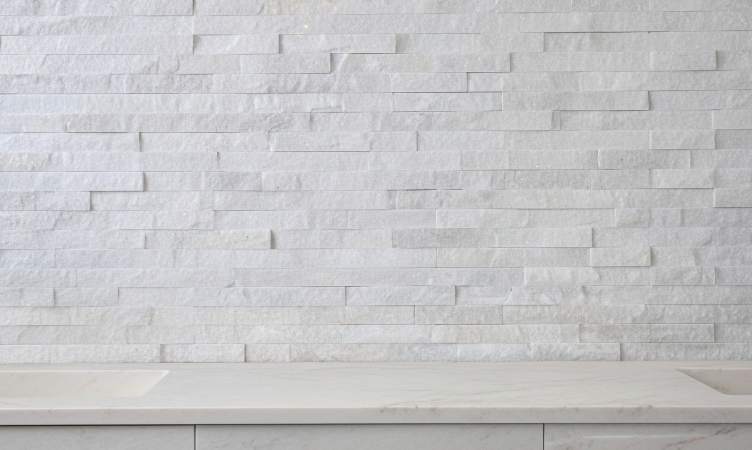
The Best Stone Types for Bathroom Vanity Backdrops
Select stone by porosity, hardness, and panel weight; specify interlocking panels, waterproof substrates, and same-batch quarry material to avoid rework and hidden moisture risk.
Material selection by performance: quartzite, slate, marble, granite, sandstone
Match stone to exposure and maintenance tolerance. Quartzite delivers the best performance for splash-prone vanity backsplashes because of its high hardness and low porosity; expect standard panels between 1.0–2.5 cm thickness and roughly 30–40 kg/m² for flat profiles. Slate works well as a textured, split-face accent where tactile, non-slip finishes matter; specify thicker faces (1.5–3.5 cm) when installing vertically to resist edge chipping and provide the expected relief depth.
Reserve marble and sandstone for low-exposure applications or where the design priority outweighs maintenance. Apply professional penetrating sealers and plan for periodic resealing—marble commonly needs reseal cycles of 6–12 months in humid bathrooms. For heavy-use vanities choose calibrated granite slabs or 1–2.5 cm panels for stain resistance and durability while checking cabinetry load limits. For any run over 1.5 m, require same-batch quarry consistency (≈95% hue uniformity) to prevent visible color shifts across the vanity wall.
Panel format and edge system: rectangle vs interlocking (Z/S) and L-corner integration
Plan panel format to reduce cutting and conceal joints. Use standard panel sizes—150×600 mm or 150×550 mm—to align with typical vanity widths and minimize waste. Specify panel orientation during design review so installers set straight-edge panels with planned grout lines or choose interlocking profiles to hide vertical seams.
- Interlocking Z-shape or S-shape panels: request CNC diamond-blade precision so male-female joints fit tightly and hide substrate for a near-seamless backdrop.
- Rectangle panels: use for linear dry-stack aesthetics but lock in joint locations and grout width before ordering to avoid visible mismatch on site.
- L-corners: specify matching pre-fabricated 90° corners for every model to ensure texture and color continuity at wall transitions and to reduce on-site fitting time.
- Surface finish: choose natural cleft, split-face, or seamless finish up front; finish choices change lighting behavior, cleaning needs, and tactile perception at eye level.
Installation, structural and maintenance specs for vanity backdrops
Start with the right substrate and load calculation. Install stacked stone over cementitious waterproof backer board or sealed gypsum board and calculate the expected load using panel weights: plan for 30–40 kg/m² for flat panels and up to 55 kg/m² for rough/feature profiles. Reinforce cabinetry or add wall anchors where the cabinetry or framing cannot carry point loads from heavier panels.
Follow adhesive, joint, cutting, and sealing rules to control long-term risk. Use polymer-modified thinset or a structural stone adhesive rated for wet areas, leave 2–5 mm joints where required, and allow expansion clearance where panels meet cabinetry. Specify CNC or diamond-blade edge cutting for interlocking edges; if you permit field-cutting, require factory tolerance matching so male-female fits remain tight and vertical seams stay concealed. For porous stones (marble, sandstone) apply a high-quality penetrating sealer immediately after installation and schedule reseal intervals per manufacturer guidance; quartzite and slate typically need only light maintenance and less frequent resealing.
- Substrate: cement backerboard or anti-microbial tiling board plus a liquid or sheet waterproofing membrane that overlaps wet-plane terminations.
- Adhesive & joints: polymer-modified thinset; 2–5 mm joint spacing; include expansion joints at cabinetry interfaces.
- Cutting & edges: require CNC diamond-blade precision for Z/S interlocks; field cuts must match factory tolerances to preserve fit.
- Sealing & maintenance: reseal porous stones per use—marble often 6–12 months; general high-humidity reseal guidance 1–2 years; use pH-neutral cleaners and maintain ventilation.
- Procurement & QC: order same-batch quarry material for color continuity, request pre-shipment visual verification of crates, and plan MOQ at 300 m² for trial or private-label orders to secure matched lots.
Cleaning Hard Water Deposits and Soap Scum from Stone Relief
Correct classification and controlled cleaning cut repair costs and protect warranty-covered stacked-stone installations.
Identify stone type, surface finish and deposit chemistry — quick test protocol
Start by confirming the stone family and expected abrasion sensitivity: mark calcareous stones (marble, travertine, limestone) as Mohs ~3–4 and quartzite/granite/slate as silicates at ~6–7. Record panel thickness (typical range 1.0–3.5 cm), finish (natural cleft, split-face, seamless) and panel shape or joint type (rectangle, Z/S-shape, S-shape, L-corner). Note that textured finishes and interlocking profiles trap soap scum and mineral crusts more aggressively than smooth surfaces, so expect longer extraction time and finer mechanical tools near edges.
- 25 × 25 mm spot test: apply one drop of 3% acetic acid (household vinegar), watch 30–60 seconds for effervescence; if you see fizz, rinse immediately and dry—the stone is acid-sensitive (calcareous).
- If the spot shows no effervescence, label the stone silicate-compatible and plan controlled descaler use per manufacturer limits.
- Photograph and document the test area, panel specs, and results before any further work.
Mechanical cleaning methods and equipment limits for stacked-stone relief
Remove loose crusts dry first to avoid driving minerals deeper. Vacuum the relief with a soft-bristle upholstery nozzle, then dislodge remaining deposits with a soft- to medium-stiff nylon or natural-fiber brush; use deliberate, short strokes into recessed areas. Use plastic scrapers or single-edge plastic blades to lift thick soap scum, then finish with microfibre cloths or 3M non-woven non-scratch pads to extract residual film without abrading cleft surfaces.
- Wet rinsing: limit to low-pressure only — keep pressure ≤1000 psi, use a fan nozzle, widen the spray angle and maintain ≥60 cm distance from the surface to protect thin panels and mortar joints.
- Avoid wire/metal brushes, angle grinders, power chisels and other aggressive tools near interlocks or L-corners to prevent edge damage and loss of CNC-dressed tolerances.
- Work from top to bottom and clear debris frequently to prevent re-deposition into relief pockets.
Chemical cleaning and post-clean protocol — cleaner selection, application, neutralization and sealing
Select cleaners by stone class: for calcareous stone use neutral pH (~7) or mild alkaline cleaners (pH 8–10) and enzyme/surfactant formulas; for silicate stones use low-concentration acid descalers or EDTA-based chelants and follow manufacturer directions. Always verify compatibility with a 25 × 25 mm test spot first, then proceed in controlled passes. Apply cleaner with a low-pressure spray or brush, let it dwell 5–10 minutes per pass, agitate with a soft brush, rinse thoroughly after each cycle and limit acid contact to 1–3 repeats.
- Neutralize acids with baking soda solution (10 g sodium bicarbonate per liter of water) or the product’s recommended neutralizer; rinse with deionized or soft water until surface pH returns near neutral.
- PPE: wear chemical-resistant gloves, splash goggles and a respirator rated for acids/solvents; ventilate mechanically for indoor spa or shower settings.
- Drying and verification: allow 24–48 hours air-dry, inspect under consistent lighting for residual scale or etch marks, and retest questionable areas before sealing.
- Sealing: apply a breathable penetrating sealer (silane/siloxane or manufacturer equivalent). Expect coverage of ~5–10 m² per liter depending on porosity; allow 24–48 hours cure and plan recoat or reseal intervals of 2–5 years based on exposure and traffic.
- Record keeping: log product names, concentrations, dwell times, PPE used and before/after photos to support warranty, project documentation and maintenance schedules.
Conclusion
Following correct installation steps for natural interior stone—proper substrate waterproofing, secure anchoring, and manufacturer‑recommended sealing—protects the structure, limits moisture-related failures, and extends the wall system’s service life. It also helps meet workplace safety and building standards, including OSHA guidance for safe installation practices.
Check your fleet’s current setup and on-site procedures to confirm substrate and waterproofing details, or contact us for a certified lighting catalog/sample to support your next bid.
Frequently Asked Questions
Can stacked stone be used safely in shower walls?
Yes — the research shows natural stone is used in spa-style showers and accents; success depends on selecting stone with durability against humidity and bacterial resistance. Nonporous or humidity-resistant materials (soapstone is specifically noted for being nonporous and heat-retaining) and spa-focused designs like frameless showers and pebble flooring are common approaches.
Does mold grow behind stone walls in bathrooms?
The provided research does not directly address mold growth behind stone. It emphasizes choosing stones for durability against humidity and bacterial resistance, so selecting less-porous, humidity-tolerant materials can help reduce moisture-related risks.
How do you waterproof stacked stone in high-humidity areas?
The research content does not provide specific sealing procedures. Instead it recommends prioritizing material selection for high-moisture areas — use stones noted for durability against humidity or inherently nonporous options such as soapstone, and favor stones with documented bacterial resistance for wet environments.
What is the best natural stone for a spa-style bathroom?
The research highlights marble and travertine for freestanding tubs and classic spa appeal; soapstone for its nonporous, heat-retaining qualities; limestone for warm, tactile finishes; and flagstone for indoor–outdoor flooring connections. Neutral, soft tones and natural veining are recommended to achieve a calming, spa-like palette.
How to remove hard water stains from stacked stone?
The research does not cover hard water stain removal methods. It focuses on preventing moisture-related issues through appropriate material selection — choosing nonporous or humidity-resistant stones and thoughtful design choices to limit exposure.
