
Equipping your crew with a standardized Professional Tool Kit prevents the costly material waste and project delays that frequently eat into thin stone veneer installation margins. Subpar equipment does more than slow down a build; it compromises the structural integrity of the facade and increases the risk of workplace injuries during the cutting and shaping process. Relying on makeshift setups often results in uneven joints and failed adhesion, leading to expensive callbacks and long-term damage to your professional reputation.
This guide details the specific hardware required to maintain a high-efficiency job site, covering everything from the choice between wet saws and table saws to the mechanics of mortar mixing paddles. We outline the hand tools needed for precise stone shaping and the layout instruments that ensure perfect alignment across large-scale surfaces. Use these technical requirements to establish a field-tested standard for your installation teams, ensuring consistent results and a clean finish on every project.
Essential Cutting Tools: Wet Saws vs. Table Saws
Selecting the correct sawing system determines the structural integrity of the bond and the speed of installation on high-volume commercial projects involving natural stone.
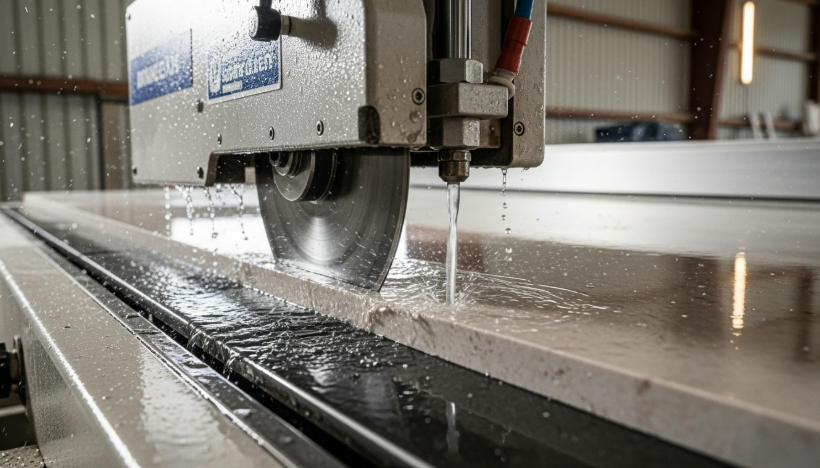
Precision Cutting and Water Cooling Systems
Wet saws utilize diamond-tipped blades and integrated water delivery to manage the heat generated during stone fabrication. Water cooling prevents the diamond blade from overheating, which extends tool life during high-volume 2026 projects. The continuous stream lubricates the cut, allowing the blade to pass through dense quartzite or slate without binding. Unlike standard table saws, wet saws include specialized trays and pumps designed specifically for masonry and natural stone.
| Performance Feature | Professional Wet Saw | Standard Table Saw |
|---|---|---|
| Blade Type | Continuous Rim Diamond | Carbide-Tipped Wood Blade |
| Cooling System | Continuous Water Jet | None (Air Cooled) |
| Dust Control | Hydraulic Suppression | Airborne Vacuum (Ineffective for Silica) |
| Finish Quality | Factory-Grade Smooth Edge | Jagged / High Chipping Risk |
Dust Suppression for Indoor and Outdoor Workspaces
Wet cutting methods eliminate the hazardous airborne silica dust typically associated with dry stone cutting. Water traps stone particles immediately, maintaining a cleaner environment for interior feature wall installations. Reducing airborne debris protects the health of the installation crew and minimizes cleanup time on-site. Safety protocols for 2026 emphasize wet-saw use to meet strict air quality standards in residential and commercial zones.
Material Versatility for Natural Stone Pieces
Wet saws handle the mineral hardness of natural stone, whereas table saws are optimized for low-density wood products. Specialized motors in wet saws provide the torque necessary to cut through 25–40mm thick loose stone pieces. Table saws lack the blade design and RPM settings required to process natural marble or slate without stalling. Using a wet saw allows for the intricate adjustments needed to trim individual stones for a bespoke random-lay pattern, ensuring a seamless fit for the entire elevation.
Finish Quality and Chipping Prevention
Wet saws provide a smooth, factory-grade edge that is critical for groutless thin stone veneer applications. Diamond blades minimize vibration, which prevents the stone from chipping or cracking at the exit point of the cut. This is essential for maintaining the integrity of the sawn-back surface, ensuring every piece has a flat bonding area for maximum adhesion. Clean cuts reduce material waste and ensure that the unique textures of the natural stone remain the focal point of the architectural facade.
Hand Tools for Shaping: Hammers, Chisels, and Nippers
While high-production saws handle the bulk of the volume, the final 5% of a premium installation—the texture matching and tight tolerances—depends entirely on the precision of manual shaping tools.
Hand tools remain the primary method for maintaining the “Bespoke Random-Lay Pattern” that defines a high-end natural stone project. Unlike factory-glued panels, Top Source Stone’s loose veneer requires individual handling. Field adjustments ensure that the 100% sawn-back surfaces bond perfectly to the substrate while the face maintains its rugged, organic character. Professional installers use these tools to bridge the gap between mechanical cuts and natural aesthetics.
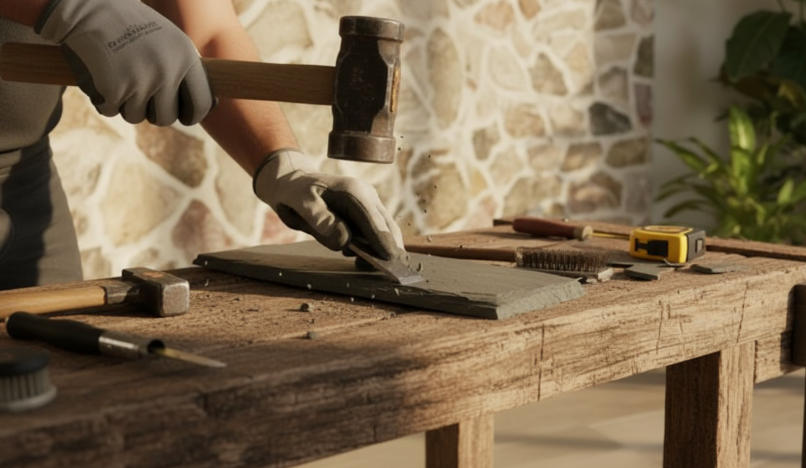
Masonry Hammers for Stone Alignment
Modern masonry hammers allow for the micro-adjustments necessary when seating loose stones into a thick mortar bed. In 2026, the industry has standardized on 2-pound to 4-pound drilling hammers for localized force. These tools provide the high-inertia impact required to move 40mm thick quartzite without the bounce-back associated with lighter hammers. For delicate faces like the Ivory Sandstone or Marble Series, rubber-faced mallets are the standard. They ensure the stone seats firmly into the mortar without marring the natural surface or causing hairline fractures in the mineral structure.
| Tool Type | Optimized Material | Technical Advantage |
|---|---|---|
| 2lb Drilling Hammer | Granite & Quartzite | High-inertia for seating heavy loose stone |
| Carbide Flat Chisel | Slate & Sandstone | Recreates “Natural Split” on sawn edges |
| High-Leverage Nippers | Pencil Series Thin Strips | 12:1 leverage ratio for dense mineral trimming |
Carbide-Tipped Chisels for Texture Customization
When a wet saw creates a clean, straight edge at the end of a wall run, it often looks artificial. Carbide-tipped chisels are the solution for restoring “Full-Depth Visual Integrity.” By scoring the stone and striking the back, installers can recreate a natural split texture that hides the mechanical cut. This technique is particularly vital for the “Rustic Irregular Series,” where a uniform edge would ruin the organic flow. Using various blade widths allows masons to navigate tight spaces around electrical outlets and plumbing fixtures while maintaining the stone’s rugged profile.
- Flat-head carbide chisels provide the precision needed to split natural slate along its natural grain.
- Manual tooling allows for “pitching” the stone edge, angling the face outward to enhance the heavy dry-stack look.
- Precision chiseling ensures the individually sawn-back pieces fit together without visible mortar gaps in dry-stack applications.
Stone Nippers for Fine Detail Work
Fine-tuning individual pieces requires a more delicate touch than a hammer and chisel can provide. Stone nippers offer the control needed for thin-profile materials and high-detail areas. Modern ergonomic handle designs focus on high-leverage ratios, allowing installers to trim dense quartzite strips with minimal physical effort. This is essential when working with “Authentic Masonry Corner Wraps,” as slight variations in the stone’s thickness may require nipping small fragments to achieve a seamless 90-degree transition.
Nippers are the go-to tool for removing sharp burrs or small protrusions that interfere with the tight, random-lay pattern. By removing these small imperfections, installers can maintain the flow of the stone’s natural profile across large facades. This attention to detail eliminates repetitive patterns and ensures that the finished project remains indistinguishable from a traditional, full-depth structural stone wall.
Scale Your Business with Factory-Direct Stone

Mixing Equipment: Paddles vs. Mortar Mixers
High-torque handheld paddles offer the precision required for polymer-modified adhesives on interior accents, while stationary drum mixers provide the volume necessary to sustain commercial crews on large-scale exterior facades.
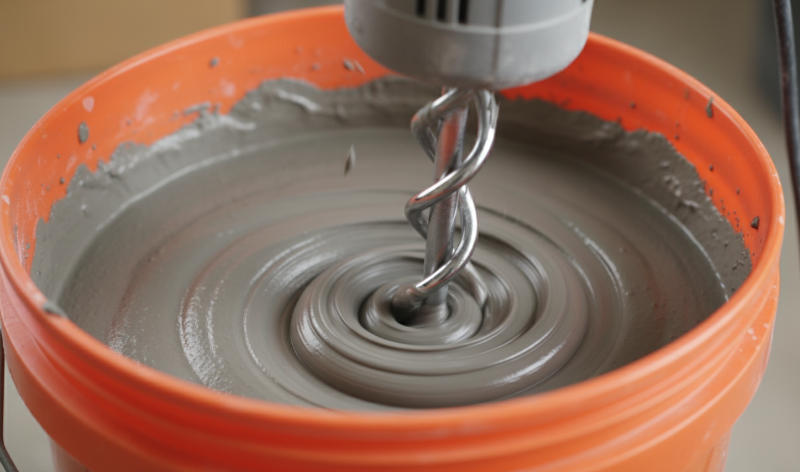
Handheld Paddle Mixers for Precise Adhesive Consistency
High-torque electric paddle mixers provide the localized control necessary for mixing specialized thin-set used with sawn-back loose stone. Because natural stone veneer carries significant weight—averaging 65kg/m²—the bond integrity depends entirely on a mix free of air pockets. Variable speed triggers allow masons to reach the ideal viscosity without over-blending, which can compromise the polymer chains in modern high-strength mortars.
These portable units excel in interior environments where space is limited. Installers mix directly in 5-gallon buckets at the point of application, reducing material waste and cleanup time. Modern 2026 models feature brushless motors that maintain constant torque even as the mortar thickens, preventing the mechanical strain commonly seen in standard drills used for masonry work.
| Equipment Class | Optimized Project Type | Technical Advantage |
|---|---|---|
| High-Torque Paddle | Residential / Fireplaces | Precision viscosity; zero air entrainment. |
| Stationary Barrel | Commercial Facades | Continuous flow for multi-person crews. |
| Cordless Brushless | Scaffolding / Remote Sites | Eliminates cord drag; high mobility. |
Stationary Mortar Mixers for Large-Scale Exterior Projects
Stationary drum or barrel mixers become the primary choice once a project exceeds 1,000 square feet. For extensive commercial installs using irregular loose stone, a single handheld paddle cannot keep pace with the mortar consumption of a three or four-person crew. These mechanical units ensure a homogeneous blend across large batches, which is critical for maintaining color consistency in the mortar joints across a massive feature wall.
- Large-capacity drums provide a continuous supply, preventing installation delays.
- Rugged construction withstands the heavy aggregate mixes required for structural masonry builds.
- Automated mixing cycles allow skilled masons to focus on stone placement rather than material prep.
Paddle Blade Geometry and Mixing Efficiency
The geometry of the mixing blade determines the homogeneity of the adhesive. Helical or spiral designs actively pull material from the bottom of the bucket to the top, ensuring no dry powder pockets remain. This is a vital step for thin stone veneer installation, as dry spots create weak points that eventually lead to stone delamination under thermal expansion.
Specialized ring-shaped heads have gained traction because they reduce splatter and mix more efficiently than traditional flat blades. These designs accelerate the hydration of polymer additives in the mortar. By selecting the correct blade geometry, masons extend the “open time” of the adhesive, allowing for the precise adjustment of individual stones to achieve a bespoke random-lay pattern without the mortar “flashing” or setting prematurely.
Equipment Selection Based on Site Logistics and Volume
Logistics often dictate the tool choice more than the material itself. On space-constrained residential renovations, a large drum mixer is impractical and creates unnecessary cleanup. Conversely, relying on a handheld paddle for a long retaining wall or a commercial building envelope is a recipe for equipment failure and labor fatigue.
Current 2026 industry trends show a definitive shift toward high-efficiency cordless paddles. These units provide the torque needed for heavy quartzite adhesives while removing the trip hazards associated with power cords on multi-level scaffolding. For B2B distributors, offering a tiered selection of mixing equipment ensures that contractors can match their tool kit to the specific square footage and site constraints of each individual project.
Precision Layout Tools: Lasers and Chalk Lines
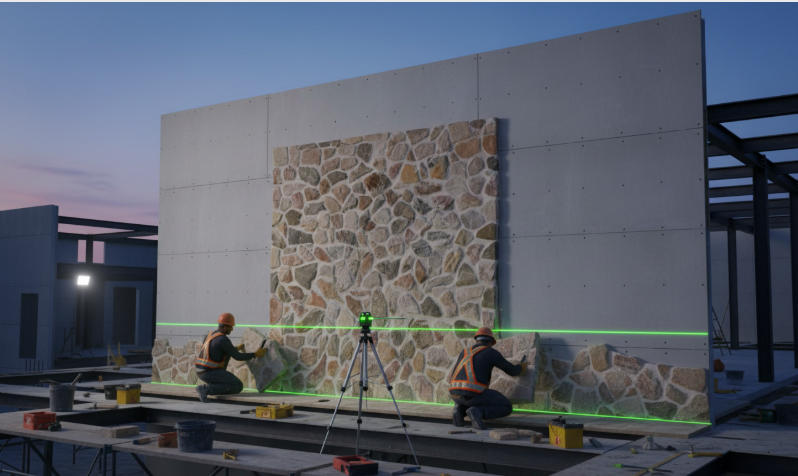
Precision layout tools eliminate the visual “drift” common in hand-laid stone, ensuring that the base course remains level and vertical margins stay crisp across large-scale architectural facades.
Establishing a perfectly level starting point is the most critical step in a successful thin stone veneer installation. We utilize self-leveling cross-line lasers to project a datum line across the entire substrate before the first stone is set. Projecting a continuous horizontal line prevents cumulative tilt, where a 2mm error on one side of a wall can grow into a massive deviation by the time the run reaches the opposite corner.
Green beam technology has become the standard for 2026 job sites because it offers significantly better visibility on the dark, porous surfaces of cement boards compared to legacy red lasers. Since Top Source Stone products feature a precision-sawn back, the laser allows installers to verify the level of each piece instantly. This eliminates the need to manually hold a spirit level against the stone’s irregular natural face, which often leads to inaccurate readings.
Chalk Lines for Permanent Reference Grids
While lasers provide temporary guidance, snap-style chalk lines create physical reference markers that remain visible throughout the installation process. Snapping horizontal lines every 12 inches provides a reliable backup guide if the laser level is accidentally moved or if high-intensity site lighting washes out the beam. These physical lines are essential for planning a bespoke random-lay pattern, allowing the mason to distribute different stone sizes evenly across the wall.
- Blue or white chalk is the preferred choice for natural stone; red chalk contains permanent dyes that can bleed through mortar or stain light-colored stones like Ivory Sandstone.
- Reference grids allow for pre-calculating the stone distribution to avoid ending a run with awkward, small slivers of stone at the edges.
- Physical markers on the substrate facilitate faster application of thin-set, as the installer can see exactly where the next course should sit without re-measuring.
Vertical Plumb Lines for Corner and Edge Precision
Vertical alignment tools ensure that the ends of stone runs remain straight and fully compatible with matching L-shaped corner wraps. Projecting a vertical laser line helps masons align the sawn-back edges of the veneer at the corners, creating the “Authentic Masonry Corner Wrap” that defines a professional installation. This is particularly important for our Granite and Marble series, where the linear patterns make even slight vertical deviations highly noticeable to the naked eye.
Correct vertical layout ensures that the stones are woven together naturally without gaps. By maintaining a strict plumb line at every corner and junction, the finished project achieves full-depth visual integrity, making the 25–40mm veneer indistinguishable from a traditional, heavy structural stone wall.
Digital Distance Meters for Accurate Material Calculation
Handheld laser measuring tools have replaced traditional tape measures for calculating the exact square footage of complex architectural walls. These digital tools provide high-precision measurements of wall height and width, which are vital for determining the correct volume of loose stone veneer required. This accuracy helps contractors maintain the recommended 10% waste factor, ensuring they have enough material for the bespoke cuts needed at windows and doors without over-ordering.
Digital tools also allow for quick verification of height at multiple points along a ceiling or soffit. This data tells the installer ahead of time if the top row of stone will require custom ripping to fit the space. Accurate calculations are the foundation of quarry-to-project consistency, ensuring that the natural variation of the stone is handled with professional efficiency.
Cleanup and Grouting Tools for a Flawless Finish
Maintaining the visual integrity of a bespoke random-lay pattern requires post-installation cleanup that removes binder residue without altering the chemical or physical surface of the natural quartzite and sandstone.
Effective cleanup remains the most overlooked phase of stone veneer installation. Professionals utilize high-density, hydrophilic sponges that retain significant water volume while resisting the abrasive surfaces of natural loose stone. Unlike standard cellulose sponges, these specialized variants do not tear when dragged across the rugged textures of quartzite or slate, ensuring that no synthetic fibers remain trapped in the stone’s surface pores.
High-Density Sponges and Dual-Chamber Buckets
We advocate for the use of dual-chamber wash buckets to maintain water purity throughout the project. These systems isolate silty residue in a separate reservoir, allowing the installer to access fresh water for the final wipe-down. This prevents the common “grout haze” that occurs when installers reuse contaminated water, which can dull the natural mineral luster of the stone once it dries.
- Hydrophilic sponges maximize moisture absorption to pull mortar away from the stone face effectively.
- Dual-chamber buckets eliminate the circulation of abrasive silt during the cleaning process.
- Standardized 2026 protocols emphasize non-abrasive material contact to protect the authentic 3D profiles of the stone.
pH-Neutral Cleaners and Soft-Bristle Brushes
Natural stone veneer requires precise chemical management during the final cleanup phase. Installers must use soft-bristle nylon brushes to agitate debris within deep crevices without scarring the stone. Acidic cleaning solutions are strictly avoided on marble and limestone, as they cause immediate etching and permanent surface damage.
The current market emphasizes biodegradable, pH-neutral surfactants. These formulas are engineered to break the bond of cementitious grout haze while preserving the natural color fastness of the quarry-sourced material. Proper chemical selection ensures that the mineral veins and natural variations remain vivid rather than becoming obscured by chemical film.
Natural Stone Sealants and Precision Applicators
Applying a high-quality sealant serves as the final defense against environmental degradation. For exterior facades and fireplace surrounds, breathable penetrating sealers are essential. These products allow internal moisture vapor to escape through the stone while simultaneously blocking external contaminants and oil-based stains.
- Microfiber applicators provide even coverage across the varied depths of individually sawn-back stones.
- Low-pressure sprayers ensure the sealant reaches deep into the texture of the random-lay pattern.
- Proper sealing preserves the “permanent” color quality, especially in high-UV exposure environments.
Grout Bags and Precision Pointing Tools
While many choose a mortarless look, specific architectural requirements demand precision grouting. Heavy-duty grout bags allow for the targeted placement of high-strength adhesives into deep recesses without smearing the stone face. This is particularly vital for maintaining the structural integrity of the wall while ensuring a clean, artisan finish.
Small tuck-pointing trowels are used to shape the joints where individual stone pieces create narrow, intricate gaps. These tools allow masons to compress the mortar, ensuring a weather-tight seal and a professional profile. Advanced 2026 grouting formulations offer increased flexibility, matching the performance of the industrial adhesives used during the stone processing phase.
Conclusion
Selecting the right tools transforms a complex masonry project into a manageable and efficient process. Using professional-grade equipment ensures precision during cuts and strong adhesion for individually sawn-back stones, resulting in a finish that maintains structural integrity. Proper tool selection ultimately saves time on the job site while delivering the authentic look of a traditional full-depth stone wall.
Review your current equipment list to ensure your team is prepared for the specific requirements of natural loose stone installation. You can contact Top Source Stone to request a technical catalog or discuss sourcing high-density quartzite and sandstone for your next wholesale project.
Frequently Asked Questions
What tools are needed for stone veneer?
To achieve a professional installation, you need a wet saw with a diamond blade, an angle grinder for detail work, a 1/2″ x 1/2″ notched trowel for mortar application, and a masonry hammer for shaping. Essential site tools include a heavy-duty mixing paddle, 5-gallon buckets, a torpedo level to ensure straight courses, and a grout bag if you are doing pointed joints.
What is the best saw for thin stone veneer?
The best saw for thin stone veneer is a sliding tray wet saw equipped with a continuous rim diamond blade. This setup provides the cleanest, most accurate cuts with minimal chipping. The sliding tray allows for stable material handling, which is critical for maintaining precision on natural stone, granite, or marble veneers.
Do I need a wet saw for stone veneer?
Yes, a wet saw is the industry standard for professional stone veneer work. It is essential for suppressing silica dust, which creates a safer work environment, and for cooling the diamond blade to prevent overheating. While small cuts can be made with an angle grinder, a wet saw is necessary for the high-precision finishes and repeatable cuts required for a high-quality installation.
How to cut stone veneer without a saw?
You can cut or shape stone veneer manually using the “score and snap” method. Use a masonry chisel and a hammer to score a line across the face of the stone, then strike the back of the stone or use a stone tracer to snap it along the line. For small adjustments and edge detailing, a pair of carbide-tipped stone nippers can be used to bite off small pieces for a more natural, hand-dressed appearance.
Best mortar mixing paddle?
The best mortar mixing paddle for stone veneer is a heavy-duty steel spiral or dual-helix paddle. These designs are specifically engineered to pull thick masonry mortar from the bottom of the bucket to the top, ensuring a smooth, lump-free consistency that is vital for the bond strength required in vertical veneer applications.
What hammer to use for stone veneer?
A masonry hammer (also known as a brick hammer) is the primary tool for this application. It features a square flat head on one side for striking chisels or tapping stones into mortar, and a sharp, chisel-like pick on the other side for “dressing” or chipping away stone edges to create a better fit or a more authentic, rugged look.
