

Mastering the right cutting techniques is the difference between a flawless installation and a project plagued by waste, rework, or a visit from an OSHA inspector over silica dust violations. A single inaccurate or unsafe cut can ruin a premium piece of stone veneer, blowing your material budget and derailing the job schedule.
This guide serves as your definitive standard operating procedure for precision and safety. We’ll break down the critical choice between angle grinders and wet saws, show you how to select the optimal diamond blade for natural stone, and detail the methods for marking, scoring, and executing perfect cuts—including tricky angles and receptacle holes. Finally, we’ll outline a clear, compliant strategy for managing hazardous silica dust, ensuring your crew stays protected and your project stays on the right side of regulations.
Choosing the Right Tools: Angle Grinders vs Wet Saws
The decision between an angle grinder and a wet saw isn’t about which tool is better, but which is the right tool for the specific cut, the job site’s constraints, and your safety compliance obligations.
For contractors installing thin stone veneer, the tool choice directly impacts efficiency, cut quality, and regulatory compliance. The modern jobsite demands a strategy that balances speed with precision, and portability with dust control. You need to understand the core strengths of each tool to deploy them effectively.
Angle Grinders: Versatility for On-Site Adjustments
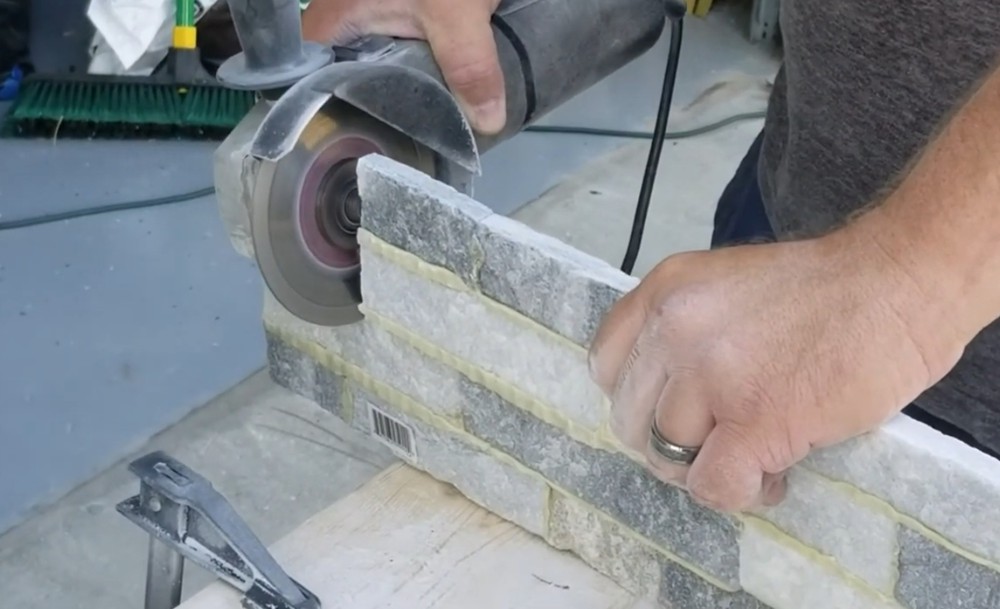
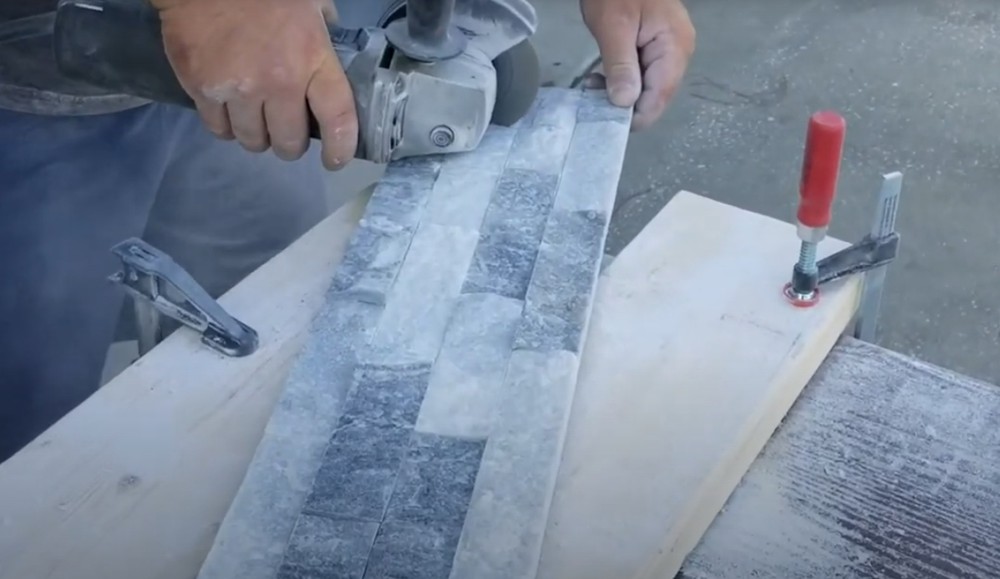
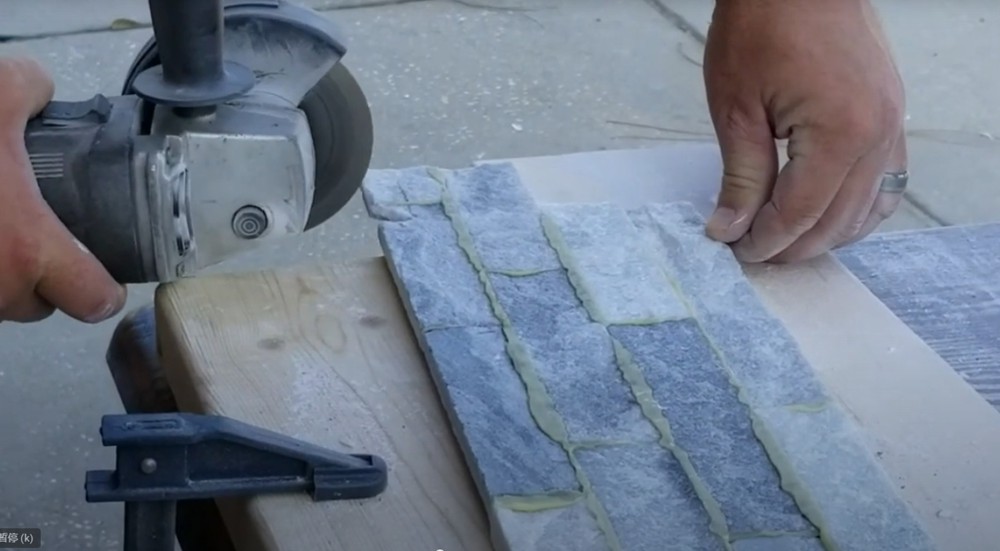
An angle grinder is the ultimate field tool for thin stone veneer. Its primary value lies in portability and the ability to make quick, custom cuts on the fly. When you’re fitting the last piece around a window jamb or notching for an electrical box, a cordless grinder with a diamond blade is indispensable. You can handle curves, intricate shapes, and straight cuts without moving the stone back to a stationary saw.
However, this versatility comes with a critical trade-off: dust. Dry cutting with a grinder generates significant respirable crystalline silica. Using a grinder without a vacuum attachment or shroud is not just messy—it’s a direct violation of OSHA silica standards. For a few quick trims, it’s manageable with proper PPE. For volume cutting, the dust becomes a major health hazard and jobsite contaminant.
Wet Saws: Precision for High-Volume and Complex Cuts
When your project requires batch processing of panels or precise, repeatable cuts for a seamless installation, a wet saw is non-negotiable. The continuous water flow serves two critical functions: it cools the diamond blade for a cleaner cut with less chipping, and it suppresses silica dust at the source. This makes it the safest option for high-volume work.
Professional-grade wet saws with accurate rail and fence systems allow you to pre-cut dozens of veneer pieces to exact dimensions before installation even begins. This workflow is essential for complex patterns, long runs, or projects where tight, consistent joints are a priority, like a high-end kitchen backsplash or a commercial facade. While setup takes time, the payoff is in speed, accuracy, and a significantly cleaner work environment.
Key Decision Factors: Project Scope, Safety, and Efficiency
Choosing the right tool is a tactical decision based on three pillars: the project’s scale, regulatory safety requirements, and overall workflow efficiency. For a small repair, a remote location, or a handful of custom fits, the angle grinder’s speed and portability win. Its ability to work anywhere often makes it the only practical choice.
For any significant installation—a full fireplace, an exterior wall, or a large interior feature—the wet saw’s precision and integrated dust control justify the setup. Stricter OSHA enforcement around silica means dust management is no longer optional; it’s a primary cost of doing business. The most efficient crews don’t choose one tool. They use both: a wet saw stationed in a controlled area for the bulk of pre-cutting, and an angle grinder on the wall for the final, precise adjustments.
| Tool | Primary Use Case | Critical Consideration |
|---|---|---|
| Angle Grinder | On-site adjustments, notches, curves, and final trimming. Ideal for small batches or remote work. | Mandatory dust control (vacuum shroud) and respiratory protection are required for OSHA silica compliance. |
| Wet Saw | High-volume, precision straight cuts, mitering, and batch processing panels before installation. | Setup time and space required. Water management and pump maintenance are key for consistent performance. |
Blade Selection and Tool Maintenance for Natural Stone
The tool is only as good as the blade on it. For natural stone veneer like slate, quartzite, or granite, a continuous-rim diamond blade designed for hard materials is the standard. It provides the cleanest edge with minimal chipping on the visible face. Match the blade’s bond hardness to the stone: a softer bond for harder stones like quartzite to keep the diamonds exposed, and a harder bond for softer stones like sandstone for longer life.
Maintenance is straightforward but non-negotiable. On a wet saw, keep the water reservoir and pump clean to prevent sediment buildup that can ruin the pump and reduce cutting performance. For angle grinders, never use a blade with a lower RPM rating than the tool’s maximum speed. Always allow a new diamond blade to “break in” with lighter cuts, and never force the stone through—let the blade do the work. Forcing a cut overheats the blade, glazing it over and ruining its cutting ability. Inspect safety guards and features before each use.
Selecting the Best Diamond Blade for Natural Stone
The right blade isn’t a generic accessory; it’s a material-specific tool that determines cut quality, blade longevity, and on-site safety compliance.
Matching Blade Bond to Stone Hardness
Think of the blade’s bond as the “clutch” that holds the diamond grit. Its hardness must be precisely calibrated to the stone you’re cutting. A mismatch leads directly to performance failures. For harder, more abrasive stones like quartzite and granite, you need a softer bond. This allows the metal matrix to wear away at the correct rate, constantly exposing fresh, sharp diamond crystals to the cutting surface. If the bond is too hard for granite, the diamonds will dull and glaze over, causing the blade to overheat, cut slowly, and burn the stone.
Conversely, softer stones like limestone and some marbles require a harder bond. The stone isn’t abrasive enough to wear the bond down efficiently, so a softer bond would disintegrate too quickly, wasting the blade’s life. The harder bond retains the diamonds longer against the less aggressive material. Using a blade designed for granite on a soft marble will just wear the segments down without making effective progress, wasting money and time.
Segment Design for Cut Quality and Speed
Segment geometry—width, height, and gullet design—directly dictates the trade-off between speed and finish. For heavy-duty ripping or cutting dense, thick stone where speed and cooling are priorities, wider segments with deep gullets are key. These channels aggressively clear slurry and debris, preventing the blade from loading up and overheating, which is critical for maintaining a consistent feed rate on a production line.
For the clean, chip-free edges required on visible faces of thin stone veneer—especially on products like our Flat or Pencil Series—a continuous rim (turbo or smooth) segment is non-negotiable. This design provides a solid cutting edge that shears the stone rather than fracturing it, eliminating the chipping that wider, segmented blades can cause. The construction of the segment matters, too. Laser-welded segments offer superior heat resistance and durability compared to traditional sintered bonds, making them a better investment for high-volume shops where blade changes cut into productivity.
Wet vs. Dry Cutting and Silica Dust Management
This choice is no longer just about convenience; it’s a core safety and compliance decision. Wet-cutting diamond blades are the industry standard for natural stone for good reason. The water coolant drastically reduces friction, dissipates heat, and most importantly, suppresses the generation of respirable crystalline silica dust. This extends blade life and is the primary engineering control for meeting OSHA’s 50 µg/m³ exposure limit.
While specialized dry-cutting blades exist for situations where water is impractical, they generate intense heat and hazardous silica dust. Their use mandates a full respiratory protection program—fit-tested respirators, job-site air monitoring, and documented exposure control plans. For contractors, integrating a wet saw or a tool with an integrated water feed is the most effective and reliable method to manage silica risk when cutting materials like slate or quartzite veneer, turning a compliance headache into a non-issue.
| Stone Type | Recommended Blade Bond | Primary Segment Design |
|---|---|---|
| Granite / Quartzite (Hard, Abrasive) | Softer Bond | Segmented (for speed) or Turbo Rim (for balance) |
| Marble / Limestone (Softer, Less Abrasive) | Harder Bond | Continuous Rim (for finish) or Turbo Rim |
| Slate / Sandstone (Varies, Often Foliated) | Medium Bond | Continuous Rim (to prevent delamination) |
Evaluating Blade Life and Total Cost
The true cost of a diamond blade is measured in cost-per-cut, not purchase price. A cheap blade that wears out after 100 linear feet on dense quartzite is more expensive than a premium blade that delivers 500 feet of clean cuts. Higher-quality blades use a more consistent diamond grit, a more durable metal matrix, and a reinforced core that resists warping under thermal stress. This investment pays off directly in reduced blade changes, less rework from poor cuts, and higher productivity.
Blade lifespan is dictated by three factors: material abrasiveness, operational discipline, and cooling. Cutting highly abrasive stone like some quartzites will naturally wear a blade faster than cutting marble. Operator discipline—avoiding excessive side pressure, twisting, or forcing the cut—prevents premature segment loss and core damage. Proper water flow in wet cutting is non-negotiable for heat management. For a business handling diverse materials, from our Rough Series slate to polished marble, investing in a few specialized, high-quality blades is more cost-effective than trying to force a “general purpose” blade to do everything poorly.
Premium Stacked Stone, Direct from Manufacturer

Marking and Scoring the Thin Stone Veneer Safely
Precise marking and controlled scoring are the foundation of efficient, waste-free installation, directly impacting both the visual integrity of the bespoke random-lay pattern and on-site productivity.
Getting the layout and initial cuts right isn’t just about saving material; it’s about controlling the job from the start. Proper marking and scoring minimize dust, reduce tool wear on expensive diamond blades, and set you up for clean, tight joints. This process blends traditional skill with modern safety protocols, especially critical given the 25–40mm thickness of quality natural veneer like our high-density quartzzite products. A mistake here isn’t just a wasted stone—it’s a compromised corner or a visible seam that breaks the full-depth visual integrity you’re selling to the client.
Essential Tools for Precision Marking
Your marking tools determine your cut accuracy. For natural thin stone veneer, you need visibility and durability. A carpenter’s pencil or a fine-tipped masonry marker provides a line that won’t smudge on the stone’s natural surface. Don’t use chalk or wax pencils meant for wood; they’ll vanish with the first splash of water from a wet saw. A sturdy metal straightedge or a thick aluminum level is non-negotiable for guiding scores and ensuring straight cuts—flimsy rulers flex and lead to wavy breaks.
A basic carbide-tipped scoring tool or a dedicated masonry scribe is sufficient for creating the initial guide groove. The goal isn’t to cut through, but to create a controlled weakness. A small combination square is perfect for laying out perfect 90-degree angles for receptacle holes and inside corners. For complex shapes around pipes or irregular edges, a piece of cardboard or flexible plastic makes an effective template to trace the exact profile onto the stone’s back—the 100% sawn-back surface provides a flat, ideal canvas for this.
Step-by-Step Scoring and Snap Technique
The score-and-snap method is your fastest, cleanest, and quietest option for straight cuts, preserving the zero-repeat natural variation by avoiding the uniform look of a saw-cut edge. Start by securing the stone on a stable, padded surface. Any movement during scoring ruins the line. Clamp your straightedge precisely along the marked line—double-check the alignment. Apply firm, consistent pressure with the scoring tool, running it along the guide multiple times. Three or four passes create a better fracture line than one heavy pass that can wander or chip the stone.
Once you have a deep, consistent groove, position it directly over the edge of your workbench or a supporting bar. Wear cut-resistant gloves. Place your hands on the secured portion of the stone and apply quick, decisive downward pressure on the overhanging section. A clean stone will snap neatly along the score. This technique is ideal for the random sizes in a crate of loose stone wall cladding, allowing you to quickly customize lengths without firing up a saw.
Integrating Wet Cutting for Complex Cuts
Scoring and snapping has its limits. For 45-degree miters, intricate notches for electrical boxes, or curved cuts, you must transition to a wet saw with a diamond blade. The initial scored line becomes your visual guide for aligning the stone on the wet saw table, ensuring precision. This hybrid approach is standard practice: score and snap for the bulk of your straight cuts, then use the wet saw for the complex geometry that defines a professional install.
For small interior cuts, like an outlet box, score the outline deeply on all sides. Then, use a hammer and chisel to nibble away the waste material from the edges inward, rather than trying to punch out the center. For tight curves, make relief cuts—straight cuts into the waste area—to prevent the blade from binding. The wet saw’s water feed is a critical safety feature here, suppressing the silica dust generated even during these detailed cuts.
Safety Protocols for Dust and Debris Management
Even manual scoring creates respirable crystalline silica dust. Treat every phase of cutting with the same level of caution. If you’re scoring multiple pieces, use a HEPA-filtered vacuum with a brush attachment at the point of scoring. When you move to the wet saw, check the water reservoir and pump function before every cut to ensure effective slurry management and dust suppression.
OSHA’s silica standard (29 CFR 1926.1153) isn’t optional. For any dry work—including scoring or follow-up grinding—a NIOSH-approved N95 respirator (or better) is mandatory. Safety glasses with side shields are essential to protect from flying stone chips during snapping. Establish a designated cutting zone on the job site, use heavy-duty drop cloths, and clean up exclusively with a HEPA vacuum. Never use compressed air or dry sweeping, which simply puts hazardous dust back into the air.
Layout Strategies for Efficient Material Use
Efficiency starts before you make a single mark. Dry-lay several crates of your thin stone veneer on the ground. This lets you visualize the pattern, blend the natural color variations inherent in 100% mineral stone, and identify pieces best suited for prominent areas versus filler. Always mark your cuts from the rough, sawn-back side when possible. This places any minor chipping from the scoring tool on the hidden side, preserving the perfect face.
For corners, use the provided authentic masonry corner wrap (L-shaped) pieces as a physical template to mark the precise cuts needed on the adjoining field stones for a seamless fit. When planning a running bond pattern, stagger end joints by at least the stone’s height. A simple story pole—a marked stick—saves time by transferring consistent horizontal layout lines directly to the wall substrate. Finally, adopt a “most complex first” rule: mark and cut your trickiest pieces (corners, special shapes) at the beginning of your session. Use the resulting offcuts for smaller, less visible areas, maximizing yield from every full piece and directly impacting project margin.
Techniques for Cutting Perfect Angles and Receptacle Holes
The most efficient installations now blend time-tested manual skills with modern layout and dust-control technologies to achieve precision while meeting stringent safety standards.
Traditional Hand Tools and Manual Techniques
For cutting thin stone veneer, the fundamentals still deliver. A miter saw fitted with a diamond blade is the go-to for creating clean, accurate angles, especially for corners and panel edges. The controlled feed and stable platform are essential for the 25–40mm thick material to prevent chipping. For receptacle openings, a diamond-grit hole saw is non-negotiable; it bores cleanly through the stone without shattering the face, which is critical for outlets and switches.
Physical templates cut from cardboard or wood remain a smart, low-tech solution for repetitive cuts. They eliminate measurement errors across multiple pieces, ensuring consistency for window surrounds or repeating architectural details. This method is particularly effective for our loose stone veneer, where each piece is individually hand-laid, allowing for precise fitting against templates to maintain the bespoke random-lay pattern without sacrificing speed.
Technology-Enhanced Cutting and Layout
Modern tools have transformed on-site adjustments. An oscillating multi-tool with a diamond-grit blade is indispensable for plunge-cutting outlet boxes directly into an installed section or fine-tuning an angle without removing the stone. For layout, laser projectors cast perfect cut lines directly onto panels, moving beyond chalk lines and reducing setup time. This precision is key for complex installations like fireplace surrounds or intricate feature walls.
Digital tools take planning off the wall. AR measuring apps and layout software allow contractors to pre-plan the entire individually sawn-back stone placement. This digital dry-run optimizes the use of material, minimizes waste from our random-sized stones, and visualizes the final full-depth visual integrity before a single cut is made, ensuring the natural variation is distributed effectively.
| Cutting Task | Primary Tool | Key Technique for Quality |
|---|---|---|
| Straight Cuts & Panel Sizing | Wet Saw with Continuous-Rim Diamond Blade | Slow, steady feed with constant water flow to prevent chipping and blade glazing. |
| 45° Mitered Corners | Wet Saw with Miter Fence | Score a shallow guide pass first, then complete the cut to ensure a clean arris on the visible edge. |
| Electrical Box Cut-Outs | Diamond Grit Hole Saw / Oscillating Multi-Tool | Apply painter’s tape over the cut area to reduce surface splintering on the finished face. |
| On-Wall Trimming & Notching | Angle Grinder with Turbo Diamond Blade | Use a vacuum shroud connected to a HEPA filter vac for dry cutting to control silica dust at the source. |
Dust Management and Worksite Safety
Silica dust management is non-negotiable. Wet-cutting with a dedicated saw is the primary engineering control, reducing airborne dust by over 80% compared to dry methods. For operations where wet cutting isn’t feasible, such as using an angle grinder for final adjustments, tools with integrated dust ports connected to a HEPA-filter vacuum are mandatory. This isn’t just about cleanliness; it’s a core compliance issue with OSHA’s 50 µg/m³ PEL for respirable crystalline silica.
PPE is the last line of defense. A NIOSH-approved respirator (N95 or better) is required for any dry-cutting activity. For high-quartz content stones like our high-density quartzzite products, this protection is critical. Combine this with eye protection, hearing protection, and cut-resistant gloves to create a complete safety protocol that protects workers through the entire cutting and fitting process.
Achieving Clean Finishes and Minimizing Rework
The difference between a good install and a great one is in the details of the cut. Lightly scoring the stone along the cut line with your diamond blade before making the full-depth pass creates a controlled fracture path, preventing ragged edges. Applying painter’s tape along the cut line on the finished face is a simple trick that significantly reduces micro-chipping, especially on the delicate, natural-cleft surfaces of slate or sandstone.
Always run practice cuts on scrap material first. This calibrates your feed speed and pressure for the specific stone type—whether it’s a softer limestone or a hard quartzite—and allows you to verify your angle setups. This step is crucial when working with natural stone to confirm blade performance and avoid costly mistakes on final pieces, ensuring the authentic masonry corner wrap and overall installation integrity is maintained without waste.
Managing Silica Dust and OSHA Respiratory Safety Compliance
Effective silica dust management is no longer optional; it’s a non-negotiable part of the job that protects your crew, keeps you compliant, and directly impacts project viability and cost.
The conversation around cutting natural stone has permanently shifted. Stricter enforcement of OSHA’s silica standard, combined with heightened awareness of long-term health risks like silicosis, has made dust control a primary operational concern. Managing this hazard isn’t just about slapping on a mask; it requires a systematic approach integrating engineering controls, verified respiratory protection, and documented administrative protocols. For contractors and fabricators working with natural thin stone veneer, this integrated safety strategy is as critical as the cutting technique itself.
Understanding OSHA’s Silica Standards and Exposure Limits
The OSHA standard for respirable crystalline silica (RCS) sets a clear, enforceable line in the sand. The permissible exposure limit (PEL) is 50 micrograms per cubic meter of air, averaged over an 8-hour workday. More importantly, the action level is half that at 25 µg/m³. Once exposure hits this action level, it triggers mandatory requirements for exposure assessment and medical surveillance. These rules apply universally to any task generating silica dust, including dry cutting, grinding, and drilling of natural stone products like quartzite, granite, or slate veneer. Compliance isn’t guesswork; employers must either conduct air monitoring or use objective data to accurately assess exposure levels for their specific operations, tools, and materials.
Implementing Effective Engineering Controls for Dust Suppression
Engineering controls are your first and most effective line of defense, aiming to eliminate the hazard at the source. For stone cutting, wet methods are paramount. Using water to suppress dust at the point of generation during sawing or grinding isn’t just a best practice—it’s recognized under OSHA’s “Table 1” as a specified exposure control method that can simplify compliance. When wet cutting isn’t feasible, Local Exhaust Ventilation (LEV) systems, such as dust collection shrouds directly attached to grinders, are essential for capturing dust before it enters the breathing zone. In fabrication shops, integrated dust collection systems for stationary saws are non-negotiable for maintaining air quality. The goal is to use these controls to keep exposure below the PEL, minimizing reliance on respirators.
Selecting and Using Proper Respiratory Protection
When engineering controls alone can’t reduce exposure below the PEL—a common scenario with angle grinder work on scaffolding—proper respiratory protection becomes mandatory. This starts with a written respiratory protection program, including medical evaluations and annual fit-testing. For silica dust, a disposable NIOSH-approved N95 respirator is often the minimum. However, for tasks like extended dry grinding of dense stone, a half-face or full-facepiece elastomeric respirator with P100 filters provides a higher level of protection. The critical factor is fit; a proper seal-check must be performed each time the respirator is worn, and filters must be replaced according to the manufacturer’s schedule. A respirator that doesn’t fit is just a placebo.
Developing a Compliant Written Exposure Control Plan
A site-specific written exposure control plan is the blueprint for your silica safety program. It moves your approach from ad-hoc to systematic. This plan must designate a competent person to implement and supervise it. It should document every task that generates silica dust, the specific engineering controls and work practices used for each, and the type of respirators required when controls are insufficient. The plan must also outline procedures for restricting access to high-exposure areas and define housekeeping methods that minimize dust re-entrainment, mandating HEPA vacuums or wet sweeping instead of dry brushing or compressed air. This isn’t a static document; it requires regular review and updates whenever work processes, materials, or tools change.
Training, Monitoring, and Recordkeeping Protocols
The final pillars of compliance are administrative: training, monitoring, and documentation. Employees must be trained on the health effects of silica, the contents of the exposure control plan, and the proper use of all controls and respirators. Exposure monitoring—through initial air sampling or reliance on objective data—is required to verify the effectiveness of your controls and trigger additional protections if needed. For employees exposed above the action level for 30 or more days a year, medical surveillance is mandatory. Finally, meticulous recordkeeping is essential. Maintain records of all exposure assessments, fit-tests, medical exams, and training sessions for the required durations. Today, digital compliance software is becoming standard for efficiently managing this documentation and proving due diligence.
Conclusion
Cutting thin stone veneer accurately is essential for achieving a professional, long-lasting installation. Following the right techniques for tool selection, blade choice, and dust management protects your investment, ensures job site safety, and delivers the authentic, bespoke look that defines a high-quality project.
For sourcing consistent, high-density natural stone with precision-sawn backs for easier installation, explore our core inventory of best-selling thin stone veneer. Contact your Top Source Stone dealer or wholesaler to discuss your project specifications and access quarry-direct materials.
Frequently Asked Questions
How to cut thin stone veneer?
For clean, straight cuts on thin stone veneer, a wet saw with a diamond blade is the industry standard for precision. For quick, on-site cuts or irregular shapes, an angle grinder fitted with a diamond blade is highly versatile. Always use a chisel and hammer to snap the scored piece for a natural look, and always wear appropriate safety gear including eye protection and a respirator to control silica dust.
Can you cut stone veneer with a tile saw?
Yes, a tile saw is essentially a type of wet saw, which is a preferred tool for high-precision work on stone and tile. The research confirms wet saws are favored for their accuracy in tile and stone work. Ensure your tile saw is equipped with a continuous-rim diamond blade designed for stone to prevent chipping and achieve the cleanest cuts on your veneer.
Do you need a wet saw for natural thin stone?
While not absolutely mandatory, a wet saw is highly recommended for most projects. It provides superior precision, minimizes dust, and extends blade life. The research indicates that stricter silica dust regulations are pushing tool choices toward solutions like wet saws that control airborne particles. For a few cuts, an angle grinder with dust control can suffice, but for volume, efficiency, and accuracy, a wet saw is the professional’s choice.
How to cut corners for thin stone veneer?
Cutting corners requires creating two precise mitered pieces. For outside corners, cut each adjoining piece at a 45-degree angle using a wet saw for accuracy. For inside corners, one piece is typically squared off and butted into the corner, while the overlapping piece is cut to fit (coping). Use an angle grinder for fine-tuning the fit. Always dry-fit the pieces before applying adhesive to ensure a tight, seamless joint.
What blade is best for cutting natural stone veneer?
A continuous-rim (turbo or smooth rim) diamond blade is best for cutting natural stone veneer. This blade type provides the cleanest, chip-free cuts on delicate stone. The research highlights that advances in blade technology are a key focus. For a wet saw, use a diamond blade rated for stone. For an angle grinder, a diamond masonry blade designed for dry or wet cutting is appropriate, but using water or a dust-attachment is crucial for safety and cut quality.
