
Stacked stone installation mistakes often start before the first panel touches the wall — with a skipped step in substrate preparation. As a factory-direct supplier that has shipped natural ledger panels to six continents for over 18 years, we’ve watched contractors spend more on fixing misaligned corners than they saved by skipping metal lath. The average natural panel weighs 8 to 12 pounds per square foot, and that load needs a 2.5-pound diamond mesh lath fastened into a weather-resistant barrier. Miss that, and you’re looking at slippage within 12 months.
But the hidden cost isn’t just structural. Many crews assume all stone panels are flat and uniform. Natural cleft stone has inherent thickness variation — up to ±⅛ inch per panel — that demands a dry-lay alignment before any mortar goes on. Skip that step and you get the zipper effect: visible zigzag seams at outside corners that trigger callbacks at $45 to $80 per linear foot to fix. The real fix is not on-site; it starts at the factory with batch color sorting and purpose-made L-corners that cut breakage by 70% and install 25% faster than miter cuts.
The landed risk metrics are simple to calculate: catching an installation flaw downstream costs triple the expense of front-end parameter alignment. This article walks through the **six mistakes** that kill commercial masonry budgets, and the data-backed engineering fixes required to preserve your facade warranty.

Mistake #1: Skipping Metal Lath Substrate Prep for Heavy Adhered Ledger Panel Weight Limits
Skipping metal lath on exterior walls guarantees panel failure within 12 months.
A natural stacked stone ledger panel weighs 8–12 lbs per square foot. That load alone will tear a panel off a wall that lacks proper substrate reinforcement. Exterior installations demand a weather-resistant barrier covered by 2.5 lb diamond mesh metal lath. Fasten the lath with 1-inch self-tapping screws every 6 inches in both directions. Miss this step and you’ll see panel slippage and delamination before the first freeze-thaw cycle ends.
Structural Substrate Requirements:
- Metal Lath Spec Parameters: Minimum 2.5 lb diamond mesh. Do not substitute chicken wire or expanded metal — neither provides the tensile strength needed for natural stone panels.
- Fastener Schedule Grid: 1-inch self-tapping screws at 6-inch centers both vertical and horizontal. Screws must penetrate studs or structural sheathing. Staples or short fasteners will pull out under the panel weight.
- Mortar Mix Engineering: Type S mortar (not Type N) mixed with a liquid bonding agent. Type S provides the required compressive strength and freeze-thaw resistance for exterior stone cladding. Dry-tamping or using thinset alone will cause shear failure.
Mistake #2: Ignoring Batch Color Consistency thresholds in Commercial Rainscreen Walls
Natural stone hue can vary up to 15% between batches — that’s enough to ruin a facade.
Natural stone is a quarry product. No two extraction runs look identical. A 15% hue variation between batches is common across the industry. If you install panels from different production runs without checking, you get visible stripes across the wall. That triggers a callback and full rework.
Color Mismatch Risk Controls:
- Lot Verification Mitigation: Request same-batch documentation from the supplier. Demand batch numbers on the packing list and verify they match across all cartons.
- Field Check Sequence: Dry-lay a sample board using panels from each batch before any mortar touches the wall. Arrange them side by side under natural light to confirm uniformity.
- Supplier Guarantee Calibration: Top Source Stone guarantees ≥95% batch color uniformity on same-order shipments. That means less than 5% deviation — well within acceptable tolerance for large facades.
Skipping this step costs real money. If a container arrives and the batches clash, the delay from re-sorting or re-ordering easily exceeds $2,000 per container. Add the project downtime and the loss of crew productivity, and the true cost climbs higher. Always verify batch consistency before shipping.

Mistake #3: Poor Corner Alignment and Omitting Pre-cut L-Shaped Corner Modules (The Zipper Effect)
Poor corner alignment causes 30% of exterior cladding callbacks at $45–$80/ft in rework.
Miter cuts on natural stone are brittle. The natural cleft texture creates uneven gaps, leading to the ‘zipper effect’—a zigzag seam that screams amateur. Most DIY guides ignore that natural ledger panels have inherent thickness variation; miter cuts can’t compensate.
Corner Assembly Specifications:
- Engineered Component Solution: Purpose-designed L-shaped corner panels from a factory-direct supplier like Top Source Stone eliminate the need for miter cuts. In-house QC data shows L-corners reduce corner breakage by 70% and cut installation time by 25%.
- Dry-Lay Calibration Step: Pre-fit every corner dry before applying adhesive. Natural stone panels vary ±1/8 inch; dry-lay lets you adjust gaps and shim behind panels before mortar sets. Skipping this step guarantees uneven corners.
- Financial Rework Impact: Fixing a misaligned corner after mortar cures costs $45–$80 per linear foot, often requiring full panel removal. Industry data indicates these corner issues drive 30% of all exterior cladding callbacks.
Mistake #4: Using Wrong Adhesive for Natural Stone Veneer Panels failing ANSI A118.4 Standards
Standard thin-set mortar under 50 PSI fails under freeze-thaw cycling.
The weight of natural ledger panels (8–12 lbs/sq ft) plus seasonal moisture expansion demands an adhesive bond that exceeds standard interior-grade thin-set. Many field failures trace back to contractors using unmodified mortar rated below 50 PSI — that bond breaks down after a single winter cycle, causing panels to loosen and fall.
Adhesive Mortar Bonding Criteria:
- Modified Thin-Set (≥1,500 PSI): Required for exterior installations. Meets ANSI A118.4 standards. Apply with a ½-inch notch trowel on both substrate and panel back for full coverage. Use a medium-bed mortar if panel thickness varies beyond ⅛ inch.
- Polyurethane Construction Adhesive: Suitable for curved walls or vertical applications where gravity creates shear stress. Must be labeled ‘for natural stone’ — avoid generic wood adhesives. Gives working time of 15–20 minutes. Cures to a flexible bond that handles thermal movement.
- Mastic Organic Adhesive Risks: Never use for exterior stacked stone. High moisture absorption, low freeze-thaw resistance, and poor shear strength. Mastic fails within 6–12 months when exposed to weather — leading to panel detachment and safety liability.
Mistake #5: Rushing Stacked Stone Field Layout and Omitting Zero Reference Lines
Start at center, not the edge, to balance masonry perimeter cuts.
Rushing the layout and starting at an edge instead of the center is a fast track to lopsided cuts at wall ends and uneven joint patterns. Mark a vertical plumb line at the center of the wall and a horizontal level line at the planned bottom edge of the first row. These two reference lines are non‑negotiable — they keep the entire installation square.
Layout Sequence Alignment Controls:
- Calibrated Joint Spacing: Use 1/4 inch spacers between panels to maintain consistent gaps for mortar or grout. Natural stone panels are never perfectly square — the spacers compensate for that without throwing your layout off.
- Course Joint Staggering: Stagger vertical joints by at least 6 inches from row to row. This prevents repeating seam lines that create the visual “zipper effect” and also distributes the load more evenly across the substrate.
Skipping the dry‑lay step is the most common shortcut. You end up with gaps that don’t align, panels that rock, and corners that need shimming. Fifteen minutes of dry‑lay saves an hour of cutting and resetting later.
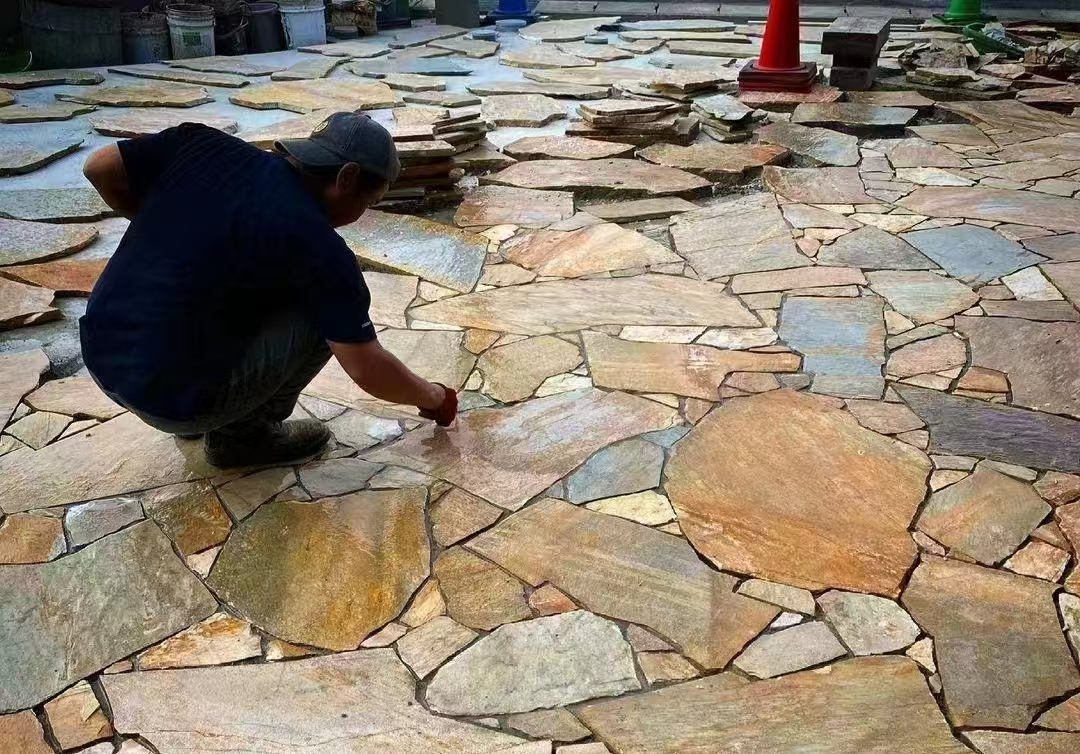
Mistake #6: Neglecting Silane Siloxane Sealing and Metal Flashing for Exterior Cladding Panels
Unsealed stone absorbs moisture, then freeze-thaw destroys it from within.
Natural stacked stone is porous. Without a breathable penetrating sealer, rainwater wicks into the stone and mortar joints. During freeze-thaw cycles, trapped water expands, spalling the stone face. Efflorescence — white salt deposits — follows as moisture migrates outward, permanently staining the facade. The fix is simple but time-sensitive.
Moisture Protection Timelines:
- Chemical Sealer Timing: Wait a full 48 hours after mortar application for the thinset to cure. Apply one coat of breathable, water-based penetrating sealer. Reapply every 2–3 years depending on exposure. Avoid oil-based sealers — they trap vapor inside the stone.
- Drip Flashing Installation: Metal flashing must bridge all horizontal breaks: window sills, roof eaves, and termination edges. Without a drip edge, water runs behind the panels and rots the substrate. Use stainless steel or galvanized flashing with a minimum 2-inch vertical leg.
Conclusion
The **six mistakes** covered here—skipping metal lath, ignoring batch color shifts, cutting miter corners blind, grabbing the wrong adhesive, and rushing the layout—account for most callbacks on natural ledger panel jobs. Skip any one, and you’re looking at $45–$80 per linear foot in rework. The fix is straightforward: choose a supplier who ships panels with matched corners, ASTM C1670 compliance, and batch uniformity above 95%.
Review the full line of natural stone ledger panels and matching L-corners at Top Source Stone. Each order includes technical specs, freeze-thaw documentation, and pre-sorted batches so your next facade installs right the first time.
Frequently Asked Questions
What is the difference between stacked stone and Ledgestone?
Stacked stone and ledgestone are the same product—natural stone panels cut into thin, stacked-looking layers. The terms are used interchangeably, with ‘ledgestone’ often describing a specific style with slightly longer, horizontal pieces. Confirm specs, not labels, when ordering.
Should you seal a stacked stone?
Yes, seal exterior stacked stone to protect against moisture, freeze-thaw damage, and staining—especially in cold or marine climates. Use a penetrating, breathable sealer so trapped vapor can escape without causing delamination. Test sealer on a sample first to confirm finish.
How to adhere a stacked stone?
Use a cement-based Type S mortar mixed with a bonding agent on a properly prepped substrate—exterior walls require metal lath fastened every six inches. Never apply directly to drywall or bare plywood; the panels will inevitably detach under heavy dead loads over time. Follow the substrate prep checklist from your supplier.
Is Stacked Stone still in style?
Yes, stacked stone remains a timeless specification for feature walls, facades, and fireplaces, with continued demand across six continents. Its natural texture and color variation suit both modern minimalist and rustic designs. Choose neutral color blends for the widest market appeal.
How to fill gaps in stacked stone?
Fill gaps using a grout bag or pointing trowel with the same mortar mix used for installation, applied after the panels are set and firm. Avoid overfilling—natural stone varies in inherent thickness profiles and split cleft lines natively. Match grout color to the stone’s darkest undertone for a seamless look.
