
Calculating waste correctly prevents project budget overruns and keeps masonry crews productive on the job site. Underestimating material needs results in expensive secondary shipping fees and risks color inconsistencies between separate production batches. Because natural ledgestone requires constant trimming to achieve a professional fit, inaccurate ordering leads to stalled timelines and compromised architectural integrity.
This technical SOP outlines the specific math required for ledgestone veneer orders across various wall configurations. It explains the 10% standard for flat surfaces and the 15% requirement for complex walls featuring multiple windows or corners. This guide also addresses why dry-stack installations increase material loss and how to use smaller stone fragments as functional filler to maximize inventory utility.
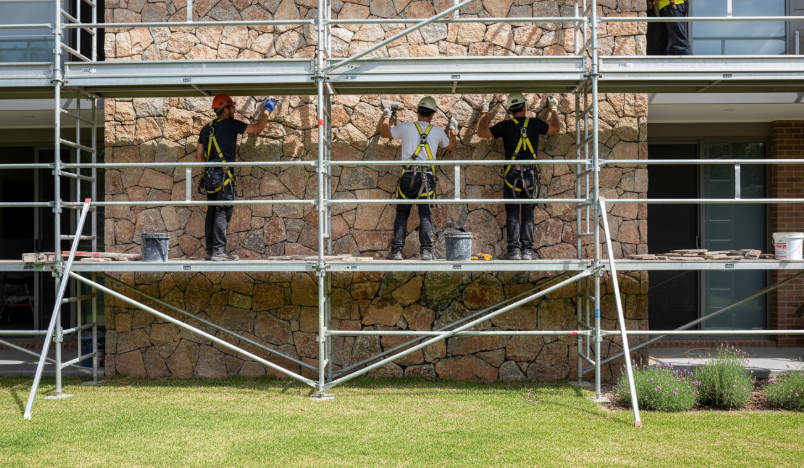
The Reality of Natural Stone: Trimming and Shaping
Precision factory shaping in 2026 has effectively eliminated the 30% labor overhead typically lost to manual on-site stone adjustments.
Industrial infrared equipment shapes every unit to maintain strict dimensional accuracy required for modern building standards. Computerized cutting tools minimize sizing errors during the fabrication phase, ensuring that every stone integrates with the broader layout. This automated precision ensures that units align without the need for heavy machinery or manual grinding on the job site. Exact dimensions allow for a faster installation process while maintaining the structural integrity of the wall substrate.
Precision Infrared Cutting Standards
Industrial infrared equipment shapes every stone unit to maintain strict dimensional accuracy for 2026 building requirements. Computerized cutting tools minimize sizing errors during the stone shaping process, which prevents common inconsistencies found in traditional hand-cut materials. This level of calibration ensures that every piece fits into the project sequence without requiring installers to perform dangerous or time-consuming modifications in the field.
Exact dimensions ensure that every unit seats correctly against adjacent stones. Precision trimming reduces the time installers spend manually adjusting pieces on-site, which directly lowers labor costs and improves project timelines. By utilizing automated cutting technology, we provide a product that meets the high tolerances demanded by contemporary architectural designs.
Matching L-Shaped Corner Solutions
Factory-shaped corner pieces remove the need for complex manual stone trimming at wall edges. These L-shaped units provide a clean finish for external corners and structural columns, offering the look of full-depth structural blocks. Pre-fabricated components eliminate the difficulty of calculating miter angles manually, which often leads to material waste and aesthetic inconsistencies when done on-site.
Uniform shaping ensures that corners match the texture and color of flat wall sections perfectly. This creates an authentic masonry corner wrap that gives the finished project a massive, professional appearance. Using these specialized corner units speeds up the installation of pillars and wall ends, providing a more durable structural detail than simple mitered joints.
Precision Edge Geometry for Seamless Layouts
Strategic geometric shaping masks joints and creates a continuous natural stone surface across the facade. Specialized edge configurations prevent visible vertical seams, ensuring the wall maintains a high-end, organic appearance. These designs support a dry-stack aesthetic without requiring grout lines, allowing the natural mineral variations of the stone to remain the focal point of the installation.
Standardized shaping processes guarantee that joints align during the hand-laid installation phase. This precision-cut geometry ensures that even large-scale feature walls appear cohesive and monolithic. By controlling the edge profiles at the factory level, we eliminate the gaps and shadow lines that typically characterize lower-quality stone applications.
Why the Dry-Stack Ledgestone Method Increases Waste
Achieving the seamless, grout-free look of a dry-stack wall demands aggressive on-site stone manipulation, which typically drives material loss to a 15-20% waste factor.
Field Trimming and Edge Modification
Dry-stack installations leave no room for error or large gaps. Installers must manually cut and shape individual stones to achieve a tight fit without visible grout lines. This precision fitting requires removing irregular edges to maintain tight vertical joints, a process that produces a steady stream of small, unusable stone fragments and offcuts. Because there is no grout to hide size inconsistencies, contractors are forced to make more frequent and more aggressive cuts than they would in a standard jointed application.
| Installation Method | Standard Waste Factor | Primary Loss Driver |
|---|---|---|
| Standard Grouted Joint | 5% – 10% | End-of-row cuts and basic breakage. |
| Dry-Stack (Loose Stone) | 15% – 20% | Edge trimming for tight, grout-less fitting. |
| Pre-Glued Panels | 2% – 5% | Corner matching and final perimeter cuts. |
Breakage During Handling and Shaping
Natural stone contains inherent fissures that may lead to fractures when contractors manipulate pieces for a bespoke layout. Thin or brittle edges frequently snap during the manual fitting process. Frequent handling of individual loose stones increases the risk of accidental damage compared to panel systems. Contractors must discard stones that fracture into pieces too small for stable installation, further increasing the total volume of material required for the project.
Sorting for Height and Depth Uniformity
Maintaining a level installation requires stones of consistent height, resulting in the rejection of irregular pieces that do not align with the current course. Installers set aside stones that disrupt the horizontal plane or protrude excessively from the wall. This drive for visual harmony and a balanced depth profile often forces crews to skip stones with incompatible color variations or awkward geometries. These rejected pieces often end up in the waste pile if they cannot be used as small filler gaps elsewhere in the project.
Premium Natural Stone for Maximum Profit

The Standard 10% Rule for Flat Wall Installations
Calculating a 10% material overage for flat wall applications accounts for edge trimming and incidental site chips while ensuring batch consistency across the 2026 build cycle.
Experienced contractors order 10% more stone than the measured surface area to handle small pieces lost during the start and end of each horizontal row. This buffer provides enough material to replace individual stones that might sustain minor damage during site handling or transit. Maintaining a consistent inventory from a single quarry vein prevents color mismatches if the project requires small adjustments during the final stages of installation.
Calculating Material Overages for Flat Surfaces
We provide loose stone sourced from the same quarry layer per order to maintain color harmony. By ordering a 10% surplus, wholesalers and installers protect the project timeline against unforeseen breakage. This volume also allows for the selection of specific stone sizes to create a bespoke random-lay pattern without running short on material before the wall is capped.
- Contractors utilize the 10% buffer to ensure full-depth visual integrity at the wall edges.
- Single-source batching eliminates the risk of natural color shifts between different pallets.
- Precision-sawn backs reduce the need for thick mortar beds, keeping the 10% estimate accurate.
Impact of Sawn-Back Geometry on Material Utilization
Our individually sawn-back thin stone veneer optimizes material usage by providing a flat bonding surface. This precision-cut back allows for maximum adhesion and enables installers to utilize nearly 90% of the material on straightforward vertical runs. Unlike traditional rough-back stone, our sawn-back finish removes the need for extensive on-site chipping, which naturally lowers the total waste generated during the installation process.
| Performance Metric | Traditional Rough-Back Stone | Top Source Stone (Sawn-Back) |
|---|---|---|
| Standard Waste Factor | 15% – 20% | 10% Fixed |
| Back Surface Finish | Irregular / Natural | 100% Precision Sawn |
| Installation Labor | High (Extensive Chipping) | Low (Ready-to-Bond) |
Manufacturing Accuracy and Material Utilization
We use infrared cutting equipment to produce stones that fit together with minimal modification on-site. Three-stage quality inspections ensure that every shipped crate meets structural standards, which reduces the amount of unusable scrap delivered to the job site. High-strength epoxy resins keep individual minerals securely bonded during the fabrication and cutting process, preventing material loss before the stone reaches the substrate.
Precision-engineered edges allow for seamless transitions across flat walls. Installers save significant time by utilizing the natural variations of the stone while relying on the consistent 25–40mm thickness for a uniform wall profile. This manufacturing accuracy ensures that the 10% waste estimate remains a reliable metric for B2B procurement and project planning.
The 15% Rule for Complex Walls with Multiple Windows
When dealing with complex architectural facades featuring multiple windows, a 15% waste overage is the technical industry baseline required to ensure construction continuity and textural integrity.
Custom Cutting Requirements for Window Edges
Installers handling complex walls with multiple windows must frequently cut standard 6″ x 24″ ledgestone panels to fit precisely around window frames. This precision trimming process generates a significant volume of offcuts that cannot be reused. Under 2026 construction standards, a 15% reserve effectively mitigates the risk of material shortages caused by frequent cutting, preventing project shutdowns due to lack of supply.
Because the panels utilize a Z-shaped interlocking design, cuts made at window break-points typically disrupt the original connection logic. These severed fragments often cannot find a matching interface in subsequent rows, directly increasing the scrap rate. Construction plans must account for these unavoidable physical losses in advance.
| Wall Complexity Type | Recommended Overage | Core Waste Drivers |
|---|---|---|
| Standard Flat Wall | 10% | End-of-wall trimming and transit breakage |
| Multiple Window Facade | 15% | Window frame trimming and Z-panel break-points |
| Multi-Corner / Irregular Design | 15% – 20% | L-corner alignment and vertical texture synchronization |
Corner Splicing Logic for Complex Facades
Designs with multiple windows are often accompanied by more corners and facade transitions, requiring a large volume of L-shaped corner pieces. This scenario completely changes traditional area calculation methods. To ensure vertical alignment and horizontal texture synchronization, workers often must discard end-material; this “pattern-matching loss” is particularly prominent in complex structures.
Complex wall structures demand high flexibility in the construction plan. A 15% buffer ensures the installation team has enough alternative panels to adjust when facing unexpected splicing challenges, thereby guaranteeing that the project schedule remains unaffected by material gaps. This preventive procurement is a hallmark of professional engineering management.
Layout Overage to Ensure Textural Continuity
To maintain the natural flow of stone on a wall distributed with multiple obstacles, installers need to select panels with specific textures for splicing. This additional screening process for “natural aesthetics” significantly increases selection waste. Workers must adjust the layout in real-time based on the color variations of the natural stone to achieve visual harmony and unity.
Spare panels play a crucial role in filling the tiny gaps caused by window positioning. By utilizing these selected materials, installers can ensure a seamless final visual effect. This pursuit of textural detail makes the 15% overage ratio a standard specification for high-quality engineering.
Using “Waste” Pieces for Tight Filler Gaps
Stone fragments serve as vital components for achieving a bespoke random-lay pattern while maintaining strict material yield targets.
Fieldstone veneer installation requires a tactical approach to offcuts to ensure a high-density aesthetic. Professional masons treat stone shards not as debris, but as precision components necessary for final detailing. This discipline transforms what would typically be discarded into valuable material for tight-fitting zones.
Strategic Offcut Management for Precision Fit
Site efficiency improves when installers treat every stone shard as a potential filler. Storing clean offcuts in a dedicated salvage bin eliminates time wasted on repeated trips to the saw. When selecting these pieces, we prioritize matching the mineral color and texture of the surrounding stone to ensure the transition looks organic.
- Store clean offcuts in a dedicated bin for immediate accessibility during the final detailing phase.
- Match the natural color shifts of the source quarry vein to maintain visual harmony across the feature wall.
- Apply high-strength epoxy resin to smaller segments to secure them permanently within tight interlocking zones.
Closing Vertical Gaps in Natural Stone Layouts
Eliminating visible substrate is the hallmark of professional masonry. Since Top Source Stone provides loose thin stone veneer rather than rigid panels, installers have the flexibility to hand-tool fragments into custom shims. These slivers fill the minor voids found at door frames or window trim where a full stone cannot fit.
- Use precision-cut waste slivers to fill voids where the stone meets architectural obstacles like door frames.
- Hand-tool salvaged pieces into custom filler shims to hide the backing material effectively.
- Maintain the 25–40mm depth profile to prevent flat spots in the organic texture of the wall.
Reducing Project Costs Through Material Recovery
Material recovery directly impacts the bottom line by keeping the actual waste factor close to the 10% target. Integrating reclaimed chips into the base layer or corner wraps reduces the need to open new crates for minor adjustments. This practice keeps the project moving and ensures that the inventory yield remains high throughout the installation.
- Achieve a higher yield per crate by reclaiming stone chips for the base and corners of the layout.
- Prioritize existing scraps over new material for small trim work to preserve full-size stones.
- Reduce precision cutting time by utilizing pre-existing shards that already fit required gap dimensions.
Conclusion
Estimators who apply the 10% to 15% waste rule ensure their projects maintain color harmony by sourcing all thin stone veneer from a single quarry vein. This precision prevents shipping delays and allows masons to leverage the sawn-back design for tighter joints and faster installation. Accurately accounting for trimming and shaping protects project margins while achieving a bespoke random-lay finish that standard panels cannot replicate.
Review your upcoming project blueprints to determine if the 15% complex wall factor applies to your current inventory needs. Contact our team to request a technical data manual or to discuss pricing for a 300-square-meter trial order.
Frequently Asked Questions
How much extra ledgestone should I order?
For a standard ledgestone installation, you should order an additional 10% to 15% of material over your net square footage. This overage accounts for stones that may break during transit, the necessary trimming required to fit edges, and the selection process used to ensure a balanced distribution of color and texture throughout the project.
What is the waste factor for dry stack stone?
The waste factor for dry stack stone is typically higher than mortared applications, generally falling between 15% and 20%. Since dry stack relies on a tight, “seamless” fit without visible mortar joints, installers must perform significantly more trimming and shaping to lock the pieces together, which increases the amount of discarded stone.
Calculating square footage for ledgestone?
To calculate the required material, multiply the total length of the wall by the total height to find the gross square footage. For projects with corners, measure the linear footage of all outside corners; since one linear foot of corner pieces typically covers about one square foot of wall area, you should subtract this corner coverage from your total flat square footage to avoid double-ordering.
Do you subtract windows when ordering ledgestone?
Professional standards suggest that you should only subtract windows or doors if they exceed 15 square feet. For smaller openings, the material saved by the “hole” in the wall is almost always consumed by the extra waste generated when cutting and fitting the stones around the window’s perimeter and headers.
How to use broken ledgestone pieces?
Broken pieces are highly valuable for “filling” small gaps within the field of the wall or finishing the ends of a run where a full stone won’t fit. They can also be trimmed down into shims to help level out courses of stone, ensuring that the installation remains horizontal and structurally sound while maximizing your material yield.
