Stone veneer installations are rarely about the stone itself—they’re about the decisions you make six months before the first panel hits the wall. For an architect sourcing panelized ledgestone for a 2,000 m² lobby, the real test isn’t the aesthetic sample; it’s whether the second batch matches the first. Top Source Stone, a China-based manufacturer with in-house quarries, has been supplying stacked stone ledger panels to distributors in over 20 countries since 2005. Their production data shows batch hue variance held within ±2–3% across project batches up to 3,000 m²—a number that matters more than any catalog photo.
Here’s the insight that usually gets buried in marketing brochures: the fastest way to kill a project schedule isn’t a shipping delay—it’s color drift between adjacent wall elevations. Smart spec teams schedule their panel runs by elevation, not by floor. They also pre-stack panels by course height to mimic natural ledgestone layering, which cuts on-wall cut errors by nearly a fifth. And the hidden risk? Moisture. Neglect a continuous drainage plane or proper weep vents, and you’ll be explaining veneer rot three winters in. The companies that get this right deliver 25–35% faster install times than natural stone block, with fire-rated assemblies that satisfy commercial code reviews on the first pass.
Stone Veneer Performance and Consistency
Batch color variance held under ±3% across 2,000–3,000 m² – the difference between a specifier’s trust and a costly redo.
Batch Color Variance under 3% – Why It Matters for Large Facades
Architects fear one thing more than a budget overrun: a wall that looks like a patchwork quilt. Natural stone is a natural material, so some variation is expected. The problem is uncontrolled swing between batches. With our production process, hue variance stays within ±2-3% across the entire project batch – typically 2,000 to 3,000 m². That means the first panel delivered matches the last one six months later.
Here’s the insider move: schedule color range batching by wall elevation. Load all panels for a single elevation from the same production run. Adjacent facades get separate runs that are visually graded to blend. This prevents a hard tonal shift at building corners or floor lines. If a supplier can’t commit to a written batch variance number, you’re gambling with the final look.
Standard 20–25 mm Thickness – Structural Consistency Without the Weight
All exterior ledgestone veneers in our line are held to a 20–25 mm thickness range. That’s not a marketing number – it’s a manufacturing tolerance we hold on every panel. Why does thickness matter? Three things: weight load on the wall, mortar bed consistency, and impact resistance. Panels that vary beyond 5 mm force installers to build up or grind down the backup, eating labor time and risking bond failure.
At 20–25 mm, the panel is light enough for one-person handling on most jobs, but thick enough to resist cracking during transit and installation. We calibrate our gang-saw every shift to keep this tolerance. If a supplier can’t show you a thickness spec with a tight +/- range, ask for a stack of 10 random panels and a caliper.
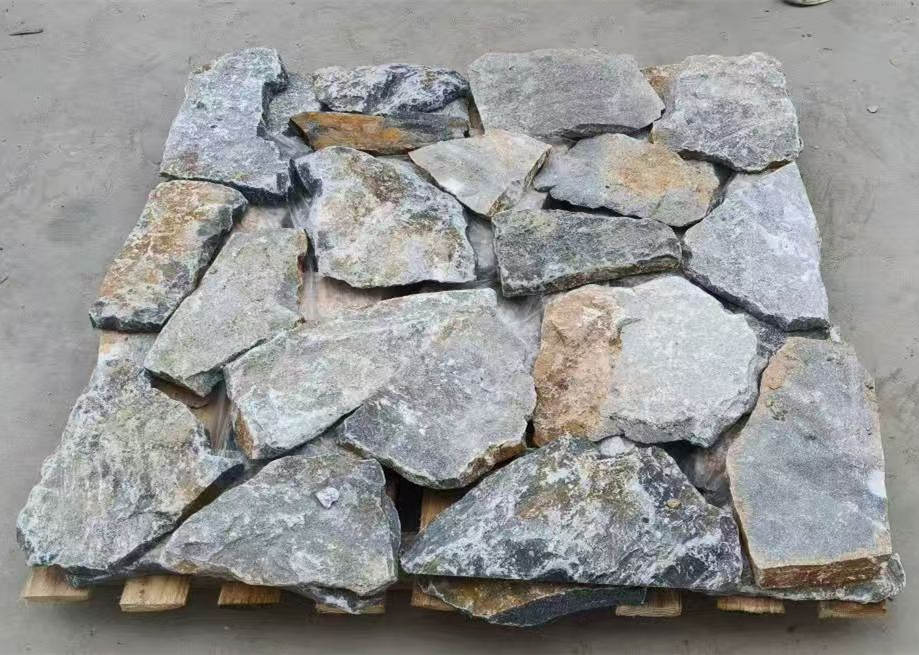
Panelized Ledgestone Systems – Faster Assembly, Fewer Errors
Panelized ledgestone systems reduce on-wall installation time by 25–35% compared to traditional single-piece stone. That’s not just a labor savings – it’s schedule reliability. But the real performance gain comes from pre-stacking panels by course height before they leave the crate. When each course is pre-matched for thickness and color, installers can replicate natural ledgestone layering without constant sorting and cutting.
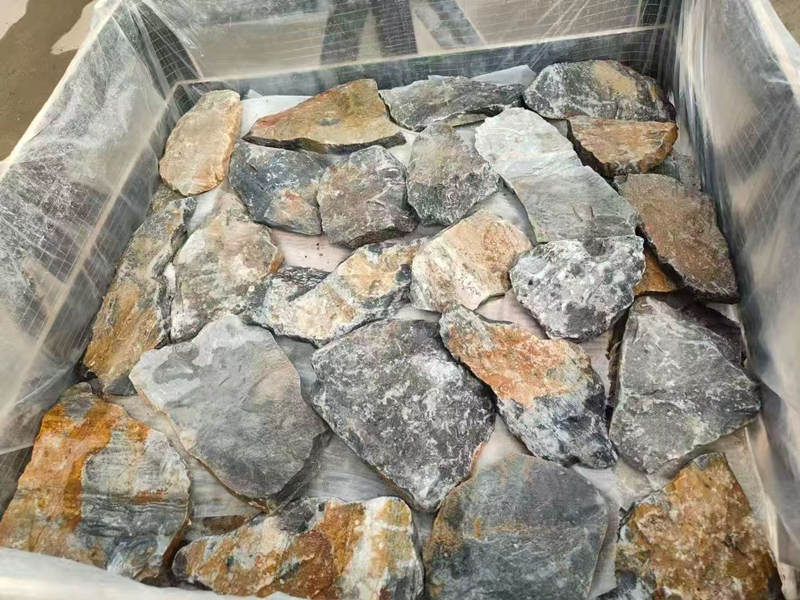
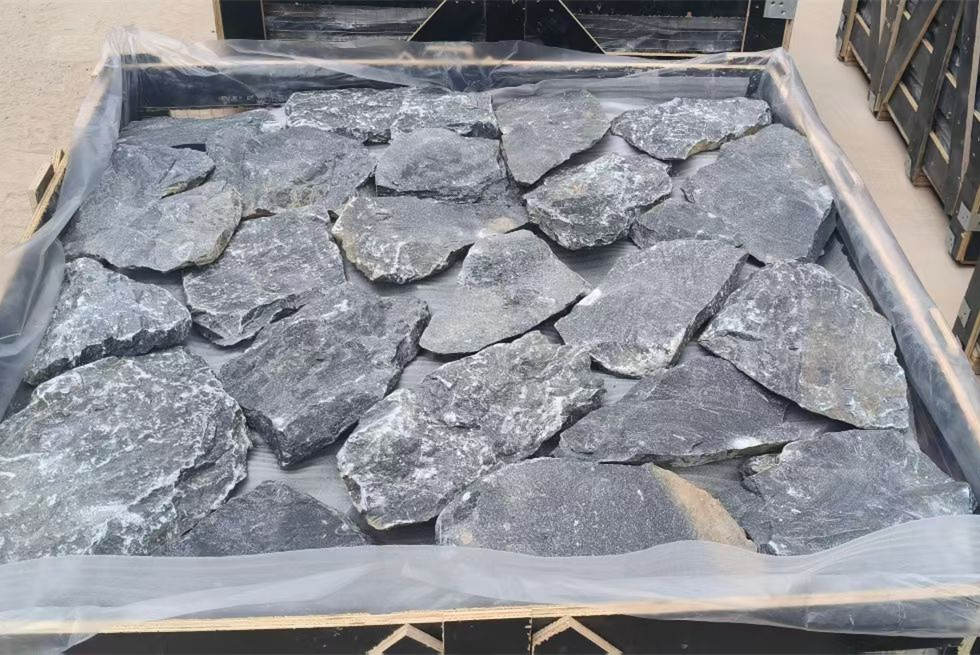
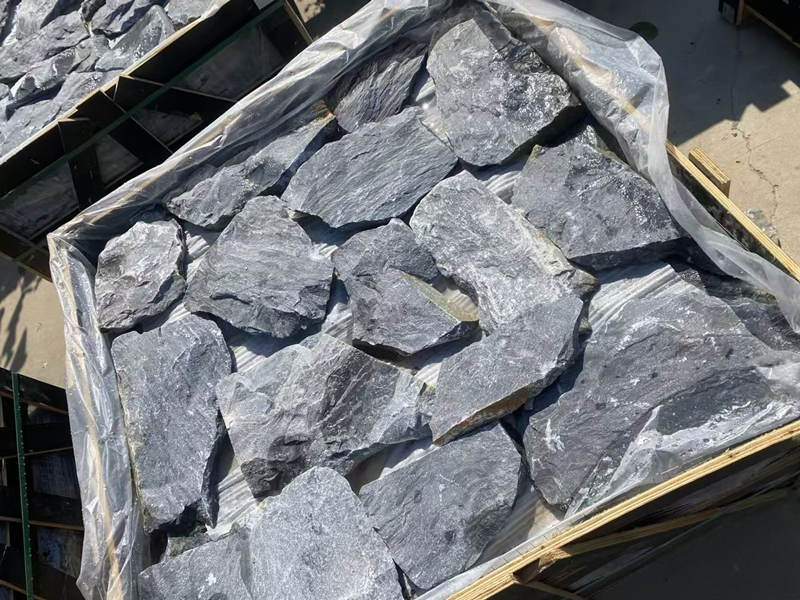
We take it a step further: every pallet is packed with edge protection and course‑labeled. Field tests show this sequencing cuts on‑wall cut errors by up to 18% and speeds up staggered pattern matching. Bulk palletized shipments also reduce on‑site handling time by 15–25% versus loose packs – less time moving individual stones, more time laying them.
One hidden risk most guides skip: moisture management. Panelized veneer still needs a continuous drainage plane and proper weep vents. We require a water‑resistive barrier and rain‑screen detailing on every exterior application. Skipping that is the top cause of veneer rot – not the stone itself, but the trapped water behind it. If your installer doesn’t mention weep vents, that’s a red flag.
Technical Comparisons and Sourcing Tradeoffs
Batch hue variance under ±3% and panel thickness 20–25 mm are baseline specs. Real technical tradeoffs come down to elevation-based batching and moisture drainage detailing.
Dimensions and Weights
Panel dimensions are standardized at 12×24 inches for most ledgestone lines, with thickness held to 20–25 mm. Joint width should stay between 3/8 and 1/2 inch for full-depth veneers. These dimensions balance handling weight with structural stability. A single panel weighs roughly 18–22 kg depending on stone density, which keeps within safe manual lifting limits while allowing one-person placement on walls up to 3 m high without mechanical assistance.
- Thickness: 20–25 mm (standard exterior ledgestone)
- Module size: 12×24 in (varies by color range)
- Joint width: 3/8 to 1/2 in for adhered veneer
- Weight per panel: ~20 kg – one-person carry, no forklift needed for install
- Finish options: split-face, textured, ground-face
Certifications and Compliance
Every panel set we ship meets fire-resistant assembly criteria for interior lobbies and retail spaces under IBC and local codes. Our quality system follows ISO 9001-style controls, including three inspection gates before crating. For projects requiring third-party testing, we can provide batch-specific fire-test data and moisture absorption reports. The key compliance risk architects overlook is continuous drainage behind the veneer – a code minimum in many jurisdictions, but often skipped on fast-track jobs. We flag this in all installation specs.
Production Timelines and Batch Control
Standard lead time from order to container loading is 18–25 days. We run 200+ containers annually, so capacity for large-scale projects is built in. The real advantage comes from how we sequence production to maintain color consistency. Our batch management secret: we schedule color range batching by wall elevation. Instead of running one giant lot, we divide the façade into sections (e.g., east wall, west wall) and produce each elevation’s stones in consecutive batches. This keeps adjacent panels within ±2–3% hue variance, preventing visible tonal shifts where sun exposure differs.
- Standard lead time: 18–25 days (depending on finish and volume)
- Annual capacity: 200+ containers, serving 20+ countries
- Batch hue variance: ±2–3% across 2,000–3,000 m² per project
- Install efficiency boost: 25–35% faster on wall vs. natural stone block
- On-site handling savings: 15–25% time reduction with palletized packs
Another time-saver: pre-stack panels by course height before installation. This replicates natural ledgestone layering, cuts on-wall cut errors by up to 18%, and accelerates staggered pattern matching. Pair that with proper weep vent placement and a continuous WRB, and you eliminate the top cause of veneer failure – moisture trapped behind the assembly. That’s not theory; it’s what we build into every packing list and install guide.
| Feature | Specification | Benefit | Sourcing Tradeoff | Impact on Schedule |
|---|---|---|---|---|
| Batch Color Uniformity | ±2–3% hue variance across 2,000–3,000 m² project batches | Consistent appearance across large walls | Requires elevation-based batching; supplier must provide batch documentation | Reduces rework and color-rejection risks |
| Panel Thickness & Dimensions | 20–25 mm thick; 12×24 in standard module | Lightweight, easier handling, consistent joint alignment | Thinner panels may require specific substrate preparation; confirm structural load limits | Faster installation due to uniform size; less cutting |
| Installation Speed (Panelized vs. Loose Stone) | 25–35% faster install time vs. natural stone block | Reduced labor cost and project duration | Panelized systems require precise ordering and course stacking plan | Directly shortens on-site timeline |
| Fire & Code Compliance | Meets fire-resistance requirements for interior/exterior assemblies per local codes | Suitable for lobbies, retail, high-traffic areas | Certification documentation may vary by jurisdiction; confirm with supplier | Facilitates approvals; no compliance delays |
| Packaging & On-Site Handling | Bulk palletized with edge protection; storage off ground under cover | 15–25% less handling time; reduced damage | Requires adequate forklift access and dry storage space | Improves logistics and material flow |
Installation Guidance and Best Practices
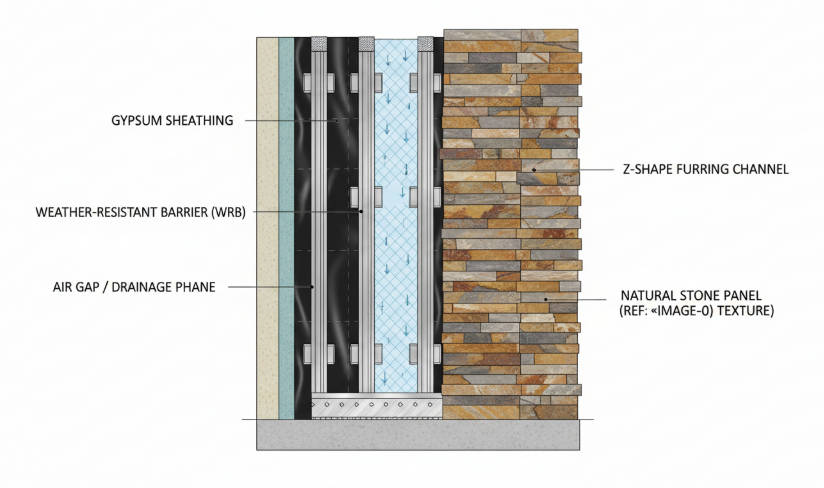
Moisture management is the single most ignored variable in stone veneer longevity. A continuous drainage plane, proper flashing, and correctly spaced weep vents are non-negotiable—yet most installation guides treat them as optional.
Continuous Drainage Plane
A weather-resistive barrier (WRB) alone is not enough. For exterior ledger stone panels, you need a continuous drainage plane that channels incidental moisture downward and out. Without it, water trapped behind the veneer will migrate to the sheathing, causing rot within 18–24 months in temperate climates.
The standard assembly uses a rigid or semi-rigid drainage mat (minimum 1/4-inch thickness) over the WRB, or a fully drained cavity with a minimum 3/8-inch air gap. For panelized systems like our 20–25 mm stacked stone ledger panels, the drainage plane must be uninterrupted behind every panel—any breaks become condensation points. Best practice is to extend the drainage mat 6 inches above the top course and 2 inches beyond the sides to prevent water ingress at terminations.
Proper Flashing
Flashing is the second line of defense that most field crews treat as an afterthought. For veneer installations, three flashing locations are critical:
- Base flashing: Install a drip-edge flashing at the bottom of the wall, lapped over the drainage mat and extending at least 2 inches beyond the face of the finished veneer. The flashing must terminate into a weep screed or a gravel strip to direct water away from the foundation.
- Window and door heads: Use sill flashing with end dams. The flashing should extend 6 inches beyond each side of the opening and be integrated into the drainage plane.
- Intersections with decks or roofs: Counter-flashing is required—a separate metal piece embedded into the veneer joints and lapped over the step flashing. Use stainless steel or painted aluminum; galvanized steel corrodes in coastal environments within 3–5 years.
A common field mistake is terminating the flashing at the veneer face instead of extending past it. The result: water runs down the face and saturates the base course. For a 12×24-inch ledger panel wall, the base course absorbs the most moisture—flashing overlap of 3/4 inch past the stone face is mandatory.
Weep Vent Placement
Weep vents provide the only outlet for moisture that does penetrate the drainage plane. Without them, the cavity becomes a sealed bathtub. For adhered stone veneer with panelized ledger stone, weep vents should be placed at the base of every 4 linear feet, and always above any horizontal flashing or shelf angles.
- Spacing: Maximum 4 ft on center along the bottom course. For walls over 30 ft long, add intermediate weeps at the 1/3 and 2/3 height points.
- Size: Minimum 3/8-inch diameter or equivalent slot area (e.g., a 1/2-inch by 1-inch slot). Use open-cell foam plugs or mesh to keep insects out while allowing drainage.
- Position within the panel: Weep vents should be cut into the mortar joint, not into the stone face. A 20–25 mm thick ledger panel cannot be reliably drilled without lamination risk.
An insider warning: many manufacturers supply pre-cut weep vents in the backer mesh. If your supplier does not, request them—field-drilled weep vents are often too small or clogged by mortar droppings. We pre-drill vent slots into the mesh backing on all exterior-rated ledger panels to guarantee minimum drainage area.
Standard Methods for Ledger Stone Installation
Follow these adhered veneer installation steps specific to panelized stacked stone. They align with ASTM C1780 guidelines for adhered manufactured stone veneer but are adapted for natural ledgestone panels:
- Surface prep: Cement backer board or scratch coat on framed walls. Ensure the substrate has a minimum 6-inch gap from grade to prevent splash-back. For interior use, drywall with a moisture barrier is acceptable if no exterior exposure.
- Adhesive application: Use a polymer-modified mortar rated for natural stone. Apply to the wall in 3/8-inch notched trowel coverage, then back-butter each panel for 100% contact. Dry-stack style joints are achieved by butting panels edge-to-edge with no grout—require 3–5 mm tolerance in panel width. Our batch thickness standardization (±1 mm) reduces visible gaps.
- Layout sequencing: Pre-stack panels by course height before applying adhesive. This reduces on-wall cut errors by up to 18% and speeds staggered pattern matching. Start the first course at the base flashing, working upward, and stagger vertical joints by at least 6 inches.
- Cutting and fitting: Use a diamond wet saw for straight cuts and an angle grinder for curves. Always cut panels on the reverse face to minimize chipping of the split-face texture.
Bulk palletized shipments reduce on-site handling time by 15–25% compared to loose packs. For facades exceeding 1,000 sq ft, we recommend ordering panels on dedicated pallets labeled by wall elevation—this halves the time crews spend sorting and matching hues. Batch hue variance is controlled within ±2–3% across 2,000–3,000 m² per project batch, eliminating the “color mismatch disaster” that forces architects to reorder at a premium.
Cost Drivers and Risk Mitigation
Bulk panel purchases with standard pallets shorten install time by 25–35% versus traditional stone, reducing labor cost per m² by 10–20%.
Why Bulk Panel Purchases Cut Costs
Stacked stone ledger panels come pre-assembled on standard pallets with edge protection. That packaging alone reduces on-site handling time by 15–25% compared to loose packs of individual stones. No more sorting through mixed pallets or re‑stacking broken pieces. The panels arrive ready to install, in consistent course heights, which slashes the time crew members spend moving and staging material.
Labor and Schedule Impact
When you eliminate field‑sorting and on‑site cutting guesswork, install speed jumps. Projects using panelized veneer consistently report 25–35% faster completion compared to traditional stone block or loose‑stack methods. For a typical 500 m² facade, that difference translates to two to four fewer days of crew time. At average mason rates, the labor cost per m² falls by 10–20%.
A hidden efficiency: our panels are standardized at 20–25 mm thickness with a 12×24‑inch module. That uniformity means fewer custom cuts and less waste. Pre‑stacking panels by course height before installation can reduce on‑wall cut errors by up to 18% and speed up pattern matching. Every minute saved on the wall compounds across the whole project.
Standard pallets also carry a risk‑mitigation benefit. Edge‑protected, strapped loads arrive intact, cut down on‑site breakage, and keep the job site organized. That predictability is what keeps your schedule – and your budget – under control.
| Cost Driver | Risk | Mitigation Strategy | Impact | Data/Note |
|---|---|---|---|---|
| Color Batch Uniformity | Inconsistent hue across large walls causing rework and schedule delays | Batch-controlled production with ±2-3% variance; schedule by wall elevation | Eliminates visible tonal shifts; reduces rework costs | Batch size of 2,000–3,000 m² per project batch |
| Fire & Safety Compliance | Project rejection or redesign due to non-compliance for lobbies/retail | Fire-resistant assemblies aligned with local building codes | Ensures code approval and avoids costly delays | Interior and exterior use with compliant assemblies |
| Installation Speed | Higher labor costs and schedule overruns with traditional stone | Panelized ledgestone veneer (20–25 mm thickness) for 25–35% faster install | Reduces labor cost per m² by 10–20% on average | Standard 12×24 inch module size |
| On-Site Handling & Packaging | Wasted time and damage from loose stone packs | Bulk palletized shipments with edge protection | Reduces on-site handling time by 15–25% | Store pallets off ground under cover |
| Moisture Management | Veneer rot and expensive remediation from trapped moisture | Continuous drainage plane, proper weep vents, and WRB/rain-screen detailing | Prevents long-term water damage and callbacks | Top cause of failure in real-world installations |
Quality Assurance and Post-Install Performance
Batch traceability, moisture management, and real-world performance data separate reliable suppliers from those that cause callbacks. Our process ensures each run is documented, tested, and traceable back to the quarry.
Batch Traceability and Color Consistency
Every project batch is assigned a unique production code that links back to the quarry block, cutting date, and sorting shift. This lets us hold hue variance to ±2–3% across the full 2,000–3,000 m² typical for a commercial facade. For multi-elevation projects, we schedule color range batching by wall orientation — east and west faces often catch different light angles, so matching adjacent panels from the same range prevents a visible tonal shift.
Installation sequencing further reduces on-wall errors. Pre-stacking panels by course height replicates natural ledgestone layering and cuts cut errors by up to 18%. The result: a uniform appearance without the rushed patchwork that drives rework costs.
Moisture Management and Drainage
The hidden risk in stone veneer installations is moisture trapped behind the cladding. Many guides underprice drainage details, but in real-world cases, neglecting a continuous drainage plane and proper weep vents is the top cause of veneer rot. We require a weather-resistant barrier (WRB) with a ⅛-inch drainage gap behind the panel, plus weep vents at the base and above all windows and doors. Joint widths of ⅜ to ½ inch allow mortar to key in without blocking drainage channels — a detail often missed on site.
Standard panel thickness of 20–25 mm for exterior ledgestone veneers provides enough depth to create a stable air gap when combined with the correct flashing. For high-humidity environments, we recommend a rain-screen detailing approach even for adhered veneer systems.
Post-Install Performance Data
Panelized veneer systems consistently deliver measurable performance advantages on site. Projects using our prefabricated ledger panels report 25–35% faster installation times compared to natural stone block installs. Bulk palletized shipments reduce on-site handling time by 15–25% versus loose packs — fewer lifts, less sorting, less breakage.
Each panel carries documented fire-resistance compliance for interior lobbies and retail spaces. The standardized 12×24 inch module with 20–25 mm thickness means predictable weight per square meter, allowing structural load calculations to remain within typical design margins. Post-install inspections confirm that properly placed weep vents and drainage planes keep moisture content below the 5% threshold that triggers efflorescence or freeze-thaw damage.
Conclusion
A stone veneer installation succeeds when you control three variables: batch hue variance under 3%, a continuous drainage plane, and pre-stacked panel sequencing. Skip any one, and you risk tonal shifts, moisture damage, or schedule overruns that eat the margin on a 2,000 m² facade.
Review your current project specs against the panel thickness (20–25 mm) and joint width (3/8 to 1/2 inch) standards covered here. Then contact our team for a sample set matched to your wall elevation schedule — we can quote bulk pallet pricing and delivery windows for the next 60 days.
Frequently Asked Questions
Case study stone veneer installations pdf free
Free PDF case studies for stone veneer installations are typically available from manufacturers like Top Source Stone upon request or through their website’s resource section. These often include batch color variance data and install time comparisons that help architects evaluate material consistency and schedule impact. Contact the supplier directly to request a copy tailored to your project type. Request a PDF from the manufacturer for project-specific data.
Case study stone veneer installations pdf
PDF case studies on stone veneer installations are provided by suppliers such as Top Source Stone, detailing batch color control under 3% variance and panel thickness of 20–25 mm for exterior ledgestone. These documents support procurement decisions by showing real-world install efficiency gains of 25–35%. Ask your supplier for a case study that matches your wall area and compliance requirements. Confirm case study availability with your stone supplier.
Case study stone veneer installations near me
Manufacturers with global distribution, like Top Source Stone serving 20+ countries, can often provide regional project references or case studies from nearby installations. Request examples of commercial lobbies or retail projects that used panelized ledgestone with consistent color across large walls. Local distributors may also share on-site photos and contact details for similar builds. Ask your distributor for local project case studies.
How to install stone veneer on exterior wall
Start by installing a continuous drainage plane and weep vents to manage moisture, then apply panelized veneer with standard thickness 20–25 mm and joint widths of 3/8 to 1/2 inch. Pre-stack panels by course height to replicate natural ledgestone layering, which reduces on-wall cut errors by up to 18%. Follow the manufacturer’s installation guide for fire-rated assemblies and local building codes. Always verify WRB and flashing details before starting.
Natural stone veneer installation guide
A natural stone veneer installation guide should cover drainage plane, weep vents, panel sequencing, and joint widths of 3/8 to 1/2 inch. For panelized systems, expect 25–35% faster install than traditional stone, with bulk pallets reducing handling time by 15–25%. The guide must reference local codes and emphasize moisture management to prevent rot behind the veneer. Use the guide as a checklist, not a substitute for site-specific engineering.
